前两篇我们完成了 DRA 的部署实战和核心概念拆解,知道了 ResourceSlice、DeviceClass、ResourceClaim 各自的职责和协作方式。
但还有一个问题没回答:从 Pod 提交到 GPU 可用,中间到底发生了什么?每个组件具体做了哪些事?
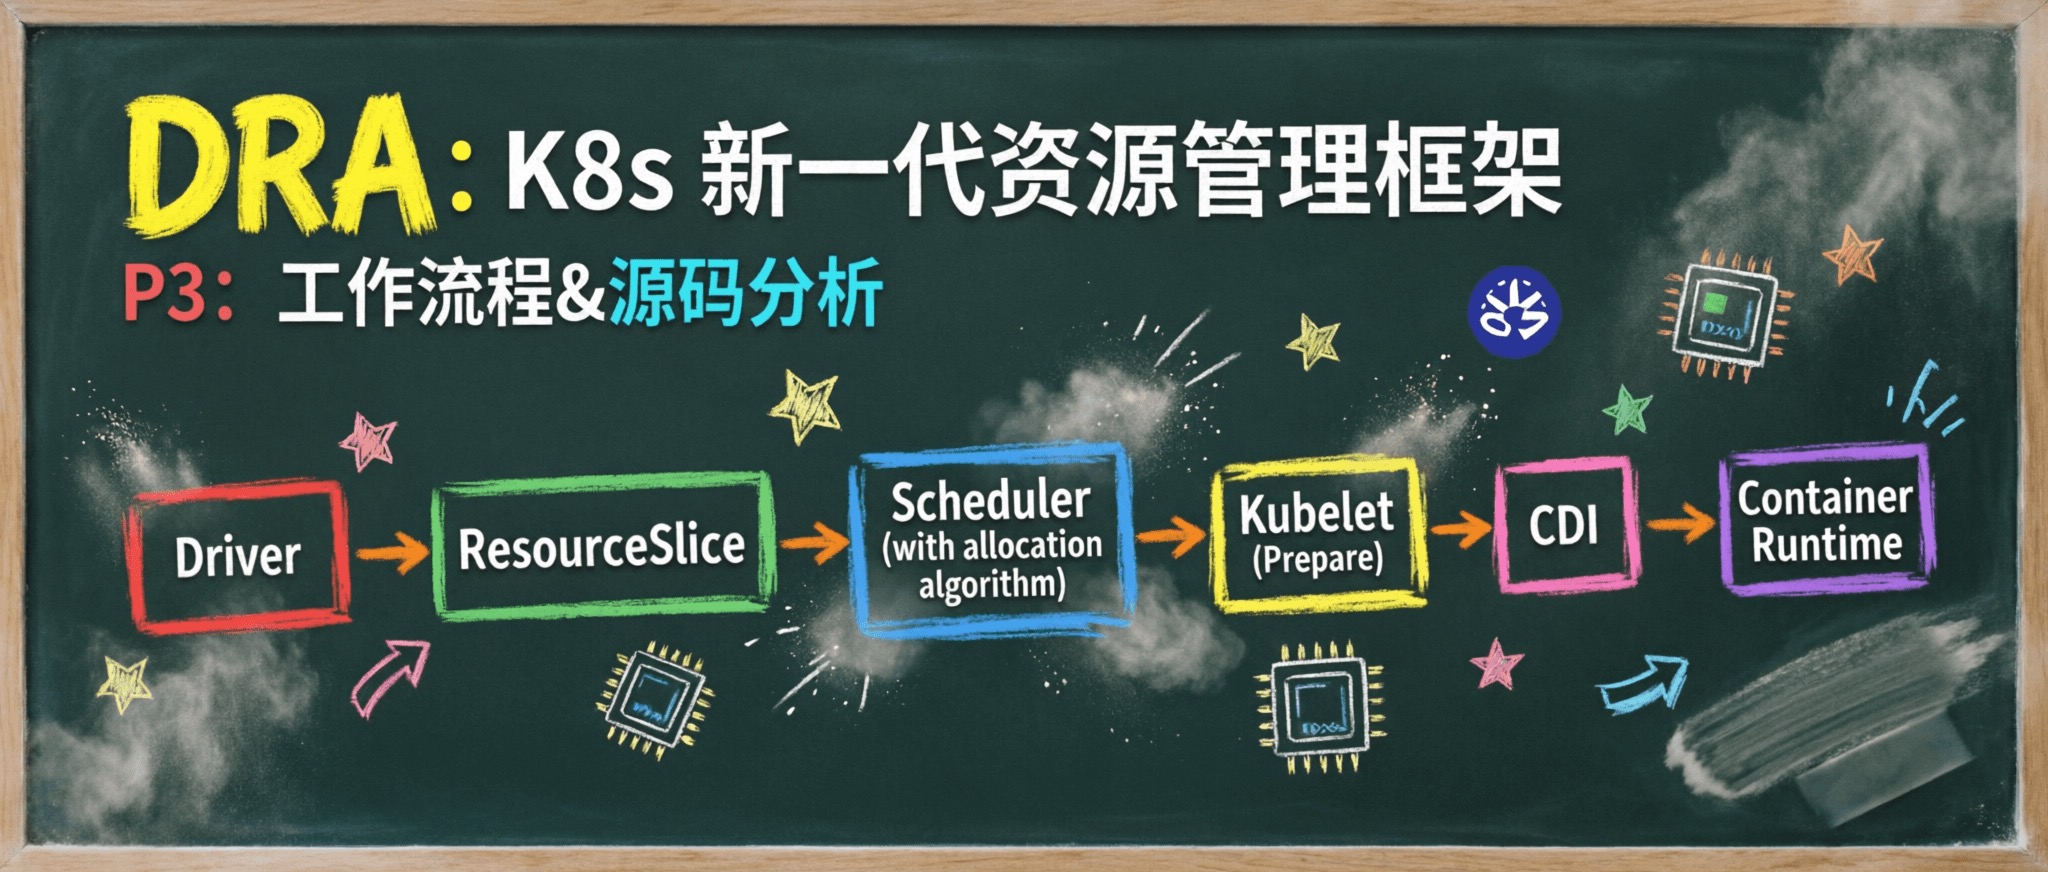
本篇逐阶段拆解 DRA 的端到端工作流,每个阶段结合 NVIDIA DRA Driver 源码分析,然后深入调度器分配算法。
1. 端到端工作流概览
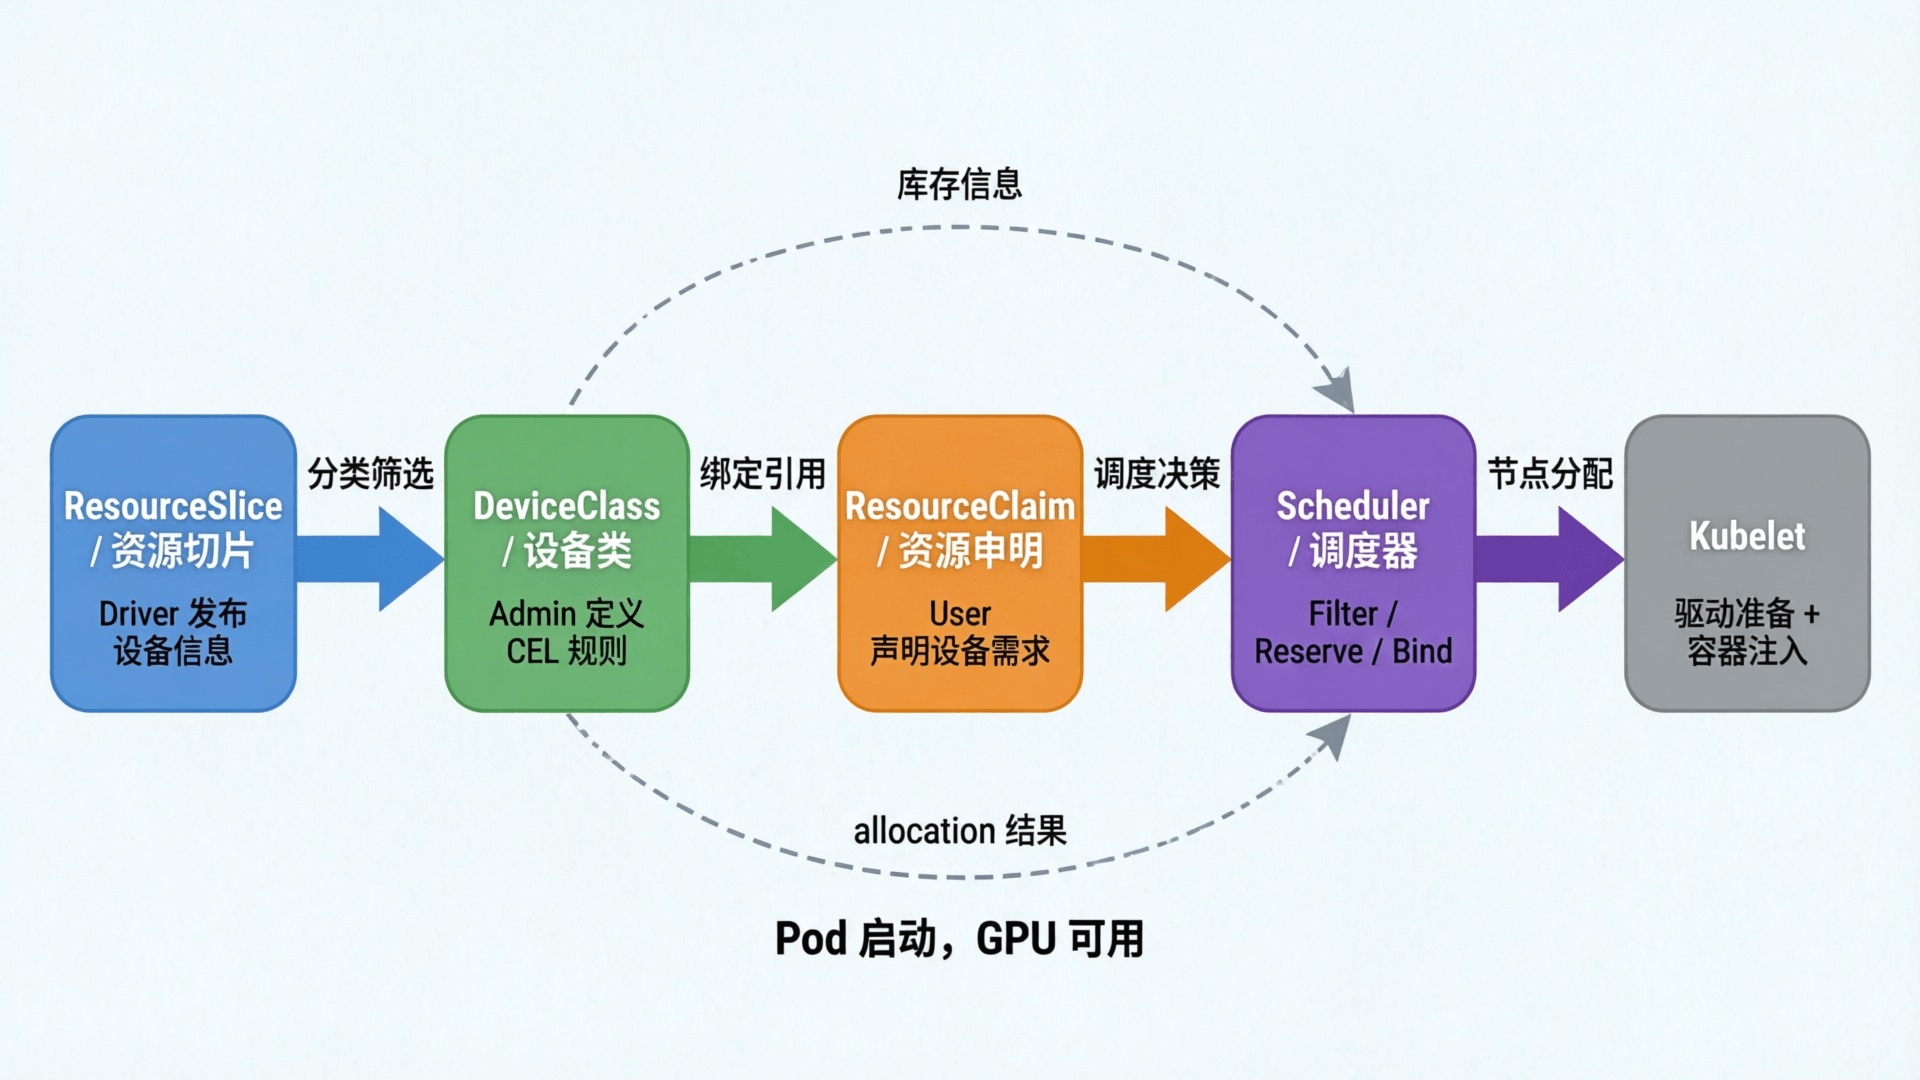
以 P1 的 gpu-test-pod 为例,从 Pod 提交到 GPU 可用,完整流程分为六个阶段:
阶段 触发者 动作 1. 设备注册 DRA Driver NVML 扫描 GPU → 注册到 Kubelet → 发布 ResourceSlice 2. 分类定义 Admin / Helm 创建 DeviceClass(CEL 选择器) 3. 用户声明需求 User 创建 Pod + ResourceClaimTemplate → Controller 生成 ResourceClaim 4. 调度器分配 Scheduler PreFilter 构建分配器 → Filter 选节点 + 选设备 → Reserve → PreBind 持久化 5. 设备准备与注入 Kubelet → Driver → CDI NodePrepareResources → 生成 CDI 描述 → 容器运行时注入设备 6. Pod 运行与清理 Kubelet + Controller NodeUnprepareResources → Controller 清除分配 → 设备回可用
下面逐阶段展开,每个阶段结合 NVIDIA DRA Driver 源码(cmd/gpu-kubelet-plugin/)分析。
2. 阶段一:设备注册
2.1 流程
 1
 2
 3
 4
 5
 6
 7
 8
 9
10
11
DRA Driver(DaemonSet)启动
    │
    ├─ 1. 调用 NVML 扫描节点上的 GPU 设备
    │     → 收集每个 GPU 的属性:型号、架构、显存、CUDA 版本、驱动版本、UUID...
    │
    ├─ 2. 注册到 Kubelet(通过 plugins_registry socket)
    │     → Kubelet 发现 DRA Plugin,建立 gRPC 连接
    │
    └─ 3. 发布 ResourceSlice 到 API Server
          → 构建 ResourceSlice 对象并发布,包含所有 GPU 设备及其属性
          → 调度器、Kubelet、用户都可以通过 kubectl 查看
和 DevicePlugin 的区别:DevicePlugin 通过 ListAndWatch() gRPC 把设备列表上报给 Kubelet,Kubelet 再更新到 Node 的 capacity 字段,只有数量。DRA Driver 直接创建 ResourceSlice 对象,包含完整的设备属性,调度器可见。
2.2 源码分析
NewDriver() 是整个驱动的初始化入口,核心步骤对应设备注册的全过程(省略了 DynamicMIG 处理、健康检查启动等中间步骤):
 1
 2
 3
 4
 5
 6
 7
 8
 9
10
11
12
13
14
15
16
17
18
19
20
21
22
// cmd/gpu-kubelet-plugin/driver.go:70
func NewDriver ( ctx context . Context , config * Config ) ( * driver , error ) {
// 1. 初始化 NVML,枚举所有设备
state , err := NewDeviceState ( ctx , config )
// ...
driver := & driver {
state : state ,
pulock : flock . NewFlock ( filepath . Join ( config . DriverPluginPath (), DriverPrepUprepFlockFileName )),
}
// 2. 注册 DRA Plugin,暴露 Prepare/Unprepare 接口
helper , err := kubeletplugin . Start ( ctx , driver ,
kubeletplugin . DriverName ( DriverName ),
kubeletplugin . Serialize ( false ), // 禁用自带序列化,改用 flock 控制
// ...
)
driver . pluginhelper = helper
// 3. 发布初始 ResourceSlice 到 API Server
if err := driver . publishResources ( ctx , config ); err != nil {
return nil , err
}
return driver , nil
}
设备发现的逻辑在 nvlib.go 中:
1
2
3
4
5
6
7
8
// cmd/gpu-kubelet-plugin/nvlib.go:174
func ( l deviceLib ) enumerateAllPossibleDevices () ( * PerGPUAllocatableDevices , error ) {
perGPUAllocatable , err := l . GetPerGpuAllocatableDevices () // 遍历 NVML 获取所有物理 GPU
if featuregates . Enabled ( featuregates . PassthroughSupport ) {
err = l . enumerateGpuVfioDevices ( perGPUAllocatable ) // 额外枚举 VFIO PCI 设备
}
return perGPUAllocatable , nil
}
每个 GPU 的信息封装为 GpuInfo 结构体(deviceinfo.go),包含 UUID、型号、架构、显存、CUDA 计算能力、驱动版本、MIG 能力等完整属性。
对比 DevicePlugin:同样通过 NVML 发现设备,但结果只上报为 nvidia.com/gpu:4 这样一个整数。
ResourceSlice 发布由 publishResources() 完成,有两种模式:
DynamicMIG 模式 :调用 GenerateDriverResources 生成资源,每张物理 GPU 一个 ResourceSlice(K8s 1.35+ 会进一步拆分为 G+1 个)普通模式 :一个节点一个 ResourceSlice,包含所有 GPU 设备 1
2
3
4
5
6
7
8
9
10
11
12
13
14
15
16
17
18
19
20
// cmd/gpu-kubelet-plugin/driver.go:455
func ( d * driver ) publishResources ( ctx context . Context , config * Config ) error {
if featuregates . Enabled ( featuregates . DynamicMIG ) {
resources := d . GenerateDriverResources ( config . flags . nodeName )
return d . pluginhelper . PublishResources ( ctx , resources )
}
// 普通模式:所有设备放进一个 Slice
var resourceSlice resourceslice . Slice
for _ , devices := range d . state . perGPUAllocatable . allocatablesMap {
for _ , device := range devices {
resourceSlice . Devices = append ( resourceSlice . Devices , device . GetDevice ())
}
}
resources := resourceslice . DriverResources {
Pools : map [ string ] resourceslice . Pool {
config . flags . nodeName : { Slices : [] resourceslice . Slice { resourceSlice }},
},
}
return d . pluginhelper . PublishResources ( ctx , resources )
}
3. 阶段二:分类定义
管理员创建 DeviceClass,定义"什么样的设备属于这一类":
1
2
3
4
5
6
7
8
apiVersion : resource.k8s.io/v1
kind : DeviceClass
metadata :
name : gpu.nvidia.com
spec :
selectors :
- cel :
expression : device.driver == 'gpu.nvidia.com' && device.attributes['gpu.nvidia.com'].type == 'gpu'
CEL 表达式可以组合任意属性条件,例如只包含 A100:
1
2
3
4
5
6
7
spec :
selectors :
- cel :
expression : |
device.driver == 'gpu.nvidia.com' &&
device.attributes['gpu.nvidia.com'].type == 'gpu' &&
device.attributes['gpu.nvidia.com'].productName == 'NVIDIA A100'
这一步一般在安装 DRA Driver 时由 Helm Chart 自动创建,用户通常不需要手动操作。
4. 阶段三:用户声明需求
用户创建 ResourceClaimTemplate 和 Pod:
 1
 2
 3
 4
 5
 6
 7
 8
 9
10
11
12
13
14
15
16
17
18
19
20
21
22
23
24
25
26
27
28
29
apiVersion : resource.k8s.io/v1
kind : ResourceClaimTemplate
metadata :
name : single-gpu
spec :
spec :
devices :
requests :
- name : gpu
exactly :
deviceClassName : gpu.nvidia.com
allocationMode : ExactCount
count : 1
---
apiVersion : v1
kind : Pod
metadata :
name : gpu-test-pod
spec :
containers :
- name : cuda-container
image : nvidia/cuda:12.1.0-base-ubuntu22.04
command : [ "nvidia-smi" , "-L" ]
resources :
claims :
- name : gpu-claim
resourceClaims :
- name : gpu-claim
resourceClaimTemplateName : single-gpu
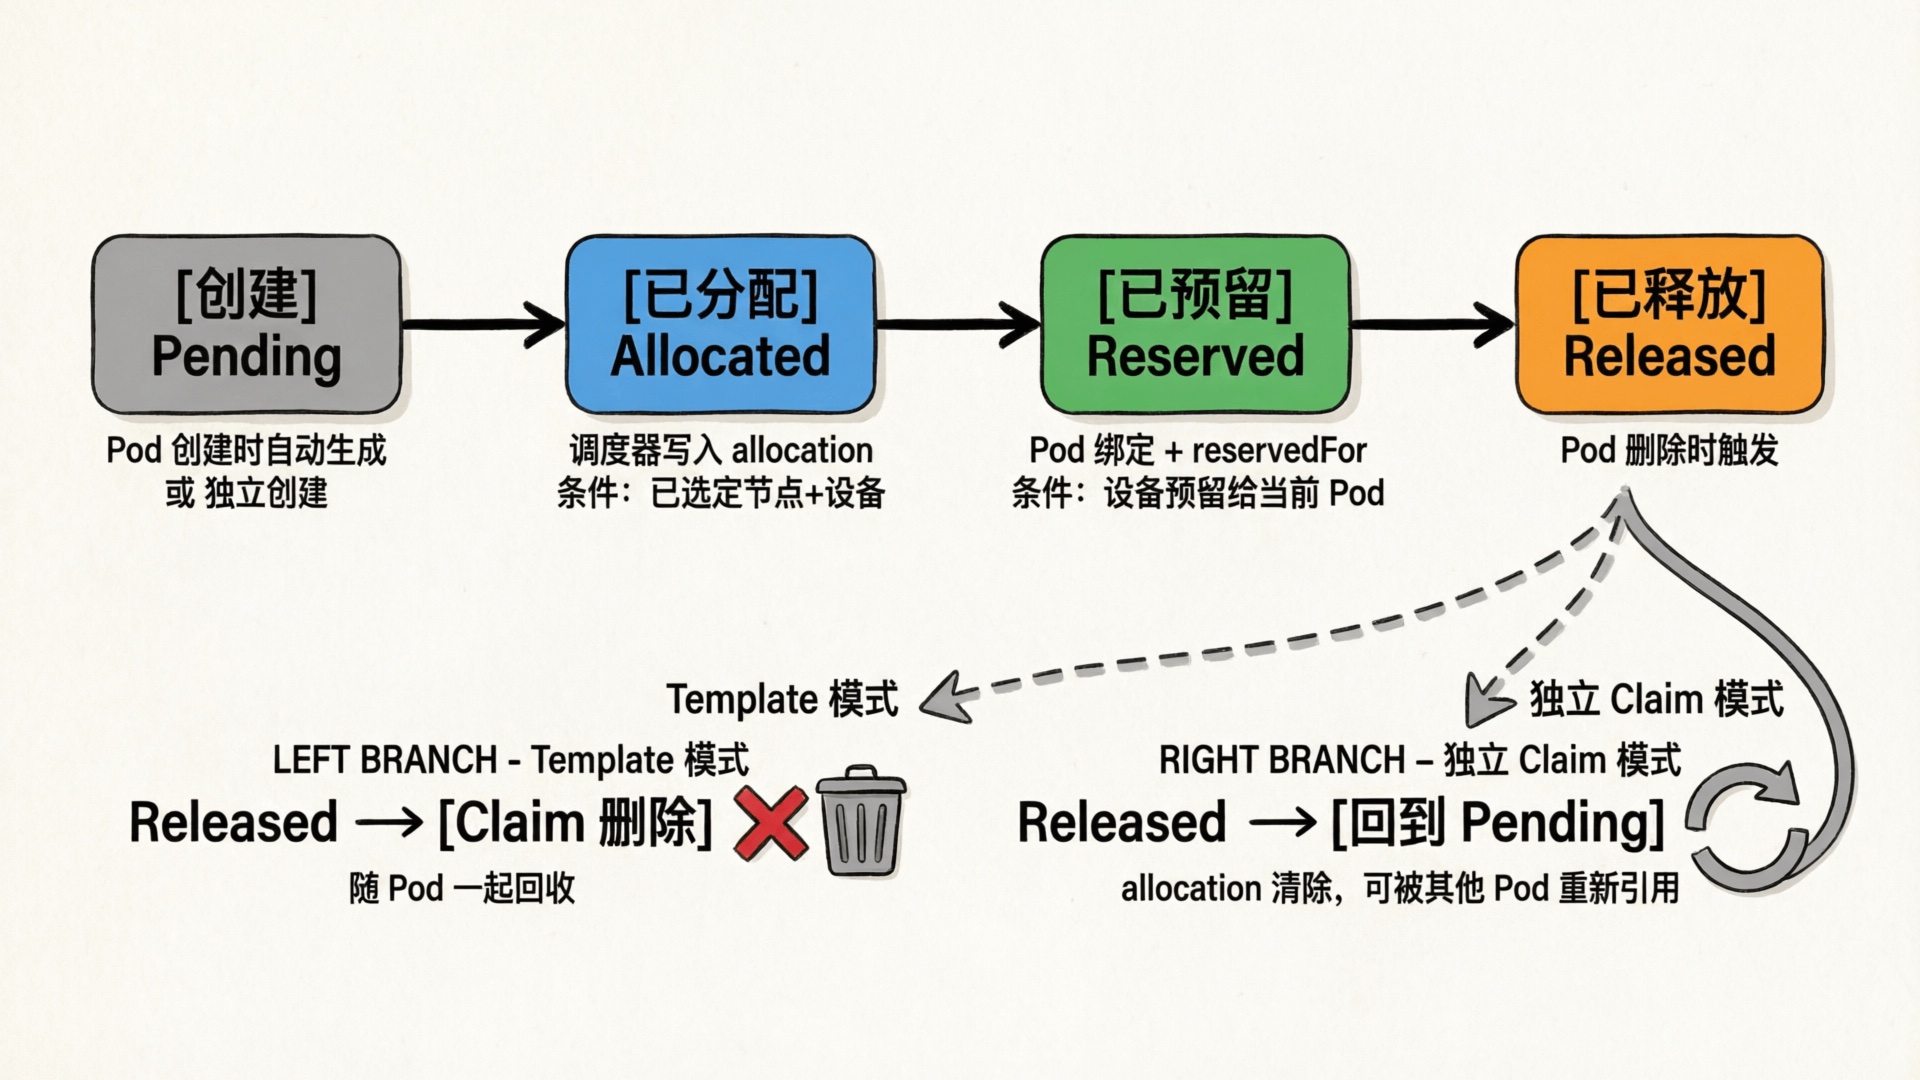
Pod 提交后,ResourceClaim Controller 根据 Template 自动创建 ResourceClaim(Pod 作为 OwnerReference,垃圾回收自动清理),然后 Pod 进入调度队列。
ResourceClaim Controller 的逻辑:
创建 Claim :Pod 引用 ResourceClaimTemplate 时,Controller 为每个 claim 生成 ResourceClaim 对象,GenerateName 避免命名冲突,Pod 作为 OwnerReference 保证随 Pod 一起删除补充预留 :正常情况下调度器的 PreBind 已完成预留;Controller 作为回退,为已分配但因冲突等原因未预留的 Claim 补充添加 ReservedFor 条目清理终止 Pod 的 Claim :当 Pod 终止后,移除 ReservedFor 条目;当 ReservedFor 为空时,清除分配并移除 Finalizer;基于模板生成的 Claim 最终由垃圾回收器删除(Controller 也会在确认 Pod 不再运行时主动删除)ResourceClaim 的状态流转和回收机制如下图所示:
5. 阶段四:调度器分配
这是 DRA 和 DevicePlugin 差异最大的阶段。DRA 的调度器实现了调度框架的多个扩展点:
调度器不仅选节点,还选定了具体设备。分配结果在调度阶段就确定了,写入 ResourceClaim.status.allocation,后续 Driver 和 Kubelet 都基于这个结果工作。
调度器内部有三层 Claim 跟踪机制防止并发冲突:
对比 DevicePlugin:调度器只检查 nvidia.com/gpu 数量够不够,具体用哪张 GPU 由 Kubelet 本地的 Allocate() 决定。
5.1 调度器扩展点实现
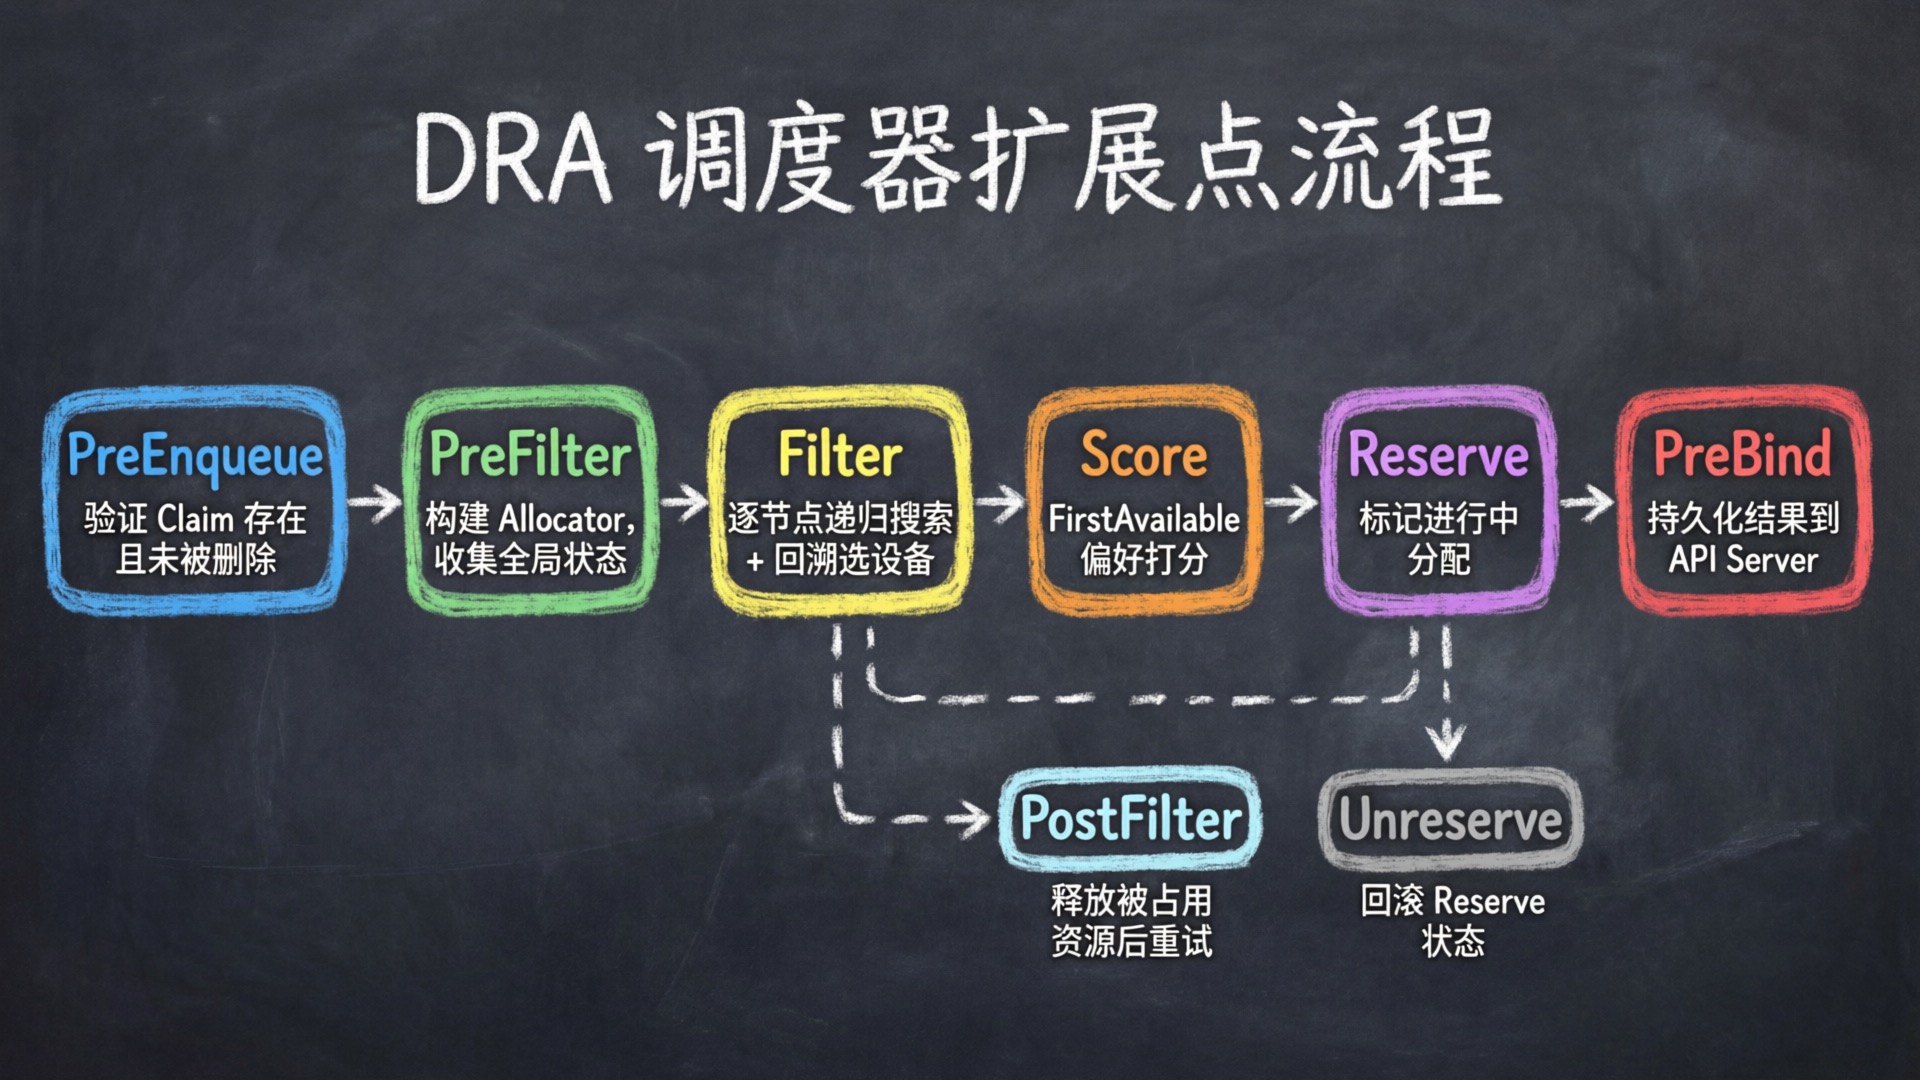
DRA 调度器插件 DynamicResources 实现了调度框架的 9 个扩展点接口:PreEnqueue、PreFilter、Filter、PostFilter、Score、Reserve(含 Unreserve)、EnqueueExtensions、PreBind、SignPlugin。
PreEnqueue — 验证所有 ResourceClaim 存在且未被删除,不满足的 Pod 留在不可调度队列。
PreFilter — 收集所有 Claim、构建分配器,是调度周期中最重的准备工作:
1
2
3
4
5
6
7
8
9
10
11
12
13
14
15
16
17
18
19
20
21
22
23
24
25
26
27
28
29
30
31
32
33
34
35
36
// pkg/scheduler/framework/plugins/dynamicresources/dynamicresources.go:444
func ( pl * DynamicResources ) PreFilter ( ctx context . Context , state fwk . CycleState , pod * v1 . Pod , nodes [] fwk . NodeInfo ) ( * fwk . PreFilterResult , * fwk . Status ) {
// ...
s := & stateData {}
state . Write ( stateKey , s )
// 收集 Pod 引用的所有 ResourceClaim
userClaims , err := pl . podResourceClaims ( pod )
// 处理扩展资源
extendedResourceClaim , status := pl . preFilterExtendedResources ( pod , logger , s )
// 对已分配的 Claim,提取 NodeSelector
for index , claim := range claims . all () {
if claim . Status . Allocation != nil {
if claim . Status . Allocation . NodeSelector != nil {
nodeSelector , err := nodeaffinity . NewNodeSelector ( claim . Status . Allocation . NodeSelector )
s . informationsForClaim [ index ]. availableOnNodes = nodeSelector
}
} else {
numClaimsToAllocate ++
// 验证 DeviceClass 存在
for _ , request := range claim . Spec . Devices . Requests {
// ...
}
}
}
// 收集全局已分配状态 + 列出所有 ResourceSlice + 创建结构化分配器
if numClaimsToAllocate > 0 {
// EnableDRAConsumableCapacity 启用时使用 GatherAllocatedState,否则使用 ListAllAllocatedDevices
allocatedState , err := pl . draManager . ResourceClaims (). GatherAllocatedState ()
slices , err := pl . draManager . ResourceSlices (). ListWithDeviceTaintRules ()
features := AllocatorFeatures ( pl . fts )
allocator , err := structured . NewAllocator ( ctx , features , * allocatedState , pl . draManager . DeviceClasses (), slices , pl . celCache )
s . allocator = allocator
s . nodeAllocations = make ( map [ string ] nodeAllocation )
}
// ...
}
Filter — 对每个候选节点调用分配器,判断节点是否满足需求:
1
2
3
4
5
6
7
8
9
10
11
12
13
14
15
16
17
18
19
20
21
22
23
24
25
26
// pkg/scheduler/framework/plugins/dynamicresources/dynamicresources.go:733
func ( pl * DynamicResources ) Filter ( ctx context . Context , cs fwk . CycleState , pod * v1 . Pod , nodeInfo fwk . NodeInfo ) * fwk . Status {
// ...
// 构建待分配 Claim 列表
claimsToAllocate := make ([] * resourceapi . ResourceClaim , 0 , state . claims . len ())
for index , claim := range state . claims . toAllocate () {
if state . informationsForClaim [ index ]. allocation != nil {
pendingResult = append ( pendingResult , * state . informationsForClaim [ index ]. allocation )
continue
}
claimsToAllocate = append ( claimsToAllocate , claim )
}
// 调用分配器
allocationResult , err := state . allocator . Allocate ( allocCtx , node , claimsToAllocate )
switch {
case errors . Is ( err , structured . ErrFailedAllocationOnNode ):
return statusUnschedulable ( logger , err . Error (), ... )
// ...
}
// 缓存分配结果
state . nodeAllocations [ node . Name ] = nodeAllocation {
allocationResults : allocations ,
// ...
}
// ...
}
PostFilter — 所有节点都不满足时,对未被其他 Pod 预留的 Claim 同时清除 Allocation、ReservedFor 和 Devices 三个字段,清除后 Pod 会在 Claim 状态变更事件触发时重新入队调度。
Reserve — 选定节点后,将 Claim 标记为进行中分配,防止并发冲突:
1
2
3
4
5
6
7
8
9
10
11
12
13
14
15
16
17
// pkg/scheduler/framework/plugins/dynamicresources/dynamicresources.go:1129
func ( pl * DynamicResources ) Reserve ( ctx context . Context , cs fwk . CycleState , pod * v1 . Pod , nodeName string ) ( status * fwk . Status ) {
// ...
if state . allocator != nil {
allocations , ok := state . nodeAllocations [ nodeName ]
for index , claim := range state . claims . toAllocate () {
allocation := & allocations . allocationResults [ allocIndex ]
state . informationsForClaim [ index ]. allocation = allocation
claim = claim . DeepCopy ()
claim . Status . Allocation = allocation
// 标记为"进行中分配"
err := pl . draManager . ResourceClaims (). SignalClaimPendingAllocation ( claim . UID , claim )
// ...
}
}
// ...
}
PreBind — 将分配结果持久化到 API Server:
1
2
3
4
5
6
7
8
9
10
11
// pkg/scheduler/framework/plugins/dynamicresources/dynamicresources.go:1317
func ( pl * DynamicResources ) PreBind ( ctx context . Context , cs fwk . CycleState , pod * v1 . Pod , nodeName string ) * fwk . Status {
// ...
for index , claim := range state . claims . all () {
if ! resourceclaim . IsReservedForPod ( pod , claim , pl . fts . EnableDRAWorkloadResourceClaims ) {
claim , err := pl . bindClaim ( ctx , state , podGroupState , index , pod , nodeName )
// ...
}
}
// ...
}
bindClaim 内部通过 retry.RetryOnConflict 将 claim.Status.Allocation 和 claim.Status.ReservedFor 写入 API Server。
Unreserve — 调度失败时回滚:移除进行中分配(MaybeRemoveClaimPendingAllocation),仅在成功移除时恢复 AssumeCache(AssumedClaimRestore),并通过 strategic-merge-patch 移除 Pod 的 ReservedFor 条目。此外还会清理 PodGroup 的 pendingAllocations、扩展资源 Claim 以及 NodeAllocatable 资源状态。
5.2 三层 Claim 跟踪机制
调度器内部通过 claimTracker(dra_manager.go)维护三层跟踪,防止并发调度导致资源冲突:
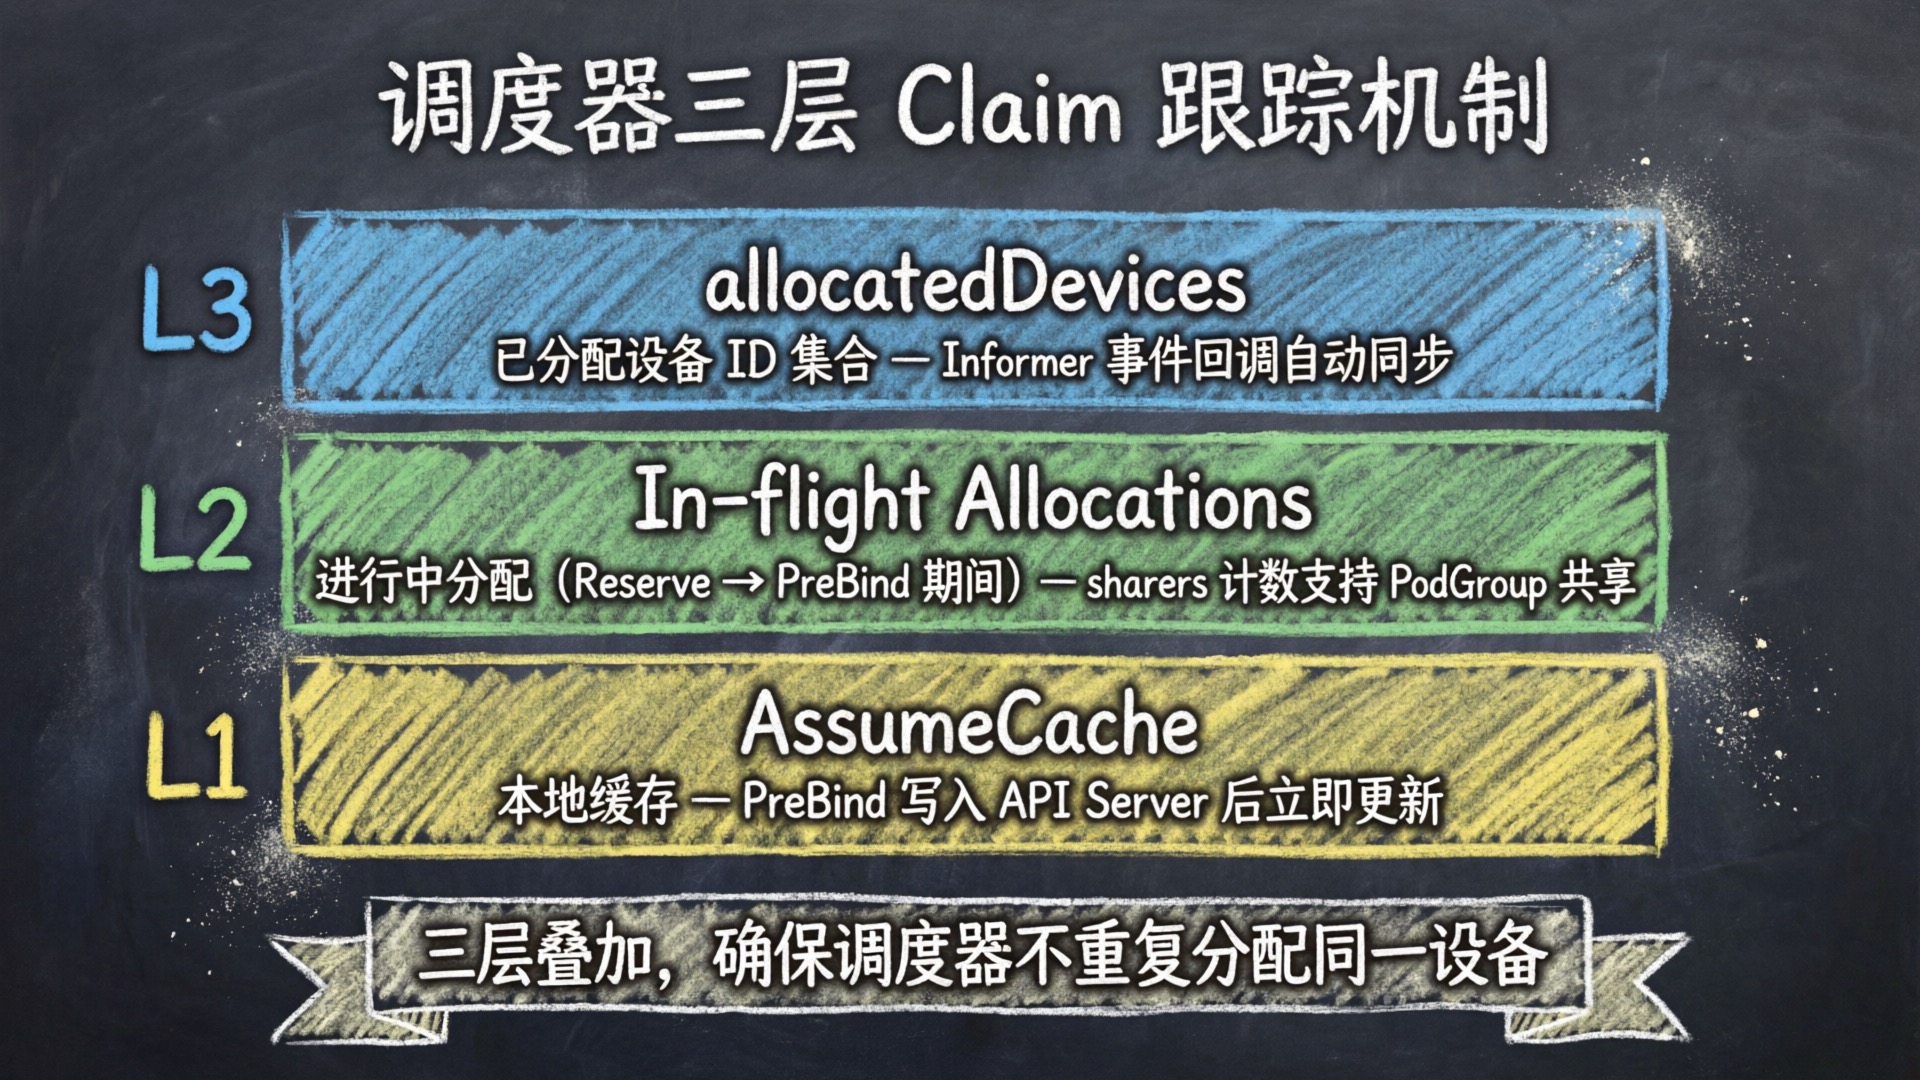
层级 1:Informer + AssumeCache — PreBind 写入 API Server 后立即更新本地缓存,不等 Informer 同步层级 2:In-flight Allocations — Reserve 到 PreBind 期间,将 Claim 标记为进行中分配,防止其他 Pod 并发分配相同设备层级 3:allocatedDevices — 响应式维护所有已分配设备 ID 集合,PreFilter 阶段获取并合并 In-flight 的分配5.3 深入:结构化分配器
调度器 Filter 阶段的核心是结构化分配器(Structured Allocator),负责从 ResourceSlice 的设备中找到满足 Claim 需求的设备组合。
分配器分层 :
层级 支持的特性 stable AdminAccess, PrioritizedList, PartitionableDevices, DeviceTaints incubating stable + DeviceBindingAndStatus, ConsumableCapacity experimental incubating + ListTypeAttributes
调度器按稳定性排序选择:选第一个支持所需 Feature Gate 集的分配器。各层完全独立,当孵化层代码足够成熟时,整体晋升到稳定层。
分配算法 分三个阶段:
Phase 1 — 收集池 (GatherPools):收集与目标节点相关的 ResourceSlice,按 (Driver, PoolName) 分组,构建候选设备池。
Phase 2 — 验证请求 :检查选择器使用 CEL、验证 DeviceClass 引用、确定设备数量或列表。
Phase 3 — 递归搜索 :
1
2
3
4
5
6
7
8
9
10
11
12
allocateOne(remainingClaims, currentAllocation)
│
├─ 基线情况:所有 Claim 已分配 → 返回成功
├─ FirstAvailable:按优先级顺序尝试子请求,第一个成功的胜出
├─ All 模式:按预计算列表顺序分配,每个设备必需
└─ ExactCount 模式:遍历池/切片/设备,对每个候选:
a. 跳过已使用的设备
b. 检查 CEL 选择器
c. 检查污点/容忍
d. 检查约束(matchAttribute)
e. 匹配则递归尝试下一个设备索引
f. 失败时回溯(deallocate),尝试下一个候选
CEL 选择器评估 两个优化:编译缓存(每表达式编译一次)、设备匹配缓存(缓存每个 (设备, 请求) 对的布尔结果)。
约束检查 两种类型:matchAttribute(同值约束,如同型号 GPU)、distinctAttribute(异值约束)。分配时逐一检查,失败则回滚之前已添加的约束。注意 distinctAttribute 仅 incubating 及以上层级支持,stable 层只支持 matchAttribute。
5.3.1 分配器选择与初始化
NewAllocator(allocator.go:127)按稳定性排序遍历 availableAllocators,选第一个 supportedFeatures 包含所需 Feature Gate 集的分配器。三层分配器传入的参数略有不同:stable 传入 AllocatedDevices,incubating 和 experimental 传入完整的 allocatedState。
5.3.2 Allocate — 收集池与验证请求
stable 分配器的 Allocate(allocator_stable.go:110)分三阶段执行:
Phase 1:收集池 — GatherPools(pools_stable.go:58)遍历所有 ResourceSlice,按 (Driver, PoolName) 分组构建候选设备池。含 SharedCounters 的 Slice 直接加入(无需节点匹配);其余按 Slice 级别的 NodeName/AllNodes/NodeSelector 和 PerDeviceNodeSelection(设备级别节点选择)进行节点匹配。
Phase 2:验证请求 — 对每个 Claim 的每个 Request 调用 validateDeviceRequest,确定设备选择器和候选设备列表,同时构建约束。注意 DistinctAttribute 仅 incubating 及以上层级支持,stable 层遇到会报错。
Phase 3:递归搜索 — 调用 allocateOne(deviceIndices{}, false) 启动分配。
5.3.3 allocateOne — 递归搜索与回溯
allocateOne 是分配算法的递归函数(allocator_stable.go:766),逐一为每个 Claim 的每个 Request 选择设备。逻辑和 5.1 节的伪代码一致,这里补充几个实现细节:
allocateDevice (allocator_stable.go:1105)— 检查设备可用性并标记分配,成功时返回回滚函数:
跳过已占用设备(deviceInUse),AdminAccess 允许分配其他 Claim 已占用的设备(但不允许同一 Claim 内重复分配) 检查 PartitionableDevices 的计数器容量(checkAvailableCounters) 检查污点/容忍(taintPreventsAllocation) 逐一检查约束(constraint.add),失败时回滚之前已添加的约束 标记为已分配,返回 deallocate 闭包用于回溯 6. 阶段五:设备准备与注入
6.1 流程
1
2
3
4
5
6
7
8
9
10
11
12
13
14
15
16
17
18
Kubelet 收到绑定的 Pod
│
├─ 1. PrepareResources(4 阶段)
│ ├─ 阶段 1:验证
│ │ → 获取每个 ResourceClaim,验证 Pod 在 ReservedFor 中
│ │ → 解析每个需要的 DRA 驱动
│ ├─ 阶段 2:缓存更新 + Checkpoint
│ │ → 将 ClaimInfo 加入缓存
│ │ → 如果已 Prepared → 跳过;否则构建 gRPC 批次
│ ├─ 阶段 3:gRPC 调用
│ │ → 调用 Driver 的 NodePrepareResources
│ │ → Driver 返回 CDI 设备 ID
│ └─ 阶段 4:标记已准备 + 最终 Checkpoint
│
├─ 2. GetResources → 为容器运行时提供 CDI 设备列表
│
└─ 3. 容器运行时注入
→ 根据 CDI 描述文件挂载设备文件、驱动库,注入环境变量
Kubelet DRA Manager 的 Checkpoint 机制保证重启后状态恢复。还有一个协调循环 (每 60 秒)扫描不活跃 Pod 的 Claim 执行 Unprepare。
6.2 NodePrepareResources
上面是 Kubelet DRA Manager 的流程。当 Kubelet 通过 gRPC 调用 Driver 的 NodePrepareResources 时,进入 NVIDIA Driver 的处理逻辑。调用入口是 nodePrepareResource()(driver.go:373),获取全局 flock 后委托给 DeviceState.Prepare()(device_state.go:229):
 1
 2
 3
 4
 5
 6
 7
 8
 9
10
11
12
13
14
15
16
17
18
19
20
21
22
23
24
25
26
27
28
func ( s * DeviceState ) Prepare ( ctx context . Context , claim * resourceapi . ResourceClaim ) ([] kubeletplugin . Device , error ) {
s . Lock ()
defer s . Unlock ()
cp , err := s . getCheckpoint ( ctx )
// 如果 Claim 已经 PrepareCompleted → 直接返回缓存结果(幂等性)
preparedClaim , exists := cp . V2 . PreparedClaims [ claimUID ]
if exists && preparedClaim . CheckpointState == ClaimCheckpointStatePrepareCompleted {
return preparedClaim . PreparedDevices . GetDevices (), nil
}
// 如果处于 PrepareStarted(上次崩溃未完成),先回滚
if exists && preparedClaim . CheckpointState == ClaimCheckpointStatePrepareStarted {
s . unpreparePartiallyPrepairedClaim ( claimUID , preparedClaim , cp )
}
// 更新 Checkpoint:标记为 PrepareStarted
s . updateCheckpoint ( ctx , func ( cp * Checkpoint ) {
cp . V2 . PreparedClaims [ claimUID ] = PreparedClaim { CheckpointState : ClaimCheckpointStatePrepareStarted , ... }
})
// 核心逻辑:按调度器的分配结果准备设备
preparedDevices , err := s . prepareDevices ( ctx , claim )
// 生成 CDI 描述文件
s . cdi . CreateClaimSpecFile ( claimUID , preparedDevices )
// 更新 Checkpoint:标记为 PrepareCompleted
s . updateCheckpoint ( ctx , func ( cp * Checkpoint ) {
cp . V2 . PreparedClaims [ claimUID ] = PreparedClaim { CheckpointState : ClaimCheckpointStatePrepareCompleted , PreparedDevices : preparedDevices }
})
return preparedDevices . GetDevices (), nil
}
几个设计要点:
Checkpoint 持久化 :本地 JSON 文件持久化每个 Claim 的准备状态,保证重启后状态不丢失(传统 DevicePlugin 进程内无持久化,重启后依赖 Kubelet 通过 ListAndWatch 重新同步)幂等性 :Claim 已 PrepareCompleted 则直接返回缓存结果,不会重复准备两阶段状态 :PrepareStarted → PrepareCompleted。PrepareStarted 阶段崩溃则重启后回滚分配结果由调度器决定 :prepareDevices() 的输入是 claim.Status.Allocation,Driver 只需按分配结果准备,不需要自己选设备6.3 CDI 设备注入
CDI(Container Device Interface)是容器运行时级别的设备注入标准。DRA Driver 在 Prepare 阶段生成 CDI 描述文件,最终靠它把 GPU 注入到容器里。
1
2
3
4
5
6
7
8
9
10
11
12
13
14
15
16
// cmd/gpu-kubelet-plugin/cdi.go:181
func ( cdi * CDIHandler ) CreateClaimSpecFile ( claimUID string , preparedDevices PreparedDevices ) error {
commonEdits , err := cdi . GetCommonEditsCached () // 通用容器编辑(缓存 5 分钟)
for _ , group := range preparedDevices {
for _ , dev := range group . Devices {
dname := fmt . Sprintf ( "%s-%s" , claimUID , dev . CanonicalName ()) // claim 专属名称
if dev . Type () == GpuDeviceType {
dspecsgpu , _ := cdi . GetDeviceSpecsByUUIDCached ( dev . Gpu . Info . UUID ) // 从缓存获取
// ...
}
if dev . Type () == PreparedMigDeviceType { /* MIG:父 GPU 规格 + MIG 设备节点 */ }
if dev . Type () == VfioDeviceType { /* VFIO:PCI 设备规格 */ }
}
}
// ...
}
生成的 CDI 设备名称格式:k8s.gpu.nvidia.com/claim=<claimUID>-<canonicalName>
CDI 设备 ID 返回给 Kubelet 后,Kubelet 通过 GetResources 为容器运行时提供 CDI 设备列表,容器运行时根据 CDI 描述文件完成挂载设备文件、驱动库、注入环境变量。Unprepare 时删除 CDI 描述文件,容器运行时就不再能访问这些设备。
对比 DevicePlugin:Allocate() 返回设备路径和环境变量的列表,Kubelet 自己手动挂载,每个 DevicePlugin 各自实现。DRA 通过 CDI 标准化了设备注入流程。
6.4 并发控制
DRA Driver 通过全局文件锁(flock)串行化所有 Prepare/Unprepare 操作,保证同一时刻只有一个操作在执行。驱动在调用 kubeletplugin.Start() 时显式设置了 Serialize(false),禁用 kubeletplugin 自带的序列化机制,转而通过 flock 自行控制并发。
7. 阶段六:Pod 运行与清理
7.1 流程
1
2
3
4
5
6
7
8
9
10
11
Pod 终止
│
├─ 1. Kubelet 清理
│ → UnprepareResources:调用 Driver 的 NodeUnprepareResources
│ → 移除 Pod 引用,当没有 Pod 引用时执行 Unprepare
│
├─ 2. ResourceClaim Controller 清理
│ → 移除 ReservedFor 条目
│ → 当 ReservedFor 为空时:清除分配、移除 Finalizer、删除从模板生成的 Claim
│
└─ 3. 设备回到可分配状态
7.2 NodeUnprepareResources
1
2
3
4
5
6
7
8
9
// cmd/gpu-kubelet-plugin/driver.go:420
func ( d * driver ) nodeUnprepareResource ( ctx context . Context , claimRef kubeletplugin . NamespacedObject ) error {
release , err := d . pulock . Acquire ( ctx , flock . WithTimeout ( 10 * time . Second ))
if err != nil {
return fmt . Errorf ( "error acquiring prep/unprep lock: %w" , err )
}
defer release ()
return d . state . Unprepare ( ctx , claimRef )
}
 1
 2
 3
 4
 5
 6
 7
 8
 9
10
11
12
13
14
15
16
17
18
19
20
// cmd/gpu-kubelet-plugin/device_state.go:426
func ( s * DeviceState ) Unprepare ( ctx context . Context , claimRef kubeletplugin . NamespacedObject ) error {
s . Lock ()
defer s . Unlock ()
checkpoint , err := s . getCheckpoint ( ctx )
pc , exists := checkpoint . V2 . PreparedClaims [ claimUID ]
if ! exists {
return nil // 不在 Checkpoint → 直接返回(幂等性)
}
switch pc . CheckpointState {
case ClaimCheckpointStatePrepareStarted : // 上次崩溃未完成 → 回滚
s . unpreparePartiallyPrepairedClaim ( claimUID , pc , checkpoint )
case ClaimCheckpointStatePrepareCompleted : // 正常完成 → 清理
s . unprepareDevices ( ctx , claimUID , pc . PreparedDevices )
}
s . cdi . DeleteClaimSpecFile ( claimUID ) // 删除 CDI 描述文件
s . deleteClaimFromCheckpoint ( ctx , claimRef ) // 从 Checkpoint 中删除该 Claim
return nil
}
unprepareDevices() 按设备类型执行相应清理(如 VFIO 反配置、MIG 设备删除等)。CDI 描述文件的删除和 Checkpoint 中 Claim 的移除由调用方 Unprepare() 负责,不在 unprepareDevices() 内部。
8. 小结
从 Pod 提交到 GPU 可用,DRA 的工作流程可以概括为:Driver 注册设备 → 用户声明需求 → 调度器分配具体设备 → Kubelet 准备并注入 → Pod 终止后清理回收。
DRA Driver 通过 NVML 发现设备 → 注册到 Kubelet → 发布 ResourceSlice 用户创建 Pod + ResourceClaimTemplate → Controller 生成 ResourceClaim 调度器:PreFilter 构建分配器 → Filter 递归搜索 + 回溯选定具体设备 → Reserve 标记进行中 → PreBind 持久化结果 Kubelet:NodePrepareResources → Driver 生成 CDI 描述 → 容器运行时注入设备 Pod 终止:Kubelet NodeUnprepareResources 清理设备 → Controller 清除分配 → GC 删除 Claim → 设备回可用 和 DevicePlugin 的根本区别:DevicePlugin 要自己管发现、分配、注入全流程;DRA Driver 只需实现 NodePrepareResources/NodeUnprepareResources,分配决策由调度器完成。