在上一篇 DRA P1:DRA 能解决什么问题?从部署到使用的完整体验 中,我们部署了 DRA 并成功运行了第一个 GPU Pod。DRA 相比 DevicePlugin 最大的区别在于:资源展示更详细,资源申请也更灵活。靠三个 API 对象来实现:ResourceSlice、DeviceClass、ResourceClaim。
那么这三个对象各自干什么,它们之间怎么配合?本篇就来回答这个问题。
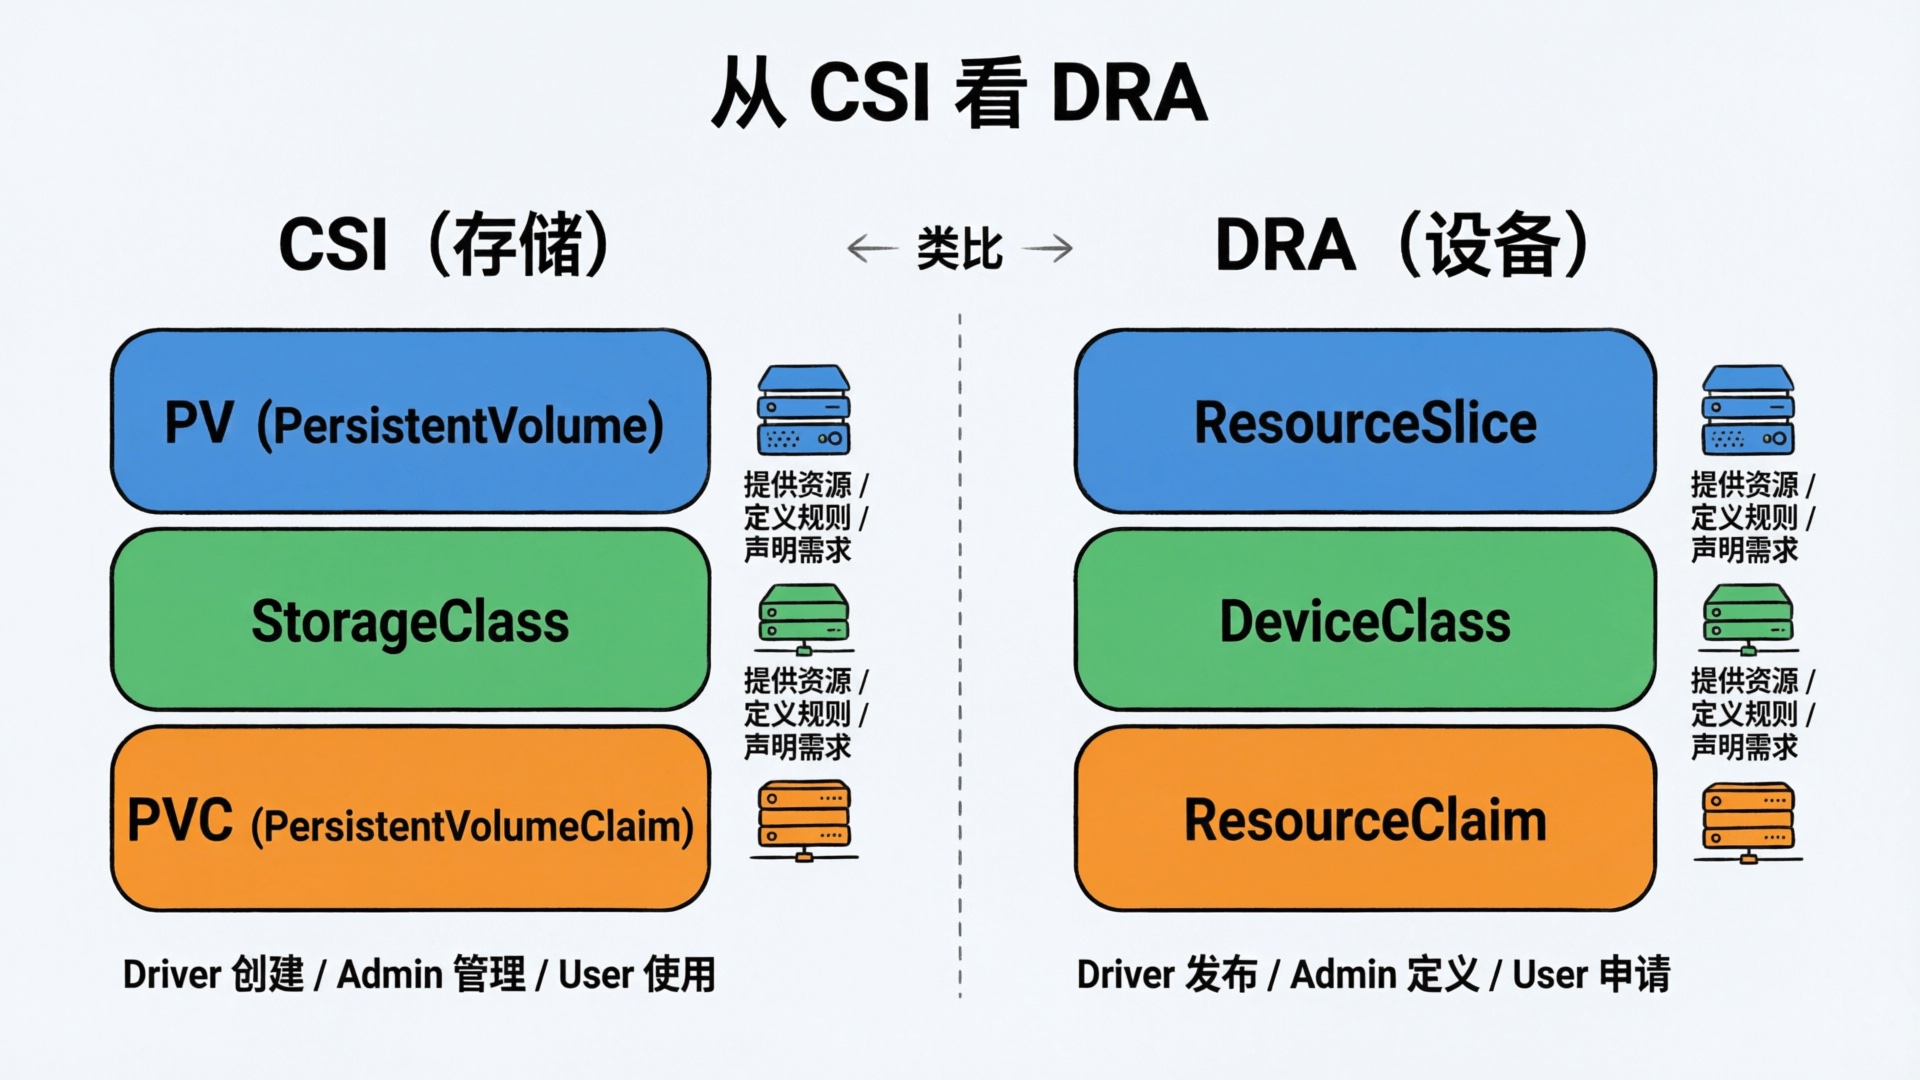
1. 从 CSI 看 DRA:同一套设计思路
如果对 K8s 比较熟悉的同学就会发现,DRA 的设计思路和 CSI 有点类似,DRA 把异构设备的管理拆成了同样的三层:
| 存储 (CSI) | 设备 (DRA) | 谁创建 |
|---|
| 供给 | PV | ResourceSlice | 驱动 (Driver) |
| 分类 | StorageClass | DeviceClass | 管理员 (Admin) |
| 需求 | PVC | ResourceClaim | 用户 (User) |
ps:严格来说 ResourceSlice 和 PV 不能完全等同——PV 是一块具体的存储卷,ResourceSlice 更像是节点上设备的目录清单。但从供需关系看,模式是一样的:
- CSI:PV 代表可用存储 → StorageClass 分类 → PVC 申请。
- DRA:ResourceSlice 代表可用设备 → DeviceClass 分类 → ResourceClaim 申请。
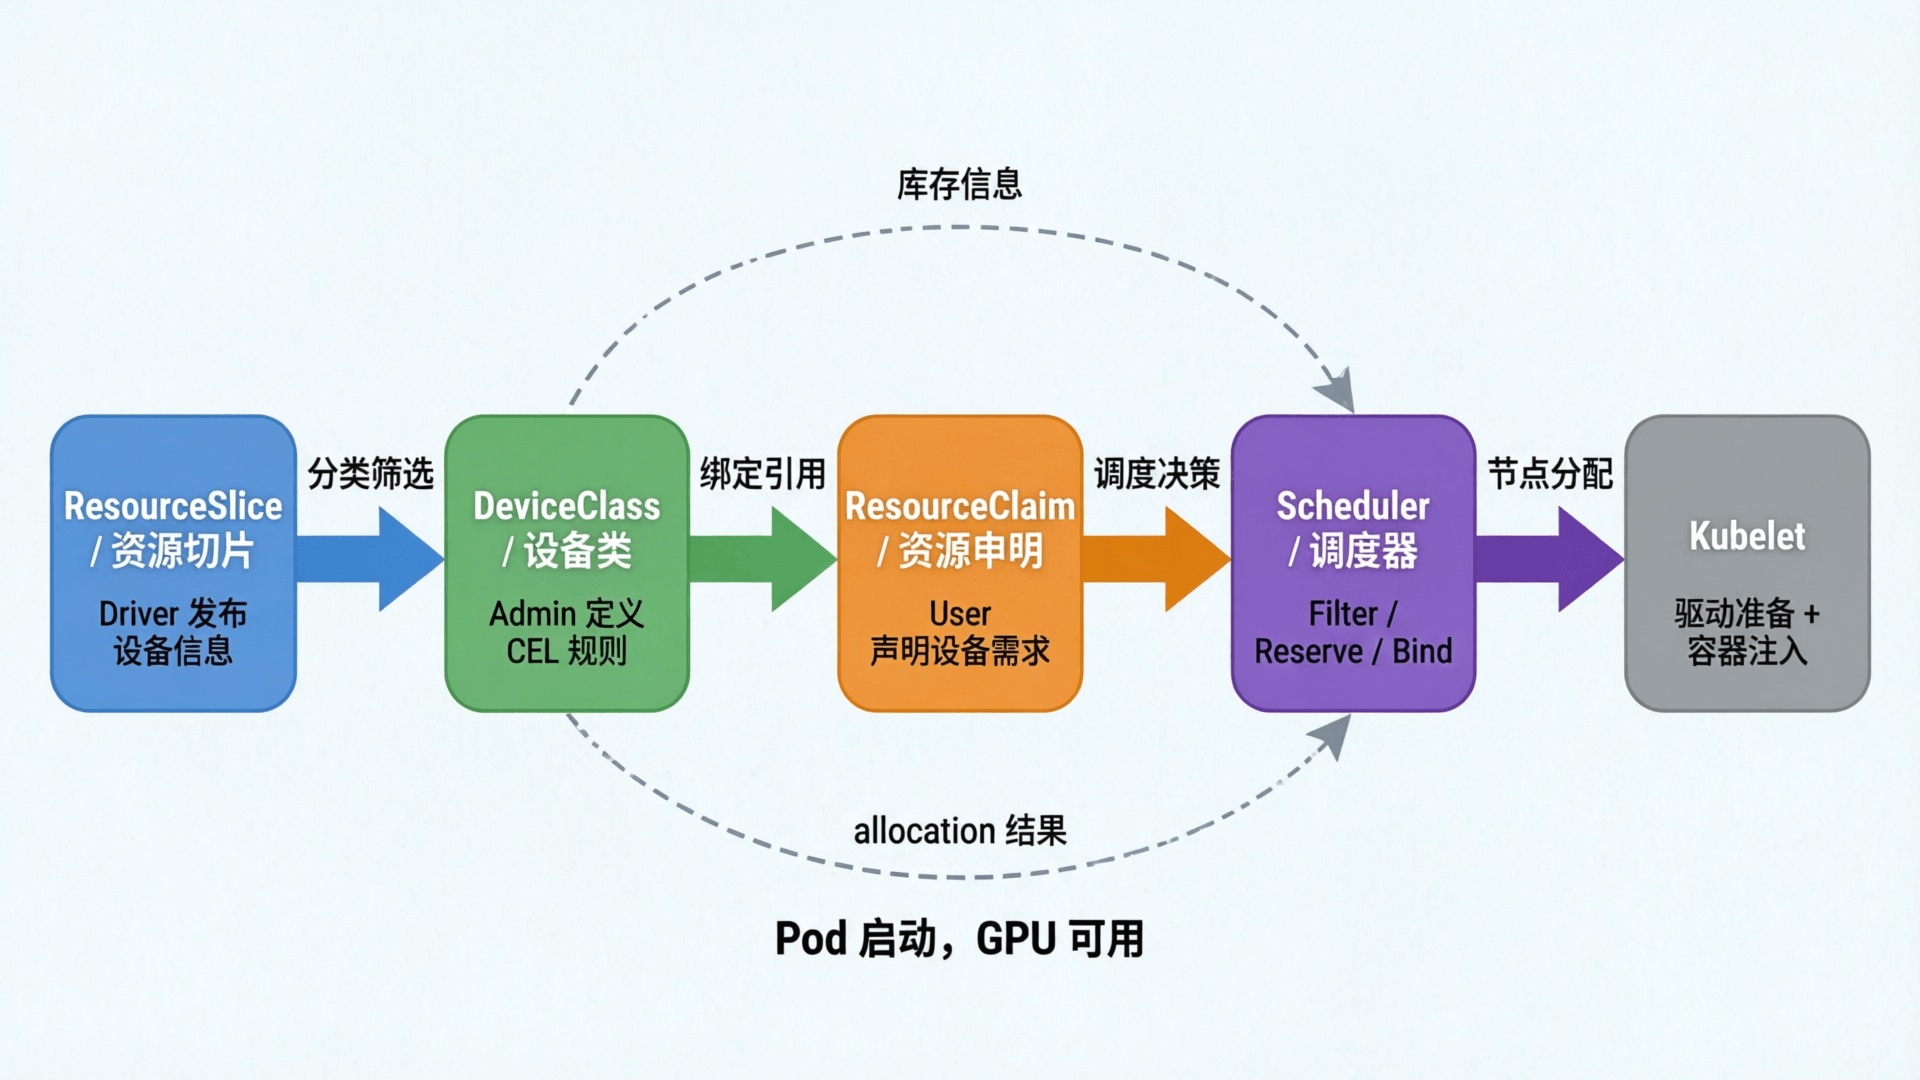
DRA 三者之间的关系,按数据流方向串起来就是:
1
2
| ResourceSlice ──→ DeviceClass ──→ ResourceClaim ──→ 调度器分配
(供给) (分类) (需求) (决策)
|
- ResourceSlice:DRA 驱动发布节点上的设备信息,包括型号、显存、驱动版本等属性,以及可用容量
- DeviceClass:管理员用 CEL 表达式从 ResourceSlice 的设备属性中筛选出一类设备形成用户友好的分组,比如"所有 NVIDIA GPU"或"仅 A100"
- ResourceClaim:用户通过
deviceClassName 引用某个 DeviceClass,声明需要几个该类设备 - 调度器:综合 ResourceSlice 的库存和 ResourceClaim 的需求,选出满足条件的节点和具体设备,完成分配
逐个来看。
2. ResourceSlice:资源提供方(Driver 视角)
2.1 从 DevicePlugin 到 ResourceSlice
ResourceSlice 是 DRA 驱动向集群"公告"设备信息的方式, 可以理解为是对 DevicePlugin 提供的 nvidia.com/gpu:4 这个信息的扩展。
1
2
3
4
5
6
7
8
9
| root@GB200-POD2-F06-Node05:~# kubectl get node gb200-pod2-f06-node05 -oyaml|grep "capacity:" -A 7
capacity:
cpu: "144"
ephemeral-storage: 1840577300Ki
hugepages-2Mi: "0"
hugepages-16Gi: "0"
hugepages-512Mi: "0"
memory: 1002716864Ki
nvidia.com/gpu: "4"
|
HAMi 提供的 hami-device-plugin-nvidia 为了能够感知 GPU 显存信息,也是只能通过给节点打 Annotations 方式实现,DRA 中的 ResourceSlice 则是原生支持了这些。
推荐阅读:HAMi VGPU 原理分析 Part1:hami-Device-Plugin-Nvidia 实现
2.2 结构
一个标准的 ResourceSlice 内容如下所示:
 1
 2
 3
 4
 5
 6
 7
 8
 9
10
11
12
13
14
15
16
17
18
19
20
21
22
23
24
25
26
27
28
29
30
31
32
33
34
35
36
37
| apiVersion: resource.k8s.io/v1
kind: ResourceSlice
metadata:
name: gb200-pod2-f06-node05-gpu.nvidia.com-j7ggv
ownerReferences:
- apiVersion: v1
controller: true
kind: Node
name: gb200-pod2-f06-node05
spec:
devices:
- attributes:
addressingMode:
string: ATS
architecture:
string: Blackwell
brand:
string: Nvidia
cudaComputeCapability:
version: 10.0.0
driverVersion:
version: 580.126.20
productName:
string: NVIDIA GB200
type:
string: gpu
uuid:
string: GPU-137d7996-cb8e-7683-e47d-9c99e6f49eb5
capacity:
memory:
value: 189471Mi
name: gpu-0
# ... 省略 gpu-1, gpu-2, gpu-3 的类似内容
driver: gpu.nvidia.com
nodeName: gb200-pod2-f06-node05
pool:
name: gb200-pod2-f06-node05
|
可以看到,相比 DevicePlugin 只能报一个 nvidia.com/gpu:4 数量信息,ResourceSlice 把 GPU 架构、型号、显存、驱动版本都暴露出来了。有了这些信息,“只要 A100”、“显存大于 40Gi 的 GPU"这类调度策略才能做到。
3. DeviceClass:资源分类标准(Admin 视角)
DeviceClass 定义了"什么样的设备属于这一类”,一般由 DRA Driver 或者集群管理员创建。
一个完整的 DeviceClass 内容如下:
 1
 2
 3
 4
 5
 6
 7
 8
 9
10
11
12
13
14
15
16
17
18
19
| root@GB200-POD2-F06-Node05:~# k get deviceclass gpu.nvidia.com -oyaml
apiVersion: resource.k8s.io/v1
kind: DeviceClass
metadata:
annotations:
meta.helm.sh/release-name: nvidia-dra-driver-gpu
meta.helm.sh/release-namespace: nvidia-dra-driver-gpu
creationTimestamp: "2026-04-22T02:08:27Z"
generation: 1
labels:
app.kubernetes.io/managed-by: Helm
name: gpu.nvidia.com
resourceVersion: "52725555"
uid: 2e700a15-2392-4c7f-9467-26bf6249b71a
spec:
selectors:
- cel:
expression: device.driver == 'gpu.nvidia.com' && device.attributes['gpu.nvidia.com'].type
== 'gpu'
|
3.1 CEL 选择器
DeviceClass 的关键是 CEL 选择器:
1
2
3
4
| spec:
selectors:
- cel:
expression: device.driver == 'gpu.nvidia.com' && device.attributes['gpu.nvidia.com'].type == 'gpu'
|
这表示:驱动为 gpu.nvidia.com 且类型为 gpu 的设备才属于这个 Class。
CEL 表达式可以组合任意属性条件。比如管理员可以创建一个只包含高端 GPU 的 DeviceClass:
 1
 2
 3
 4
 5
 6
 7
 8
 9
10
11
| apiVersion: resource.k8s.io/v1
kind: DeviceClass
metadata:
name: gpu.nvidia.com-a100
spec:
selectors:
- cel:
expression: |
device.driver == 'gpu.nvidia.com' &&
device.attributes['gpu.nvidia.com'].type == 'gpu' &&
device.attributes['gpu.nvidia.com'].productName == 'NVIDIA A100'
|
这样用户只需要在 ResourceClaim 中指定 deviceClassName: gpu.nvidia.com-a100,就能精确地申请到 A100,而无需关心 CEL 表达式的写法。
DevicePlugin 只能通过 gpu.nvidia.com:1 指定数量,GPU 型号管不了,得靠 nodeSelector 之类的方式绕路。DRA 直接在 Claim 里选 Class 就行。
说白了,DeviceClass 就是把 CEL 的复杂性藏起来——管理员写规则,用户选 Class。
3.2 config:设备级配置
DeviceClass 还可以在 config 字段中定义传递给 DRA 驱动的配置参数:
 1
 2
 3
 4
 5
 6
 7
 8
 9
10
11
12
| spec:
selectors:
- cel:
expression: device.driver == 'gpu.nvidia.com' && device.attributes['gpu.nvidia.com'].type == 'gpu'
config:
- opaque:
driver: gpu.nvidia.com
parameters:
apiVersion: v1
kind: GPUConfig
spec:
enablePersistence: true
|
当 Kubelet 调用驱动的 NodePrepareResources 准备设备时,会将这些配置传递给驱动。管理员在 Class 级别统一设置设备参数,不用每个用户单独配。
目前 NVIDIA DRA 驱动对 config 的支持还在完善中,具体可配置项参考驱动文档。
3.3 extendedResourceName:兼容模式
extendedResourceName 是 DeviceClass 中的一个字段,开启后匹配该 Class 的设备可以通过 Pod 的扩展资源请求(resources.requests/limits)来使用,不用写 ResourceClaim。调度器会负责资源核算,确保不会超分配。
DeviceClass 中指定 extendedResourceName:
1
2
3
4
5
6
7
8
9
| apiVersion: resource.k8s.io/v1
kind: DeviceClass
metadata:
name: nvidia-gpu-class
spec:
extendedResourceName: nvidia.com/gpu
selectors:
- cel:
expression: 'device.driver == "gpu.nvidia.com"'
|
Pod 按传统方式申请即可:
 1
 2
 3
 4
 5
 6
 7
 8
 9
10
| apiVersion: v1
kind: Pod
spec:
containers:
- name: container
resources:
requests:
nvidia.com/gpu: 1
limits:
nvidia.com/gpu: 1
|
extendedResourceName 是 Alpha 特性,需要启用 DRAExtendedResource feature gate 才能生效。该特性在 Kubernetes 1.34/1.35 默认关闭,1.36 开始默认开启。
4. ResourceClaim:资源需求方(User 视角)
ResourceClaim 是用户对资源的"采购订单",描述需要什么设备、需要多少。
4.1 两种声明方式
4.1.1 ResourceClaimTemplate:Pod 级别声明
上一篇我们用了 ResourceClaimTemplate:
 1
 2
 3
 4
 5
 6
 7
 8
 9
10
11
12
13
| apiVersion: resource.k8s.io/v1
kind: ResourceClaimTemplate
metadata:
name: single-gpu
spec:
spec:
devices:
requests:
- name: gpu
exactly:
deviceClassName: gpu.nvidia.com
allocationMode: ExactCount
count: 1
|
随 Pod 创建而自动生成 ResourceClaim,Pod 删除时自动回收。适合"一个 Pod 用一份资源"的场景。
4.1.2 ResourceClaim:独立声明(支持跨 Pod 共享)
单独创建的 ResourceClaim 有独立的生命周期,可以跨 Pod 共享。适合"多个 Pod 共用同一份资源"的场景(如 GPU 共享)。
是的,DRA 默认就支持 GPU 共享。多个 Pod 同时引用同一个 Claim,获得同一个设备的访问权,本质是共享同一块 GPU。效果和 DevicePlugin 的 TimeSlicing 方案类似。
关于 TimeSlicing 方案推荐阅读这篇文章:一文搞懂 GPU 共享方案: NVIDIA Time Slicing
例如:
 1
 2
 3
 4
 5
 6
 7
 8
 9
10
11
12
13
14
15
16
17
18
19
20
21
22
23
24
25
26
27
28
29
30
31
32
33
34
35
36
37
38
39
40
41
42
43
44
45
46
47
| # 共享的 ResourceClaim
apiVersion: resource.k8s.io/v1
kind: ResourceClaim
metadata:
name: shared-gpu
spec:
devices:
requests:
- name: gpu
exactly:
deviceClassName: gpu.nvidia.com
allocationMode: ExactCount
count: 1
---
# Pod A 引用共享 Claim
apiVersion: v1
kind: Pod
metadata:
name: pod-a
spec:
resourceClaims:
- name: gpu
resourceClaimName: shared-gpu # 直接引用独立 Claim
containers:
- name: app
image: nvidia/cuda:12.1.0-base-ubuntu22.04
command: ["nvidia-smi", "-L"]
resources:
claims:
- name: gpu
---
# Pod B 引用同一个 Claim
apiVersion: v1
kind: Pod
metadata:
name: pod-b
spec:
resourceClaims:
- name: gpu
resourceClaimName: shared-gpu # 同一个 Claim
containers:
- name: app
image: nvidia/cuda:12.1.0-base-ubuntu22.04
command: ["nvidia-smi", "-L"]
resources:
claims:
- name: gpu
|
Pod A 和 Pod B 共享同一个 GPU 设备,调度器会将它们调度到同一节点,分配同一个设备。
结果如下:
1
2
3
4
| root@GB200-POD2-F06-Node05:~/lixd/dra/test# k logs -f pod-a
GPU 0: NVIDIA GB200 (UUID: GPU-f6c15dc5-4024-fb95-39e6-5089c0c100c8)
root@GB200-POD2-F06-Node05:~/lixd/dra/test# k logs -f pod-b
GPU 0: NVIDIA GB200 (UUID: GPU-f6c15dc5-4024-fb95-39e6-5089c0c100c8)
|
4.2 分配模式
ResourceClaim 支持两种分配模式:
 1
 2
 3
 4
 5
 6
 7
 8
 9
10
| # 模式一:精确数量
exactly:
deviceClassName: gpu.nvidia.com
allocationMode: ExactCount
count: 2 # 恰好需要 2 个 GPU
# 模式二:全部满足
all:
deviceClassName: gpu.nvidia.com
allocationMode: All # 需要节点上该 Class 下的全部设备
|
All 模式本质是:我要这个节点这个资源池里的所有设备。
只有当该节点上该 Class 下的所有设备均未被占用时,分配才会成功;否则分配失败(除非设置了 adminAccess)。适合分布式训练这类需要独占节点全部 GPU 的场景。
4.3 额外选择条件
除了通过 deviceClassName 限定设备范围,ResourceClaim 还可以添加额外的 CEL 选择条件,进一步缩小匹配范围:
 1
 2
 3
 4
 5
 6
 7
 8
 9
10
11
| spec:
devices:
requests:
- name: training-gpu
exactly:
deviceClassName: gpu.nvidia.com
selectors:
- cel:
expression: device.attributes['gpu.nvidia.com'].productName == 'NVIDIA GB200'
allocationMode: ExactCount
count: 2
|
这里虽然引用的是通用的 gpu.nvidia.com Class,但通过额外选择条件限定只匹配 GB200 GPU。
4.4 跨设备约束
当请求多个设备时,可以用 constraints 定义跨设备的约束条件:
 1
 2
 3
 4
 5
 6
 7
 8
 9
10
11
| spec:
devices:
requests:
- name: gpu
exactly:
deviceClassName: gpu.nvidia.com
allocationMode: ExactCount
count: 2
constraints:
- matchAttribute: productName
- matchAttribute: cudaComputeCapability
|
matchAttribute: productName 表示:分配的 2 个 GPU 必须是相同型号。
matchAttribute: cudaComputeCapability 则是确保 CUDA 兼容性。
matchAttribute 配置主要匹配 ResourceSlice 中的 devices.attributes 参数,保证所有设备都有同样的参数。
5. 三角协作:从设备发布到 Pod 启动
三个对象各自干什么搞清楚了,接下来看它们怎么配合完成一次资源分配。以下流程以上篇的 gpu-test-pod 为例。
5.1 阶段一:设备注册(DRA Driver → ResourceSlice)
1
2
3
4
5
| DRA Driver 启动
│
├─ 1. 扫描节点上的 GPU 设备
├─ 2. 收集设备属性(型号、显存、驱动版本等)
└─ 3. 创建/更新 ResourceSlice
|
DRA 驱动以 DaemonSet 方式运行在每个节点上,持续 watch 设备状态。设备变化时(新增、移除、健康状态变化),驱动更新对应的 ResourceSlice 并递增 pool.generation。
5.2 阶段二:分类定义(Admin → DeviceClass)
1
2
3
4
5
6
| 管理员创建 DeviceClass
│
├─ 1. 确定设备筛选规则(如"所有 NVIDIA GPU")
├─ 2. 编写 CEL 表达式
│ 例如:expression: device.driver == 'gpu.nvidia.com'
└─ 3. 创建 DeviceClass,供用户引用
|
DeviceClass 是管理员对 ResourceSlice 中设备的分类标准。驱动把原始设备信息发布到集群后,管理员通过 DeviceClass 告诉用户"有哪些设备类别可用"。
例如创建一个通用的 NVIDIA GPU 类别:
1
2
3
4
5
6
7
8
| apiVersion: resource.k8s.io/v1
kind: DeviceClass
metadata:
name: gpu.nvidia.com
spec:
selectors:
- cel:
expression: device.driver == 'gpu.nvidia.com'
|
用户不需要理解 CEL 语法,只需知道 deviceClassName: gpu.nvidia.com 代表"NVIDIA GPU"。管理员写好规则,用户选 Class 就行——跟 CSI 里选 StorageClass 一个道理。
5.3 阶段三:用户声明需求(ResourceClaim / Template)
用户根据 DeviceClass 创建 ResourceClaim,声明需要什么设备、需要多少。上一篇我们用的是 ResourceClaimTemplate:
 1
 2
 3
 4
 5
 6
 7
 8
 9
10
11
12
13
| apiVersion: resource.k8s.io/v1
kind: ResourceClaimTemplate
metadata:
name: single-gpu
spec:
spec:
devices:
requests:
- name: gpu
exactly:
deviceClassName: gpu.nvidia.com
allocationMode: ExactCount
count: 1
|
也可以直接创建独立的 ResourceClaim(适合跨 Pod 共享的场景)。
无论哪种方式,都是通过 deviceClassName: gpu.nvidia.com 引用 DeviceClass,告诉调度器"我需要这个类别的设备"。
与 DevicePlugin 只能指定数量不同,ResourceClaim allocationMode 除了 ExactCount 之外还支持 All 模式,不指定数量,直接占用该节点该 class 下的全部设备。适合分布式训练等需要独占所有 GPU 的场景。
5.4 阶段四:创建 Pod 并触发调度
用户创建 Pod,通过 resourceClaims 引用 Template:
 1
 2
 3
 4
 5
 6
 7
 8
 9
10
11
12
13
14
| apiVersion: v1
kind: Pod
metadata:
name: gpu-test-pod
spec:
containers:
- name: cuda-container
image: nvidia/cuda:12.1.0-base-ubuntu22.04
resources:
claims:
- name: gpu-claim
resourceClaims:
- name: gpu-claim
resourceClaimTemplateName: single-gpu
|
Pod 提交后,调度流程如下:
 1
 2
 3
 4
 5
 6
 7
 8
 9
10
11
12
13
14
15
16
17
18
| Pod 提交到 API Server
│
├─ 1. ResourceClaim Controller 根据 Template 创建 ResourceClaim
│
├─ 2. 调度器 Filter
│ → 遍历节点,基于 ResourceSlice 判断:
│ - 先通过 DeviceClass CEL 筛选符合 Class 的设备子集
│ - 再结合 Claim selector 进一步过滤
│ - 容量是否满足
│ - 约束是否满足
│
├─ 3. 调度器 Reserve + Bind
│ → 选定节点 + 选定具体设备
│ → 写入 ResourceClaim.status.allocation(driver/pool/device)
│ → 写入 ResourceClaim.status.reservedFor
│ → 绑定 Pod 到节点
│
└─ 4. Kubelet 启动 Pod
|
调度器不仅选节点,还选定了具体设备。Reserve 阶段调度器在内部缓存中完成设备选择,Bind 阶段将分配结果(哪个节点、哪个设备)写入 ResourceClaim.status.allocation,后续 Driver 和 Kubelet 都基于这个结果工作。
三个组件的分工:
| 组件 | 职责 |
|---|
| Scheduler | 选节点 + 选具体设备,写入 allocation |
| Driver | 根据 allocation 结果准备设备(NodePrepareResources) |
| Kubelet | 调用 Driver + 将设备注入容器 |
5.5 阶段五:设备准备与 Pod 启动
 1
 2
 3
 4
 5
 6
 7
 8
 9
10
11
12
13
14
| Kubelet 收到绑定的 Pod
│
├─ 1. 查找 Pod 引用的 ResourceClaim
│ → gpu-test-pod-gpu-claim-7rqsj (已 allocated + reserved)
│
├─ 2. 调用 DRA Plugin 的 NodePrepareResources
│ ├─ 传入 ResourceClaim 的分配结果
│ ├─ 驱动准备设备(配置 GPU、创建 CDI 描述文件)
│ └─ 返回 CDI 设备 ID
│
├─ 3. Kubelet 将 CDI ID 传递给容器运行时
│
└─ 4. 容器运行时根据 CDI 描述注入设备到容器
→ Pod 启动,nvidia-smi 可见 GPU
|
最终我们看到 P1 中的运行结果:
1
2
3
| root@GB200-POD2-F06-Node05:~# kubectl logs gpu-test-pod
GPU 0: NVIDIA GB200 (UUID: GPU-137d7996-cb8e-7683-e47d-9c99e6f49eb5)
GPU allocation successful.
|
5.6 ResourceClaim 状态流转
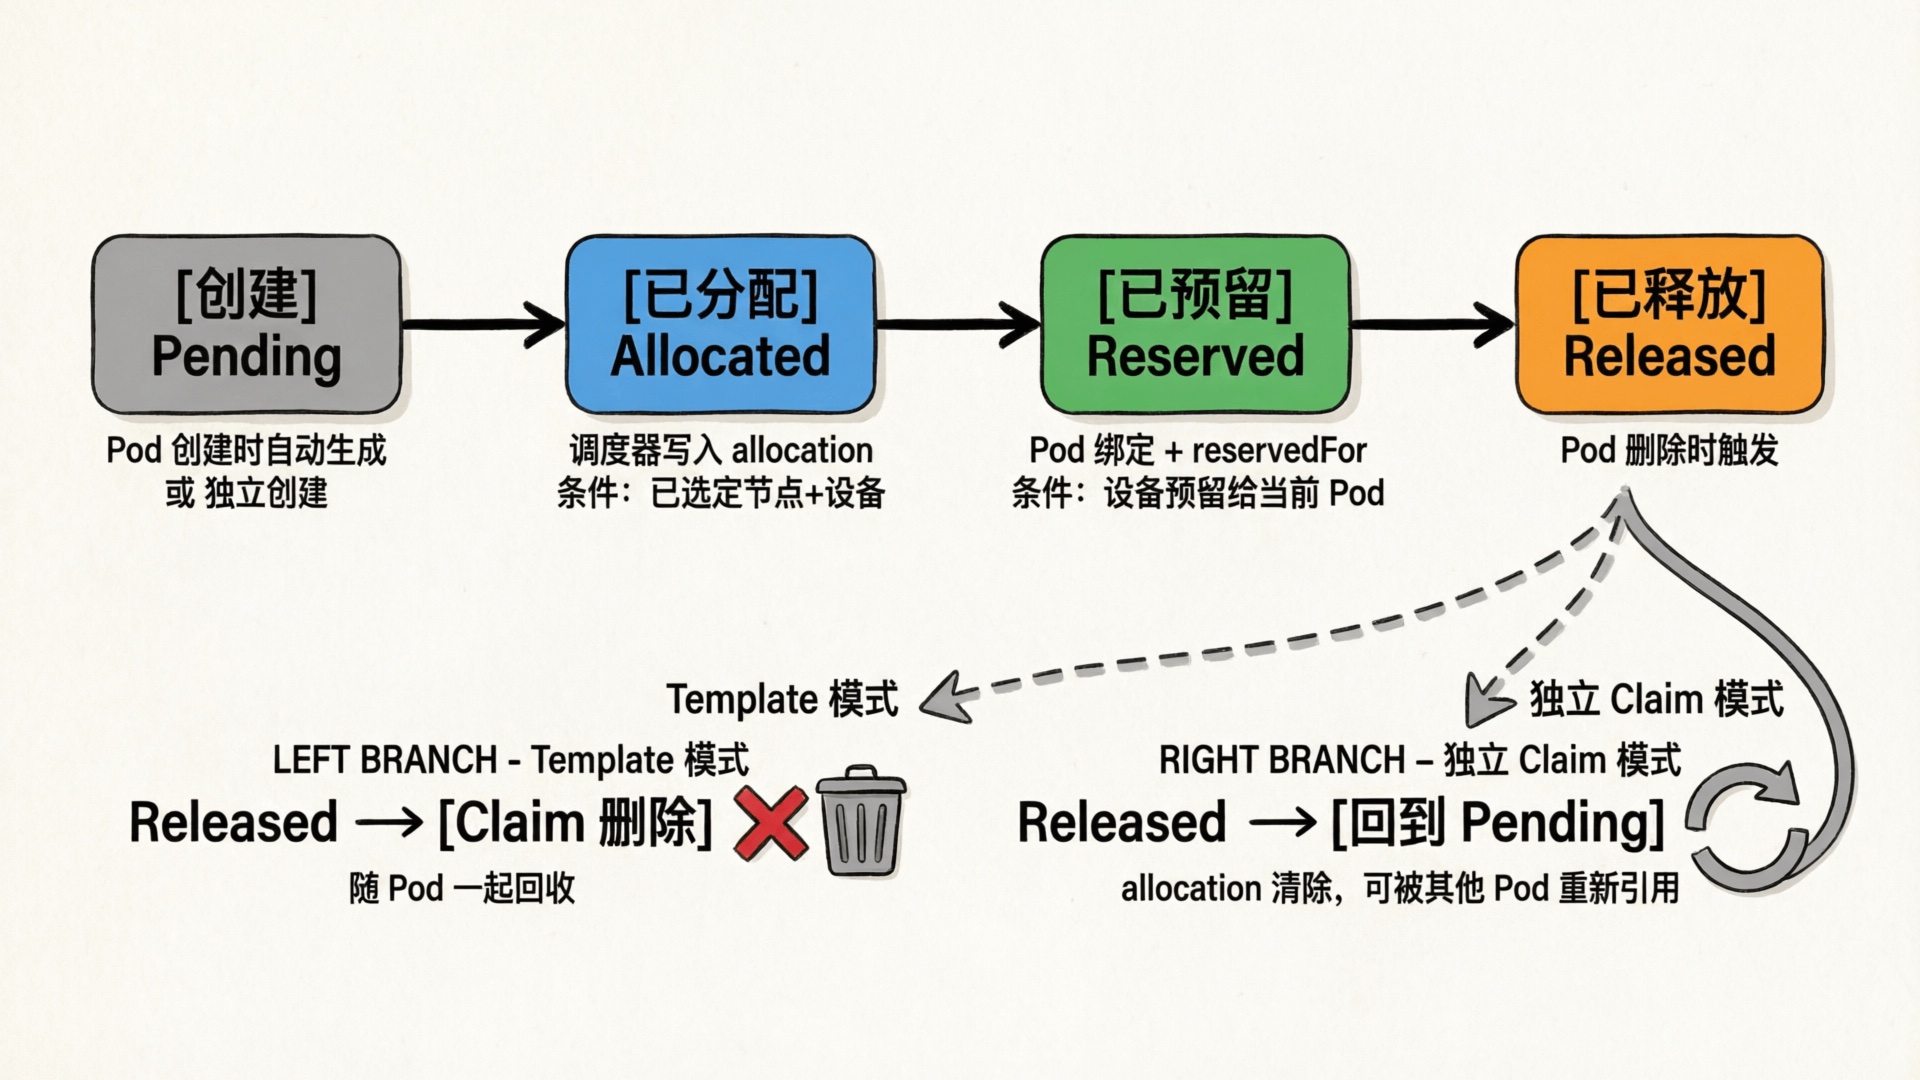
整个过程中 ResourceClaim 的状态变化:
| 状态 | 触发时机 | 含义 |
|---|
| (创建) | Pod 创建时由 Controller 生成 | 等待调度器处理 |
| Allocated | 调度器完成分配 | 已选定具体设备,写入 allocation 结果 |
| Reserved | Pod 绑定到节点 | 设备已预留给该 Pod,其他 Pod 不可使用 |
P1 中我们看到的 allocated,reserved 就是这两个状态的组合:
1
2
| NAME STATE AGE
gpu-test-pod-gpu-claim-7rqsj allocated,reserved 37s
|
Pod 删除后,基于 Template 创建的 ResourceClaim 会随 Pod 一起被回收,设备回到可分配状态。若是独立创建的 ResourceClaim,Pod 删除后 allocation 被清除、Claim 回到 Pending,但 Claim 本身不会被删除,可被其他 Pod 重新引用。
6. 小结
| 概念 | 职责 |
|---|
| ResourceSlice | 设备目录,驱动发布设备信息 |
| DeviceClass | 分类标准,封装选择规则 |
| ResourceClaim | 资源订单,描述用户需求 |
协作流程:
- 驱动发布 ResourceSlice(设备注册)
- 管理员定义 DeviceClass(分类筛选)
- 用户创建 ResourceClaim/Pod(资源申请)
- 调度器综合三者的信息做分配决策
- Kubelet 调用驱动准备设备,容器获得 GPU
下一篇来看 DRA 的完整工作流和源码实现——调度器怎么分配、Kubelet 怎么准备设备,以及 NVIDIA DRA Driver 的源码。