本文为从零开始写 Docker 系列第九篇,实现类似 docker ps 的功能,使得我们能够查询到后台运行中的所有容器。
完整代码见:https://github.com/lixd/mydocker
欢迎 Star
推荐阅读以下文章对 docker 基本实现有一个大致认识:
开发环境如下:
1
2
3
4
5
6
7
8
root@mydocker:~# lsb_release -a
No LSB modules are available.
Distributor ID:	Ubuntu
Description:	Ubuntu 20.04.2 LTS
Release:	20.04
Codename:	focal
root@mydocker:~# uname -r
5.4.0-74-generic
注意:需要使用 root 用户
1. 概述
上一篇已经实现了mydocker run -d 命令,可以让容器脱离父进程在后台独立运行。
那么我们怎么知道有哪些容器在运行,而且它们的信息又是什么呢?
这里就需要实现 mydocker ps 命令了。其实 mydocker ps 命令比较简单,主要是去约定好的位置查询一下容器的信息数据,然后显示出来,因此数据准备就显得尤为重要。
因此整个实现分为两部分:
1)容器启动时记录数据 2)mydocker ps 查询数据 对于 docker 来说,他会把容器信息存储在var/lib/docker/containers 目录下。
读取 var/lib/docker/containers 目录下的所有文件夹就能拿到当前系统中的容器 读取/var/lib/docker/containers/{containerID}/config.v2.json 文件即可拿到对应容器的详细信息。 我们也参考着 Docker 实现即可。
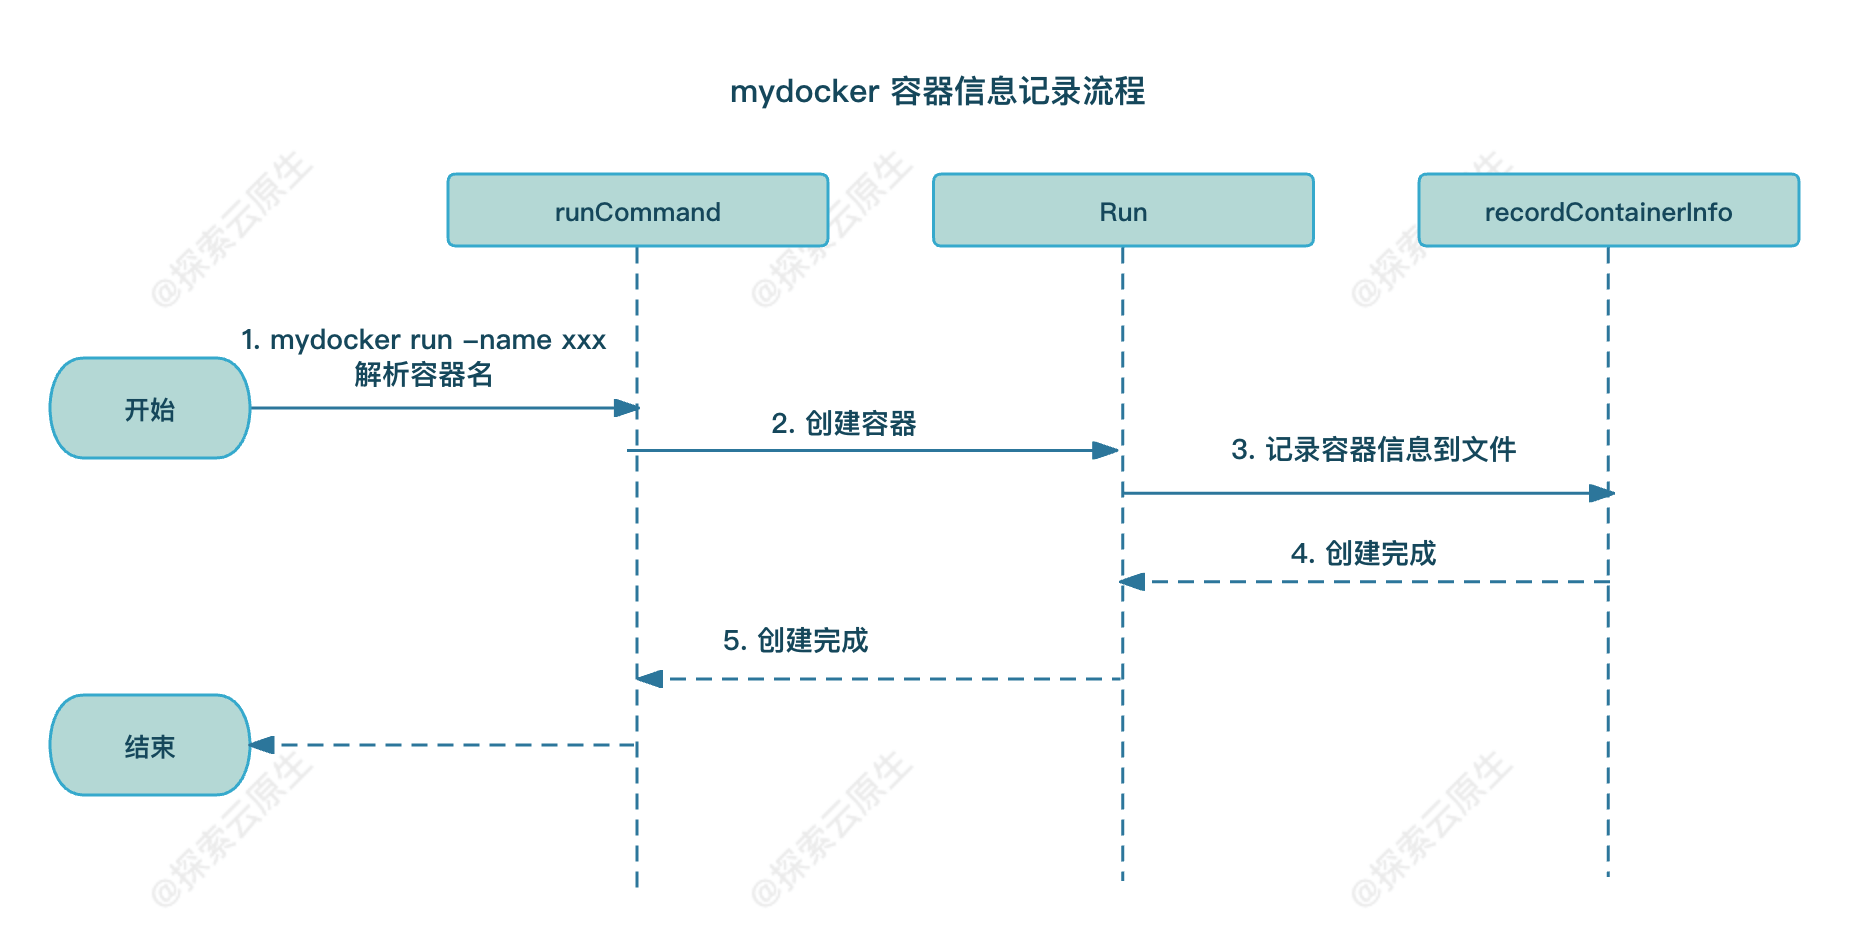
2. 记录容器信息
在前面章节创建的容器中,所有关于容器的信息,比如PID、容器创建时间、容器运行命令等,都没有记录,这导致容器运行完后就再也不知道它的信息了,因此需要把这部分信息保留下来。
具体实现则是创建容器时将相关信息写入/var/lib/mydocker/containers/{containerId}/config.json 文件中。
具体流程如下图所示:
提供 -name flag
首先,要在 runCommand flag 里面增加一个 name 标签,方便用户启动容器时指定容器的名字。
 1
 2
 3
 4
 5
 6
 7
 8
 9
10
11
12
13
14
15
16
17
var runCommand = cli . Command {
Name : "run" ,
Usage : `Create a container with namespace and cgroups limit
mydocker run -it [command]` ,
Flags : [] cli . Flag {
// 省略其他内容
cli . StringFlag {
Name : "name" ,
Usage : "container name" ,
},
},
Action : func ( context * cli . Context ) error {
// 把namne传递给Run方法
containerName := context . String ( "name" )
Run ( tty , cmdArray , resConf , volume , containerName )
return nil
},
recordContainerInfo
然后,需要增加一个 record 方法记录容器的相关信息。在增加之前,需要一个 ID 生成器,用来唯一标识容器。
使用过 Docker 的都知道,每个容器都会有一个 ID,为了方便起见,mydocker 中就用 10 位数字来表示一个容器的 ID。
1
2
3
4
5
6
7
8
9
func randStringBytes ( n int ) string {
letterBytes := "1234567890"
rand . Seed ( time . Now (). UnixNano ())
b := make ([] byte , n )
for i := range b {
b [ i ] = letterBytes [ rand . Intn ( len ( letterBytes ))]
}
return string ( b )
}
另外就是记录容器信息这个重要的环节,我们先定义了一个容器的一些基本信息,比如 PID 和创建时间等,然后默认把容器的信息以 json 的形式存储在宿主机的/var/run/mydocker/容器名/config.json文件里面。
容器完整信息的基本格式如下:
1
2
3
4
5
6
7
8
type Info struct {
    Pid         string `json:"pid"`        // 容器的init进程在宿主机上的 PID
    Id          string `json:"id"`         // 容器Id
    Name        string `json:"name"`       // 容器名
    Command     string `json:"command"`    // 容器内init运行命令
    CreatedTime string `json:"createTime"` // 创建时间
    Status      string `json:"status"`     // 容器的状态
}
然后就开始记录容器信息:
 1
 2
 3
 4
 5
 6
 7
 8
 9
10
11
12
13
14
15
16
17
18
19
20
21
22
23
24
25
26
27
28
29
30
31
32
33
34
35
36
37
func RecordContainerInfo ( containerPID int , commandArray [] string , containerName , containerId string ) error {
// 如果未指定容器名,则使用随机生成的containerID
if containerName == "" {
containerName = containerId
}
command := strings . Join ( commandArray , "" )
containerInfo := & Info {
Id : containerId ,
Pid : strconv . Itoa ( containerPID ),
Command : command ,
CreatedTime : time . Now (). Format ( "2006-01-02 15:04:05" ),
Status : RUNNING ,
Name : containerName ,
}
jsonBytes , err := json . Marshal ( containerInfo )
if err != nil {
return errors . WithMessage ( err , "container info marshal failed" )
}
jsonStr := string ( jsonBytes )
// 拼接出存储容器信息文件的路径,如果目录不存在则级联创建
dirPath := fmt . Sprintf ( InfoLocFormat , containerId )
if err := os . MkdirAll ( dirPath , constant . Perm0622 ); err != nil {
return errors . WithMessagef ( err , "mkdir %s failed" , dirPath )
}
// 将容器信息写入文件
fileName := path . Join ( dirPath , ConfigName )
file , err := os . Create ( fileName )
defer file . Close ()
if err != nil {
return errors . WithMessagef ( err , "create file %s failed" , fileName )
}
if _ , err = file . WriteString ( jsonStr ); err != nil {
return errors . WithMessagef ( err , "write container info to file %s failed" , fileName )
}
return nil
}
实际就是把容器的信息序列化之后持久化到磁盘的/var/run/{containerID}/config.json文件里。
Run 方法修改
最后,在 Run 函数上加上对于这个函数的调用,代码如下:
 1
 2
 3
 4
 5
 6
 7
 8
 9
10
11
12
13
14
15
16
17
18
19
20
21
22
23
24
25
26
27
28
29
30
31
32
33
34
func Run ( tty bool , comArray [] string , res * subsystems . ResourceConfig , volume , containerName string ) {
containerId := container . GenerateContainerID () // 生成 10 位容器 id
parent , writePipe := container . NewParentProcess ( tty , volume )
if parent == nil {
log . Errorf ( "New parent process error" )
return
}
if err := parent . Start (); err != nil {
log . Errorf ( "Run parent.Start err:%v" , err )
return
}
// record container info
err := container . RecordContainerInfo ( parent . Process . Pid , comArray , containerName , containerId )
if err != nil {
log . Errorf ( "Record container info error %v" , err )
return
}
// 创建cgroup manager, 并通过调用set和apply设置资源限制并使限制在容器上生效
cgroupManager := cgroups . NewCgroupManager ( "mydocker-cgroup" )
defer cgroupManager . Destroy ()
_ = cgroupManager . Set ( res )
_ = cgroupManager . Apply ( parent . Process . Pid , res )
// 在子进程创建后才能通过pipe来发送参数
sendInitCommand ( comArray , writePipe )
if tty { // 如果是tty,那么父进程等待,就是前台运行,否则就是跳过,实现后台运行
_ = parent . Wait ()
container . DeleteWorkSpace ( "/root/" , volume )
container . DeleteContainerInfo ( containerId )
}
}
另外再容器退出后,就需要删除容器的相关信息,实现也很简单,把对应目录的信息都删除就好了。
1
2
3
4
5
6
func DeleteContainerInfo ( containerID string ) {
dirPath := fmt . Sprintf ( InfoLocFormat , containerID )
if err := os . RemoveAll ( dirPath ); err != nil {
log . Errorf ( "Remove dir %s error %v" , dirPath , err )
}
}
到此为止,就完成了信息的收集。容器创建后,所有需要的信息都被存储到/var/lib/mydocker/containers/{containerID}下,下面就可以通过读取并遍历这个目录下的容器去实现 mydocker ps 命令了。
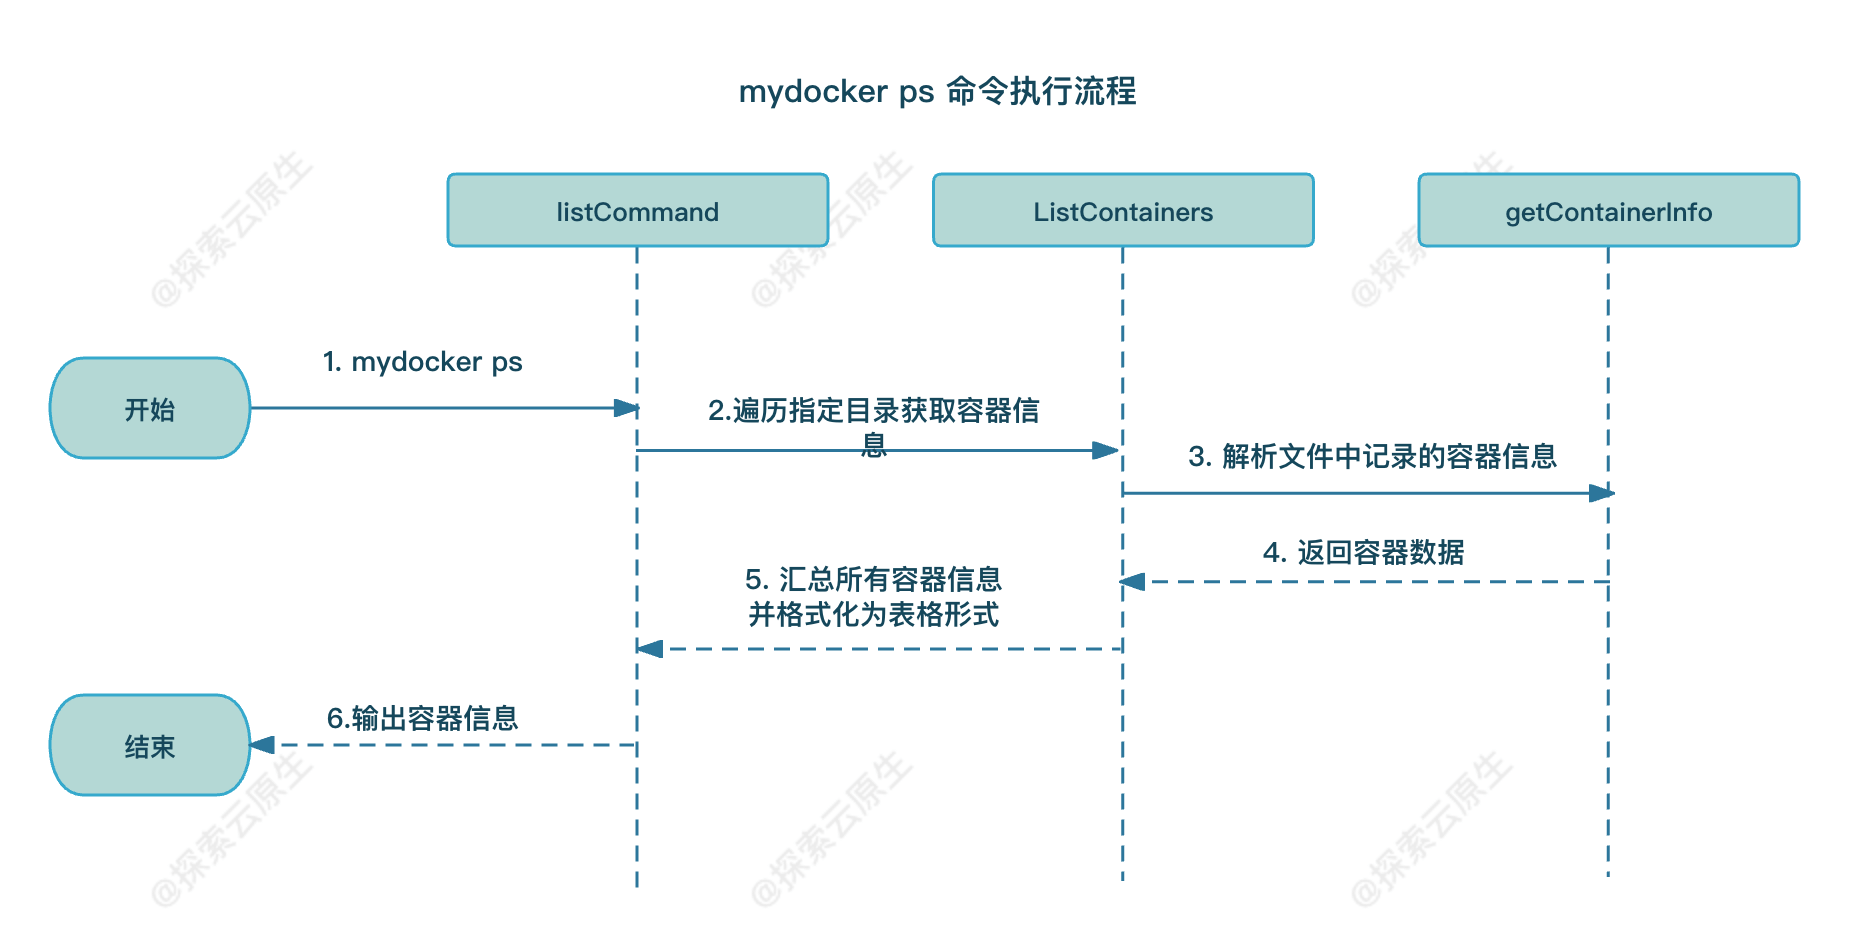
3. 实现 mydocker ps
具体实现则是遍历 /var/lib/mydocker/containers/ 目录,解析得到容器信息并汇总后以表格形式打印出来。
具体流程如下图所示:
listCommand
首先在 main_command.go 中增加 ps 命令:
1
2
3
4
5
6
7
8
var listCommand = cli . Command {
Name : "ps" ,
Usage : "list all the containers" ,
Action : func ( context * cli . Context ) error {
ListContainers ()
return nil
},
}
在 main.go 中引用该命令:
1
2
3
4
5
6
7
8
9
func main {
// 省略其他内容
app . Commands = [] cli . Command {
initCommand ,
runCommand ,
commitCommand ,
listCommand ,
}
}
具体实现见 ListContainers 方法。
ListContainers
整体实现也比较简单:
首先遍历存放容器数据的/var/lib/mydocker/containers/目录,里面每一个子目录都是一个容器。 然后使用 getContainerInfo 方法解析子目录中的 config.json 文件拿到容器信息 最后格式化成 table 形式打印出来即可 1
2
3
4
5
6
7
8
9
10
11
12
13
14
15
16
17
18
19
20
21
22
23
24
25
26
27
28
29
30
31
32
33
34
35
36
37
38
39
func ListContainers () {
// 读取存放容器信息目录下的所有文件
files , err := os . ReadDir ( container . InfoLoc )
if err != nil {
log . Errorf ( "read dir %s error %v" , container . InfoLoc , err )
return
}
containers := make ([] * container . Info , 0 , len ( files ))
for _ , file := range files {
tmpContainer , err := getContainerInfo ( file )
if err != nil {
log . Errorf ( "get container info error %v" , err )
continue
}
containers = append ( containers , tmpContainer )
}
// 使用tabwriter.NewWriter在控制台打印出容器信息
// tabwriter 是引用的text/tabwriter类库,用于在控制台打印对齐的表格
w := tabwriter . NewWriter ( os . Stdout , 12 , 1 , 3 , ' ' , 0 )
_ , err = fmt . Fprint ( w , "ID\tNAME\tPID\tSTATUS\tCOMMAND\tCREATED\n" )
if err != nil {
log . Errorf ( "Fprint error %v" , err )
}
for _ , item := range containers {
_ , err = fmt . Fprintf ( w , "%s\t%s\t%s\t%s\t%s\t%s\n" ,
item . Id ,
item . Name ,
item . Pid ,
item . Status ,
item . Command ,
item . CreatedTime )
if err != nil {
log . Errorf ( "Fprint error %v" , err )
}
}
if err = w . Flush (); err != nil {
log . Errorf ( "Flush error %v" , err )
}
}
getContainerInfo
具体的解析方法则提取到了 getContainerInfo。
读取文件内容,并反序列化得到容器信息。
 1
 2
 3
 4
 5
 6
 7
 8
 9
10
11
12
13
14
15
16
17
18
func getContainerInfo ( file os . DirEntry ) ( * container . Info , error ) {
// 根据文件名拼接出完整路径
configFileDir := fmt . Sprintf ( container . InfoLocFormat , file . Name ())
configFileDir = path . Join ( configFileDir , container . ConfigName )
// 读取容器配置文件
content , err := os . ReadFile ( configFileDir )
if err != nil {
log . Errorf ( "read file %s error %v" , configFileDir , err )
return nil , err
}
info := new ( container . Info )
if err = json . Unmarshal ( content , info ); err != nil {
log . Errorf ( "json unmarshal error %v" , err )
return nil , err
}
return info , nil
}
4. 测试
测试以下功能:
创建容器后能否记录信息到文件 mydocker ps 能否正常读取并展示容器信息 记录容器信息
分别测试指定容器名称和不知道名称两种情况。
指定名称
通过--name 指定容器名称,并通过-d 指定后台运行:
1
2
3
4
5
6
7
8
9
root@mydocker:~/feat-ps/mydocker# ./mydocker run -d -name runtop top
{ "level" :"info" ,"msg" :"createTty false" ,"time" :"2024-01-25T14:20:11+08:00" }
{ "level" :"info" ,"msg" :"resConf:\u0026{ 0 }" ,"time" :"2024-01-25T14:20:11+08:00" }
{ "level" :"info" ,"msg" :"busybox:/root/busybox busybox.tar:/root/busybox.tar" ,"time" :"2024-01-25T14:20:11+08:00" }
{ "level" :"error" ,"msg" :"mkdir dir /root/merged error. mkdir /root/merged: file exists" ,"time" :"2024-01-25T14:20:11+08:00" }
{ "level" :"error" ,"msg" :"mkdir dir /root/upper error. mkdir /root/upper: file exists" ,"time" :"2024-01-25T14:20:11+08:00" }
{ "level" :"error" ,"msg" :"mkdir dir /root/work error. mkdir /root/work: file exists" ,"time" :"2024-01-25T14:20:11+08:00" }
{ "level" :"info" ,"msg" :"mount overlayfs: [/usr/bin/mount -t overlay overlay -o lowerdir=/root/busybox,upperdir=/root/upper,workdir=/root/work /root/merged]" ,"time" :"2024-01-25T14:20:11+08:00" }
{ "level" :"info" ,"msg" :"command all is top" ,"time" :"2024-01-25T14:20:11+08:00" }
可以看到此时,命令已经退出了,查询容器(top 命令)是否在后台运行。
1
2
3
root@mydocker:~/feat-ps/mydocker# ps -ef| grep -e PPID -e top
UID PID PPID C STIME TTY TIME CMD
root 169514 1 0 14:20 pts/8 00:00:00 top
后台确实有一个 top 命令在运行,PID 为 169514。
查看 /var/lib/mydocker/containers 目录,是否新增了容器信息记录文件
1
2
3
4
5
6
root@mydocker:~/feat-ps/mydocker# ls /var/lib/mydocker/containers
5633481844
root@mydocker:~/feat-ps/mydocker# ls /var/lib/mydocker/containers/5633481844/
config.json
root@mydocker:~/feat-ps/mydocker# cat /var/lib/mydocker/containers/5633481844/config.json
{ "pid" :"169514" ,"id" :"5633481844" ,"name" :"runtop" ,"command" :"top" ,"createTime" :"2024-01-25 14:20:11" ,"status" :"running" }
可以看到,config.json 文件记录了容器名称,id、pid、command 等信息,基于这些信息,我们执行 mydocker ps 时就可以列出当前正在运行的容器信息了。
不指定名称
在测试一下不指定名称的容器,能否正常记录。
1
2
3
4
5
6
7
8
9
root@mydocker:~/feat-ps/mydocker# ./mydocker run -d top
{ "level" :"info" ,"msg" :"createTty false" ,"time" :"2024-01-25T14:22:28+08:00" }
{ "level" :"info" ,"msg" :"resConf:\u0026{ 0 }" ,"time" :"2024-01-25T14:22:28+08:00" }
{ "level" :"info" ,"msg" :"busybox:/root/busybox busybox.tar:/root/busybox.tar" ,"time" :"2024-01-25T14:22:28+08:00" }
{ "level" :"error" ,"msg" :"mkdir dir /root/merged error. mkdir /root/merged: file exists" ,"time" :"2024-01-25T14:22:28+08:00" }
{ "level" :"error" ,"msg" :"mkdir dir /root/upper error. mkdir /root/upper: file exists" ,"time" :"2024-01-25T14:22:28+08:00" }
{ "level" :"error" ,"msg" :"mkdir dir /root/work error. mkdir /root/work: file exists" ,"time" :"2024-01-25T14:22:28+08:00" }
{ "level" :"info" ,"msg" :"mount overlayfs: [/usr/bin/mount -t overlay overlay -o lowerdir=/root/busybox,upperdir=/root/upper,workdir=/root/work /root/merged]" ,"time" :"2024-01-25T14:22:28+08:00" }
{ "level" :"info" ,"msg" :"command all is top" ,"time" :"2024-01-25T14:22:28+08:00" }
查看 /var/lib/mydocker/containers 目录是否新增记录文件
1
2
3
4
5
6
root@mydocker:~/feat-ps/mydocker# ls /var/lib/mydocker/containers
5633481844 8636128862
root@mydocker:~/feat-ps/mydocker# ls /var/lib/mydocker/containers/8636128862/
config.json
root@mydocker:~/feat-ps/mydocker# cat /var/lib/mydocker/containers/8636128862/config.json
{ "pid" :"169707" ,"id" :"8636128862" ,"name" :"8636128862" ,"command" :"top" ,"createTime" :"2024-01-25 14:22:28" ,"status" :"running"
可以看到,新增了 8636128862 目录,其中 8636128862 就是容器 ID,对于未指定名称的容器,会使用生成的 id 作为名称。
接着查看一下/var/lib/mydocker/containers目录结构:
1
2
3
4
5
6
root@mydocker:/var/lib/mydocker/containers# tree .
.
├── 5633481844
│   └── config.json
└── 8636128862
    └── config.json
可以看到,mydocker 分别在该路径下创建了两个文件夹,分别以容器的ID命名。
子目录里面的config.json 存储了容器的详细信息。
至此,说明我们的容器信息记录功能是正常的。
mydocker ps
最后测试 mydocker ps 命令能否正常展示,容器信息。
1
2
3
4
root@mydocker:~/feat-ps/mydocker# ./mydocker ps
ID           NAME         PID         STATUS      COMMAND     CREATED
5633481844   runtop       169514      running     top         2024-01-25 14:20:11
8636128862   8636128862   169707      running     top         2024-01-25 14:22:28
成功打印出了当前运行中的两个容器,说明 mydocker ps 命令是 ok 的。
5. 总结
本篇实现的 mydocker ps 比较简单,和 docker 实现基本类似:
容器启动把信息存储在var/lib/mydocker/containers 目录下
读取 var/lib/mydocker/containers 目录下的所有文件夹就能拿到当前系统中的容器
读取/var/lib/mydocker/containers/{containerID}/config.json 文件即可拿到对应容器的详细信息。
不过现在由于没有隔离每个容器的 rootfs,因此启动多个容器时会出现一些问题,不过不是本篇重点,暂时先不关注,等后续统一处理。
完整代码见:https://github.com/lixd/mydocker
欢迎关注~
相关代码见 feat-volume 分支,测试脚本如下:
需要提前在 /root 目录准备好 busybox.tar 文件,具体见第四篇第二节。
1
2
3
4
5
6
7
8
# 克隆代码
git clone -b feat-ps https://github.com/lixd/mydocker.git
cd mydocker
# 拉取依赖并编译
go mod tidy
go build .
# 测试
./mydocker run -d -name c1 top