[root@lixd-argo workdir]# k get cwfNAME AGE
test-cron-wf 116s
[root@lixd-argo workdir]# k get wfNAME STATUS AGE MESSAGE
test-cron-wf-1711852560 Running 47s
[root@lixd-argo workdir]# k get wfNAME STATUS AGE MESSAGE
test-cron-wf-1711852560 Failed 103s Stopped with strategy 'Terminate'test-cron-wf-1711852620 Running 43s
typeCronWorkflowSpecstruct{// WorkflowSpec is the spec of the workflow to be runWorkflowSpecWorkflowSpec`json:"workflowSpec" protobuf:"bytes,1,opt,name=workflowSpec,casttype=WorkflowSpec"`// Schedule is a schedule to run the Workflow in Cron formatSchedulestring`json:"schedule" protobuf:"bytes,2,opt,name=schedule"`// ConcurrencyPolicy is the K8s-style concurrency policy that will be usedConcurrencyPolicyConcurrencyPolicy`json:"concurrencyPolicy,omitempty" protobuf:"bytes,3,opt,name=concurrencyPolicy,casttype=ConcurrencyPolicy"`// Suspend is a flag that will stop new CronWorkflows from running if set to trueSuspendbool`json:"suspend,omitempty" protobuf:"varint,4,opt,name=suspend"`// StartingDeadlineSeconds is the K8s-style deadline that will limit the time a CronWorkflow will be run after its// original scheduled time if it is missed.StartingDeadlineSeconds*int64`json:"startingDeadlineSeconds,omitempty" protobuf:"varint,5,opt,name=startingDeadlineSeconds"`// SuccessfulJobsHistoryLimit is the number of successful jobs to be kept at a timeSuccessfulJobsHistoryLimit*int32`json:"successfulJobsHistoryLimit,omitempty" protobuf:"varint,6,opt,name=successfulJobsHistoryLimit"`// FailedJobsHistoryLimit is the number of failed jobs to be kept at a timeFailedJobsHistoryLimit*int32`json:"failedJobsHistoryLimit,omitempty" protobuf:"varint,7,opt,name=failedJobsHistoryLimit"`// Timezone is the timezone against which the cron schedule will be calculated, e.g. "Asia/Tokyo". Default is machine's local time.Timezonestring`json:"timezone,omitempty" protobuf:"bytes,8,opt,name=timezone"`// WorkflowMetadata contains some metadata of the workflow to be runWorkflowMetadata*metav1.ObjectMeta`json:"workflowMetadata,omitempty" protobuf:"bytes,9,opt,name=workflowMeta"`}
apiVersion:argoproj.io/v1alpha1kind:WorkflowEventBindingmetadata:name:event-consumerspec:event:# metadata header name must be lowercase to match in selectorselector:payload.message != "" && metadata["x-argo-e2e"] == ["true"] && discriminator == "my-discriminator"submit:workflowTemplateRef:name:my-wf-tmplearguments:parameters:- name:messagevalueFrom:event:payload.message
kind:SecretapiVersion:v1metadata:name:argo-workflows-webhook-clients# The data keys must be the name of a service account.stringData:# https://support.atlassian.com/bitbucket-cloud/docs/manage-webhooks/bitbucket.org:| type: bitbucket
secret: "my-uuid"# https://confluence.atlassian.com/bitbucketserver/managing-webhooks-in-bitbucket-server-938025878.htmlbitbucketserver:| type: bitbucketserver
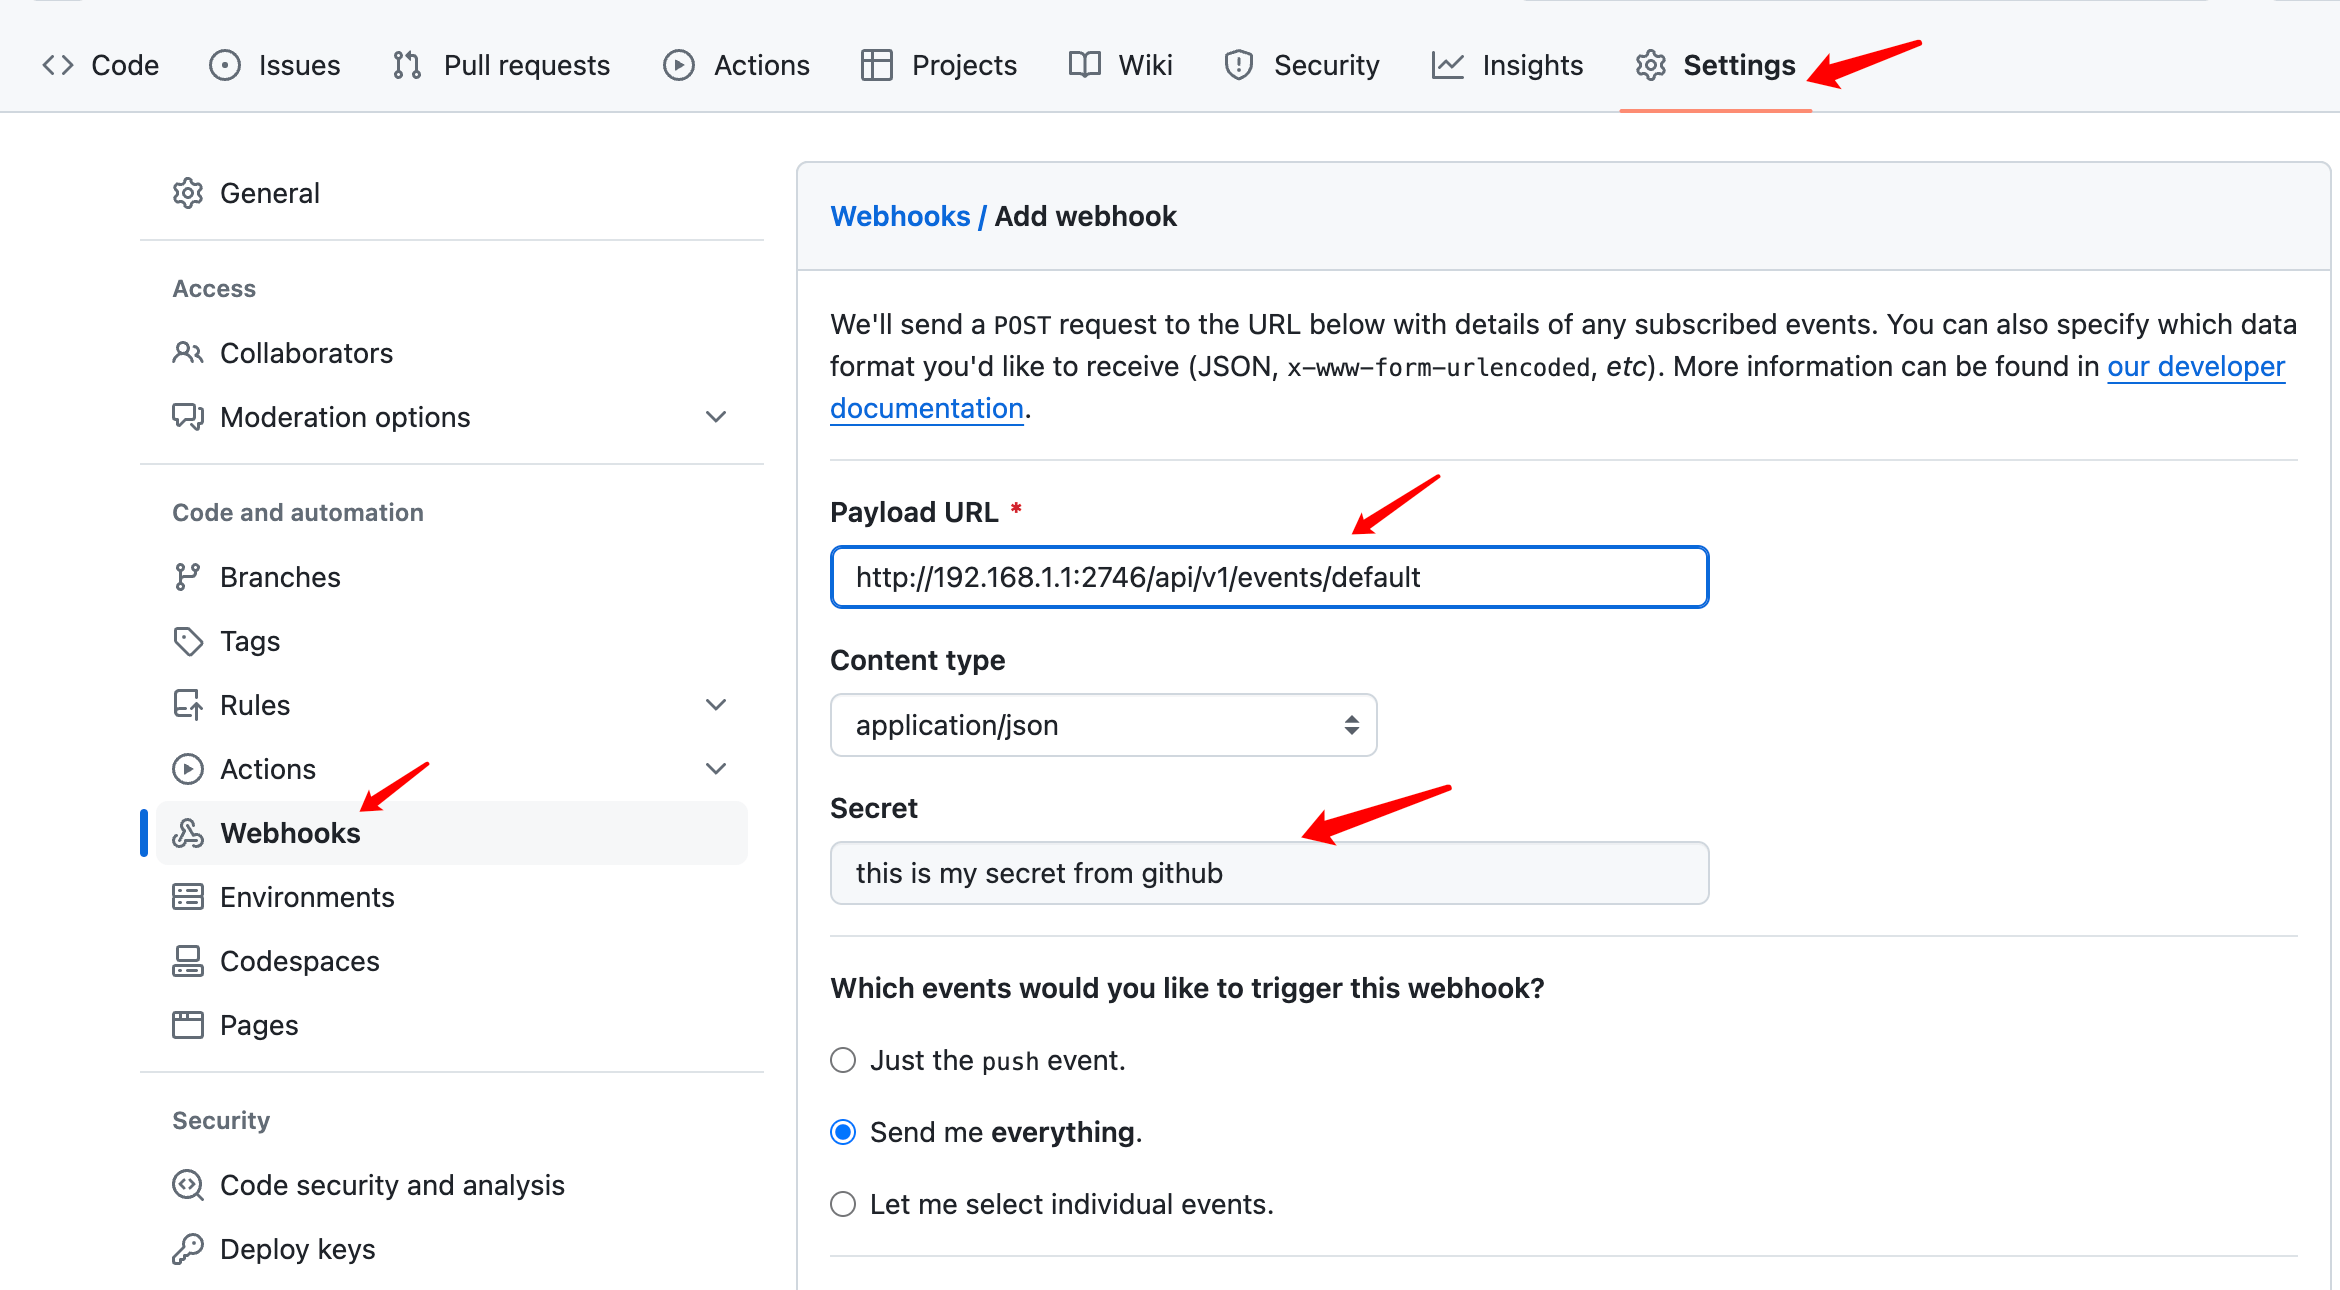
secret: "shh!"# https://developer.github.com/webhooks/securing/github.com:| type: github
secret: "shh!"# https://docs.gitlab.com/ee/user/project/integrations/webhooks.htmlgitlab.com:| type: gitlab
secret: "shh!"
这块逻辑以一个 Interceptor 的形式出现,对于所有 Event API 都会经过该逻辑,用于为没有携带 Authorization 的请求添加 Authorization 信息。
1
2
3
4
5
6
7
8
9
10
11
12
13
14
// Interceptor creates an annotator that verifies webhook signatures and adds the appropriate access token to the request.funcInterceptor(clientkubernetes.Interface)func(whttp.ResponseWriter,r*http.Request,nexthttp.Handler){returnfunc(whttp.ResponseWriter,r*http.Request,nexthttp.Handler){err:=addWebhookAuthorization(r,client)iferr!=nil{log.WithError(err).Error("Failed to process webhook request")w.WriteHeader(403)// hide the message from the user, because it could help them attack us_,_=w.Write([]byte(`{"message": "failed to process webhook request"}`))}else{next.ServeHTTP(w,r)}}}
funcaddWebhookAuthorization(r*http.Request,kubekubernetes.Interface)error{// try and exit quickly before we do anything API callsifr.Method!="POST"||len(r.Header["Authorization"])>0||!strings.HasPrefix(r.URL.Path,pathPrefix){returnnil}parts:=strings.SplitN(strings.TrimPrefix(r.URL.Path,pathPrefix),"/",2)iflen(parts)!=2{returnnil}namespace:=parts[0]secretsInterface:=kube.CoreV1().Secrets(namespace)ctx:=r.Context()webhookClients,err:=secretsInterface.Get(ctx,"argo-workflows-webhook-clients",metav1.GetOptions{})iferr!=nil{returnfmt.Errorf("failed to get webhook clients: %w",err)}// we need to read the request body to check the signature, but we still need it for the GRPC request,// so read it all now, and then reinstate when we are donebuf,_:=io.ReadAll(r.Body)deferfunc(){r.Body=io.NopCloser(bytes.NewBuffer(buf))}()serviceAccountInterface:=kube.CoreV1().ServiceAccounts(namespace)forserviceAccountName,data:=rangewebhookClients.Data{r.Body=io.NopCloser(bytes.NewBuffer(buf))client:=&webhookClient{}err:=yaml.Unmarshal(data,client)iferr!=nil{returnfmt.Errorf("failed to unmarshal webhook client \"%s\": %w",serviceAccountName,err)}log.WithFields(log.Fields{"serviceAccountName":serviceAccountName,"webhookType":client.Type}).Debug("Attempting to match webhook request")ok:=webhookParsers[client.Type](client.Secret,r)ifok{log.WithField("serviceAccountName",serviceAccountName).Debug("Matched webhook request")serviceAccount,err:=serviceAccountInterface.Get(ctx,serviceAccountName,metav1.GetOptions{})iferr!=nil{returnfmt.Errorf("failed to get service account \"%s\": %w",serviceAccountName,err)}tokenSecret,err:=secretsInterface.Get(ctx,secrets.TokenNameForServiceAccount(serviceAccount),metav1.GetOptions{})iferr!=nil{returnfmt.Errorf("failed to get token secret \"%s\": %w",tokenSecret,err)}r.Header["Authorization"]=[]string{"Bearer "+string(tokenSecret.Data["token"])}returnnil}}returnnil}
具体流程如下:
首先判断了,只有 POST 方法,而且 Authorization 为空时才会自动添加。
然后就从 API 中指定的 Namespace 下查询名为 argo-workflows-webhook-clients 的 Secret。
最后就是循环对比,Secret 中的 type 和 secret 能否和当前请求匹配上,如果匹配上则把 data 对应的 key 做了 serviceaccount 名去查询 token 然后解析 token 做了 Authorization 使用。