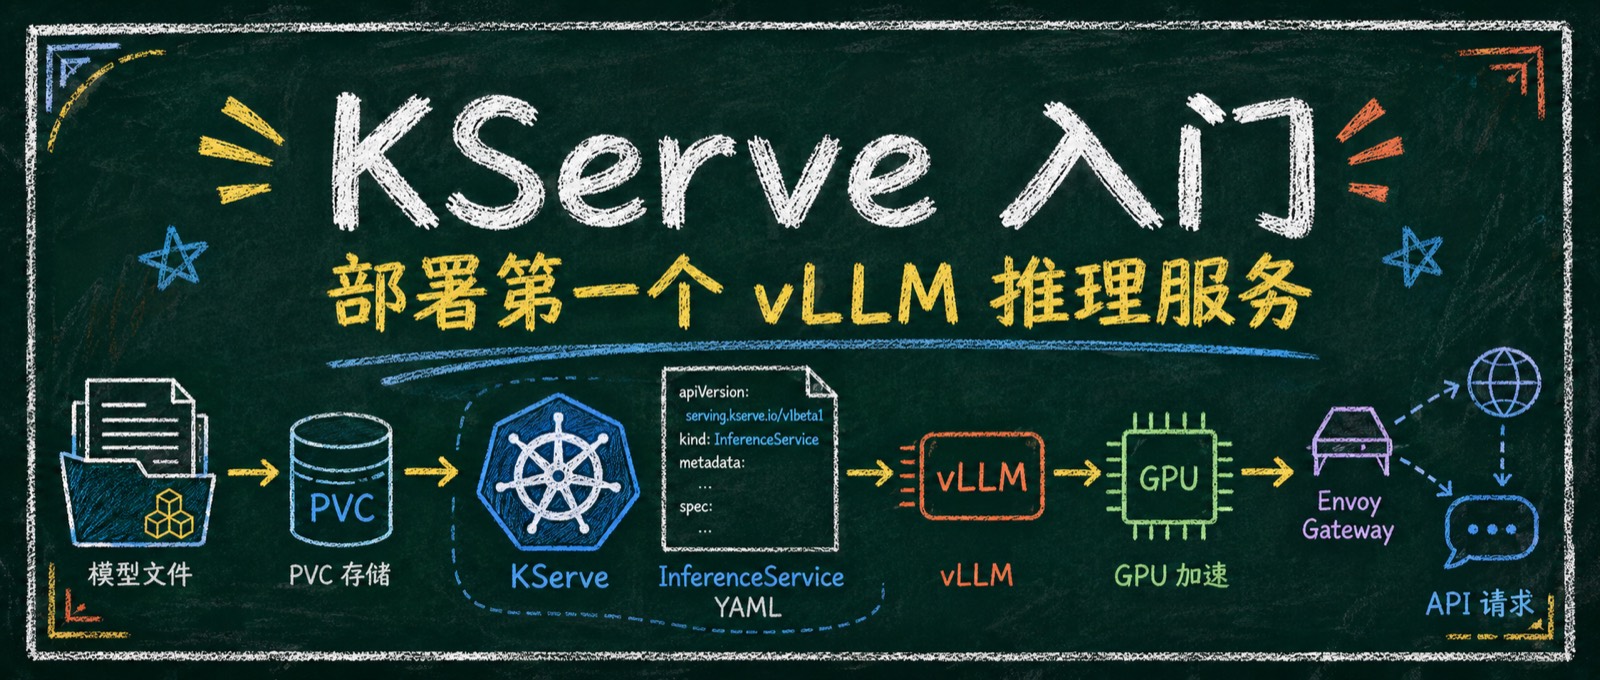
在 Kubernetes 上启动一个推理服务并不难。如果只有一个模型,vLLM + Deployment 确实够了。但服务多起来以后,模型从哪里加载、使用哪个 Runtime、GPU 怎么分配、服务怎么暴露,每个服务都要重复处理一遍,配置很快就会散落在一堆 YAML 里。KServe 解决的不是怎么启动 vLLM,而是怎么用统一的方式管理这些模型服务。
本文从零安装 KServe Standard 模式和 Envoy Gateway,通过本地 PVC 部署 Qwen2.5-0.5B-Instruct 模型。
KServe 是什么
KServe 官方给出的定位 是:
Standardized Distributed Generative and Predictive AI Inference Platform for Scalable, Multi-Framework Deployment on Kubernetes.
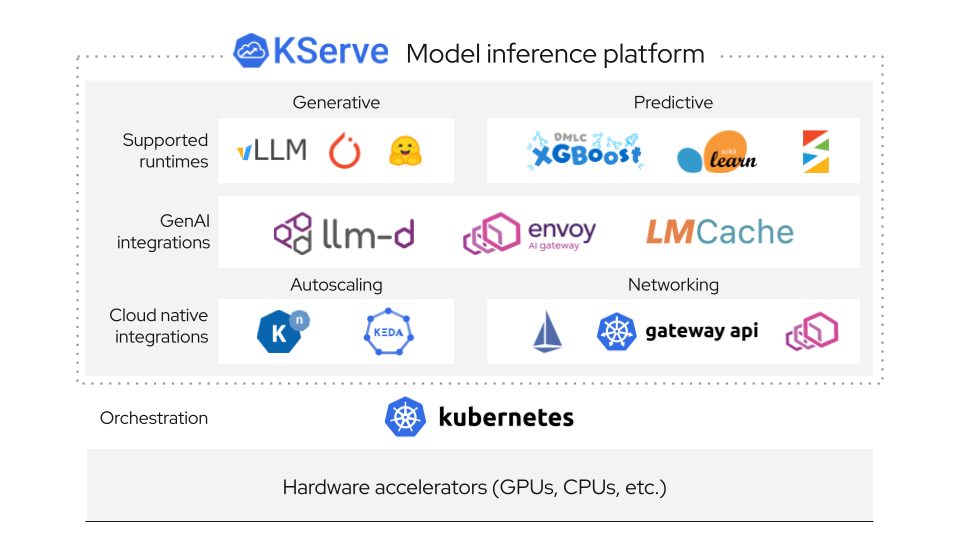
KServe 是一个面向 Kubernetes 的可扩展、多框架部署的标准化分布式生成式和预测式 AI 推理平台
即:KServe 是一个 AI 推理平台 。
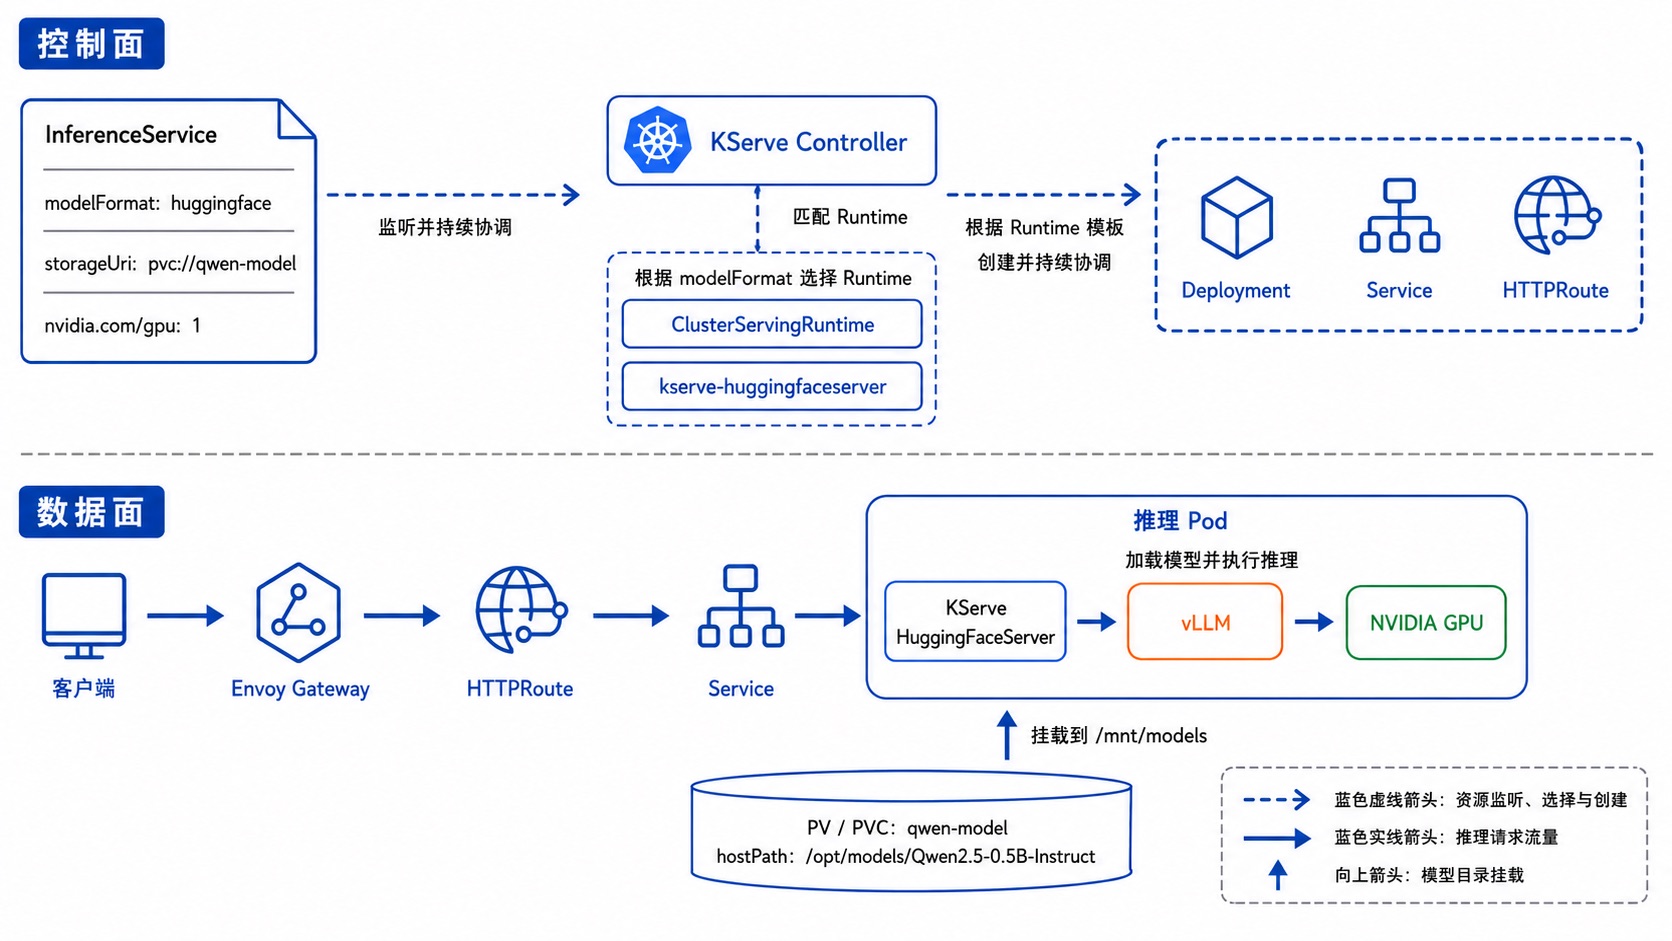
KServe 不直接执行模型计算,它负责管理模型服务 。我们创建一个 InferenceService,写清楚模型地址、模型格式和资源需求,KServe Controller 就会选择对应的 Runtime,并创建底层的 Deployment、Service、HTTPRoute 等资源。
KServe 最初叫 KFServing,由 Google、IBM、Bloomberg、NVIDIA 和 Seldon 等团队在 2019 年共同发起。2021 年,项目从 Kubeflow 组织迁移到独立的 KServe GitHub 组织,并正式更名。现在 KServe 是独立的 CNCF 孵化项目,同时仍是 Kubeflow 生态中的重要组件,既可以随 Kubeflow 使用,也可以独立安装。
安装
本文使用 Kubernetes 1.32+。假设节点已经安装 NVIDIA 驱动、Container Toolkit 和 Device Plugin,开始前先确认节点能够看到 GPU:
1
2
kubectl get nodes \
= NAME:.metadata.name,GPU:.status.allocatable.nvidia\. com/gpu
输出中的 GPU 应该大于 0。本文使用标准的 nvidia.com/gpu 资源;如果这里是 <none>,后面的推理 Pod 会一直处于 Pending。
服务 API 与部署模式
这里需要分成两层理解。
InferenceService 是通用模型服务 API,它有 Standard 和 Knative 两种部署模式:
Standard :使用原生 Kubernetes Deployment、Service 和 Pod 承载模型服务,依赖少、链路清晰,可以通过 HPA 或 KEDA 扩缩容,适合传统模型以及常驻的 GPU、vLLM 推理服务。Knative/Serverless :使用 Knative Serving 承载 InferenceService,支持 Scale to Zero、请求驱动扩缩容和流量切分,适合突发或不可预测的流量,但会增加 Knative Serving 及对应网络层依赖,部署和排障更加复杂。LLMInferenceService 是另一套独立 API,面向大语言模型的分布式工作负载、Prefill/Decode 分离和智能路由等场景。它不是 InferenceService 的第三种部署模式;如果只是部署单 GPU vLLM,使用 InferenceService Standard 模式通常更简单。
本文后面的安装流程只覆盖 InferenceService。LLMInferenceService 需要额外安装 Addon 和相关依赖,系列最后一篇再单独展开。
可以根据需求选择:
1
2
3
4
5
6
是否需要高级 LLM 分布式推理能力?
├── 是 → LLMInferenceService
└── 否
    └── 是否需要 Scale to Zero、Revision 和请求驱动扩缩容?
        ├── 是 → InferenceService(Knative)
        └── 否 → InferenceService(Standard)
这里我们选择比较简单的 InferenceService(Standard) 模式进行演示。
安装 cert-manager
KServe 依赖 cert-manager,需要提前安装,支持的最低版本是 1.15.0。
1
2
3
4
5
6
7
8
helm repo add cert-manager https://charts.jetstack.io
helm repo update
helm upgrade --install cert-manager cert-manager/cert-manager \
\
\
= true \
= 10m
查看 Pod:
1
kubectl -n cert-manager get pod
1
2
3
4
NAME                                       READY   STATUS    RESTARTS   AGE
cert-manager-6c8f88f5b9-4b8zv              1/1     Running   0          25m
cert-manager-cainjector-8577b58487-r6cnt   1/1     Running   0          25m
cert-manager-webhook-7c7694dfd-df4ft       1/1     Running   0          25m
安装 Network Controller
KServe 可以通过 Gateway API 或 Ingress 暴露服务。本文使用 Gateway API,并选择 Envoy Gateway 作为具体实现。
安装 Envoy Gateway
使用 Helm 安装 Envoy Gateway,包括 Gateway API CRD 和 Controller:
1
2
3
4
5
6
helm upgrade --install eg \
\
\
\
\
= 10m
创建 Gateway
先创建 GatewayClass:
 1
 2
 3
 4
 5
 6
 7
 8
 9
10
cat <<'EOF' > gatewayclass.yaml
apiVersion: gateway.networking.k8s.io/v1
kind: GatewayClass
metadata:
  name: envoy
spec:
  controllerName: gateway.envoyproxy.io/gatewayclass-controller
EOF

kubectl apply -f gatewayclass.yaml
然后创建 Gateway。本文的测试集群没有 LoadBalancer,因此使用 EnvoyProxy 将 Envoy Service 配置为 NodePort;如果集群已经有可用的 LoadBalancer,可以删掉 EnvoyProxy 以及 Gateway 中的 parametersRef,直接使用默认配置。
 1
 2
 3
 4
 5
 6
 7
 8
 9
10
11
12
13
14
15
16
17
18
19
20
21
22
23
24
25
26
27
28
29
30
31
32
33
34
35
36
37
38
39
40
41
42
43
44
45
46
47
cat <<'EOF' > gateway.yaml
apiVersion: v1
kind: Namespace
metadata:
name: kserve
---
apiVersion: gateway.envoyproxy.io/v1alpha1
kind: EnvoyProxy
metadata:
name: kserve-envoy-proxy
namespace: kserve
spec:
provider:
type: Kubernetes
kubernetes:
envoyService:
type: NodePort
---
apiVersion: gateway.networking.k8s.io/v1
kind: Gateway
metadata:
name: kserve-ingress-gateway
namespace: kserve
spec:
gatewayClassName: envoy
listeners:
- name: http
protocol: HTTP
port: 80
allowedRoutes:
namespaces:
from: All
infrastructure:
labels:
serving.kserve.io/gateway: kserve-ingress-gateway
parametersRef:
group: gateway.envoyproxy.io
kind: EnvoyProxy
name: kserve-envoy-proxy
EOF
kubectl apply -f gateway.yaml
kubectl wait --for= condition = Programmed \
\
\
= 5m
安装 KServe
安装 KServe CRD: 1
2
3
4
5
helm -n kserve install kserve-crd \
\
\
\
= 10m
安装 KServe Controller,使用 Standard + Gateway API: 1
2
3
4
5
6
7
8
helm -n kserve upgrade --install kserve \
\
\
= Standard \
= true \
= true \
= kserve/kserve-ingress-gateway \
= 10m
安装默认 ClusterServingRuntime: 1
2
3
4
5
6
helm -n kserve upgrade --install kserve-runtime-configs \
\
\
= true \
= false \
= 10m
查看 HuggingFaceServer Runtime 使用的基础镜像:
1
2
kubectl get clusterservingruntime kserve-huggingfaceserver \
jsonpath = '{.spec.containers[0].image}{"\n"}'
这里配置的是 v0.18.0 基础标签;InferenceService 申请 NVIDIA GPU 后,KServe 会自动在标签后追加 -gpu,最终 Pod 使用的是 v0.18.0-gpu。
查看 KServe Controller:
1
kubectl -n kserve get pod
1
2
NAME READY STATUS RESTARTS AGE
kserve-controller-manager-54bb5b957f-m82fd 2/2 Running 0 4m35s
使用
下载模型
KServe 支持从 Hugging Face、PVC、S3 等位置加载模型。由于当前环境不能稳定访问 Hugging Face,本文提前从 ModelScope 下载模型,再通过 PVC 挂载。
1
2
3
4
5
pip install modelscope
modelscope download \
\
检查模型文件:
1
ls -lh /opt/models/Qwen2.5-0.5B-Instruct
创建 PV 和 PVC
本文只有一个 GPU 节点,因此使用 hostPath 静态 PV。生产环境更适合使用 CephFS、NFS、JuiceFS 等共享存储。
1
kubectl create namespace kserve-test
1
2
3
4
5
6
7
8
9
10
11
12
13
14
15
16
17
18
19
20
21
22
23
24
25
26
27
28
29
30
31
32
cat <<'EOF' > qwen-model.yaml
apiVersion: v1
kind: PersistentVolume
metadata:
name: qwen-model
spec:
capacity:
storage: 3Gi
accessModes:
- ReadOnlyMany
persistentVolumeReclaimPolicy: Retain
storageClassName: ""
hostPath:
path: /opt/models/Qwen2.5-0.5B-Instruct
type: Directory
---
apiVersion: v1
kind: PersistentVolumeClaim
metadata:
name: qwen-model
namespace: kserve-test
spec:
accessModes:
- ReadOnlyMany
storageClassName: ""
volumeName: qwen-model
resources:
requests:
storage: 3Gi
EOF
kubectl apply -f qwen-model.yaml
创建 InferenceService
然后部署 InferenceService:
1
2
3
4
5
6
7
8
9
10
11
12
13
14
15
16
17
18
19
20
21
22
23
24
25
26
27
28
29
cat <<'EOF' > qwen-llm.yaml
apiVersion: serving.kserve.io/v1beta1
kind: InferenceService
metadata:
name: qwen-llm
namespace: kserve-test
spec:
predictor:
model:
modelFormat:
name: huggingface
storageUri: pvc://qwen-model
args:
- --model_name=qwen
- --max_model_len=4096
- --max-num-seqs=32
- --gpu-memory-utilization=0.8
resources:
requests:
cpu: "1"
memory: 4Gi
nvidia.com/gpu: "1"
limits:
cpu: "2"
memory: 6Gi
nvidia.com/gpu: "1"
EOF
kubectl apply -f qwen-llm.yaml
核心参数是这部分:
1
2
3
4
5
6
7
8
9
model :
modelFormat :
name : huggingface
storageUri : pvc://qwen-model
args :
- --model_name=qwen
- --max_model_len=4096
- --max-num-seqs=32
- --gpu-memory-utilization=0.8
model.modelFormat:声明模型格式,会用来匹配 Runtime。当前指定的 huggingface 会匹配到 ClusterServingRuntime/kserve-huggingfaceserver。storageUri:模型来源。当前 pvc://qwen-model 说明模型在 qwen-model 这个 PVC 里面。args:传给 HuggingFaceServer 的启动参数。--model_name 设置 API 中的模型名;其余三个参数用于 vLLM,分别限制最大上下文长度、单次调度最多处理的序列数和 GPU 显存使用比例。查看推理服务状态
1
2
3
4
5
6
7
kubectl wait --for= condition = Ready \
\
\
= 30m
kubectl get inferenceservice qwen-llm -n kserve-test
kubectl get pod,deploy,svc,httproute -n kserve-test
服务就绪后,READY 会变成 True:
首次启动需要读取模型、初始化 CUDA 并完成 CUDA Graph 预热。普通环境通常只需要几分钟,但磁盘较慢的单节点环境可能需要十几分钟,因此这里将等待上限设置为 30 分钟。
1
2
NAME URL READY
qwen-llm http://qwen-llm-kserve-test.example.com True
Standard 模式下,KServe 会为这个 InferenceService 创建 Deployment、Service 和 HTTPRoute:
1
2
3
4
5
InferenceService/qwen-llm
├── Deployment/qwen-llm-predictor
├── Service/qwen-llm-predictor
├── HTTPRoute/qwen-llm
└── HTTPRoute/qwen-llm-predictor
查看模型服务日志:
1
2
3
kubectl logs -n kserve-test \
= qwen-llm \
= 200
日志中出现下面的内容,说明 HuggingFaceServer 已经使用 vLLM 加载 /mnt/models:
1
2
3
4
Initializing a V1 LLM engine (v0.19.0)
model='/mnt/models'
Using max model len 4096
Uvicorn running on http://0.0.0.0:8080
请求 API
KServe 创建的 HTTPRoute 使用域名匹配:
1
qwen-llm-kserve-test.example.com
如果没有配置 DNS,可以直接访问 Envoy 的 NodePort,同时手动设置 Host Header。
查看 Envoy Service:
1
2
kubectl get service -n envoy-gateway-system \
= kserve-ingress-gateway
NodePort 是动态分配的,先读取实际访问地址:
1
2
3
4
5
6
7
8
9
10
11
ENVOY_SERVICE = $( kubectl get service -n envoy-gateway-system \
= kserve-ingress-gateway \
jsonpath = '{.items[0].metadata.name}' )
NODE_PORT = $( kubectl get service -n envoy-gateway-system " $ENVOY_SERVICE " \
jsonpath = '{.spec.ports[?(@.port==80)].nodePort}' )
NODE_IP = $( kubectl get node \
jsonpath = '{.items[0].status.addresses[?(@.type=="InternalIP")].address}' )
echo "http:// ${ NODE_IP } : ${ NODE_PORT } "
查看模型列表
1
2
curl -H "Host: qwen-llm-kserve-test.example.com" \
"http:// ${ NODE_IP } : ${ NODE_PORT } /openai/v1/models"
返回结果:
1
2
3
4
5
6
7
8
9
{
"object" : "list" ,
"data" : [
{
"id" : "qwen" ,
"object" : "model"
}
]
}
发送 Chat Completions 请求
1
2
3
4
5
6
7
8
9
10
11
12
13
14
curl -H "Host: qwen-llm-kserve-test.example.com" \
"Content-Type: application/json" \
"http:// ${ NODE_IP } : ${ NODE_PORT } /openai/v1/chat/completions" \
'{
"model": "qwen",
"messages": [
{
"role": "user",
"content": "请用一句话介绍 Kubernetes。"
}
],
"max_tokens": 64,
"temperature": 0.2
}'
返回 chat.completion,说明下面这条链路已经打通。这里的 HTTPRoute 是 Envoy Proxy 使用的路由配置,Envoy Gateway Controller 不在在线请求链路中:
1
2
3
4
5
6
Client
  -> Envoy Proxy(应用 HTTPRoute/qwen-llm 的规则)
  -> Predictor Pod(后端由 Service/qwen-llm-predictor 标识)
  -> KServe HuggingFaceServer
  -> vLLM
  -> GPU
Qwen2.5-0.5B-Instruct 主要用于验证部署链路,模型规模很小,输出质量不能代表生产模型。
总结
到这里,我们已经用 KServe 跑通了一条完整的 LLM 推理链路,从本地 PVC 加载模型,再通过 Envoy Gateway 管理的 Envoy Proxy 调用 OpenAI 兼容接口。
KServe 的价值不只是启动一个模型进程,而是把模型地址、Runtime、GPU 资源和访问入口收敛到 InferenceService 中,让推理服务也能沿用 Kubernetes 的声明式方式统一管理。
这也是理解 KServe 的起点。下一篇继续往下拆,看看一份 InferenceService YAML 提交之后,KServe 在集群里到底创建了什么。
 意琦行
意琦行