
Kimi-K2.6 是 Moonshot AI 在 4 月 20 日正式发布并开源的旗舰大语言模型,具备强大的长上下文推理、多模态理解和工具调用能力。本文将详细介绍如何使用 vLLM 部署 Kimi-K2.6 模型,并附上性能基准测试。
1. 模型速览
根据各大榜单排名以及实测表现,Kimi-K2.6 在多项评测中表现出色,是当前开源模型中的佼佼者。
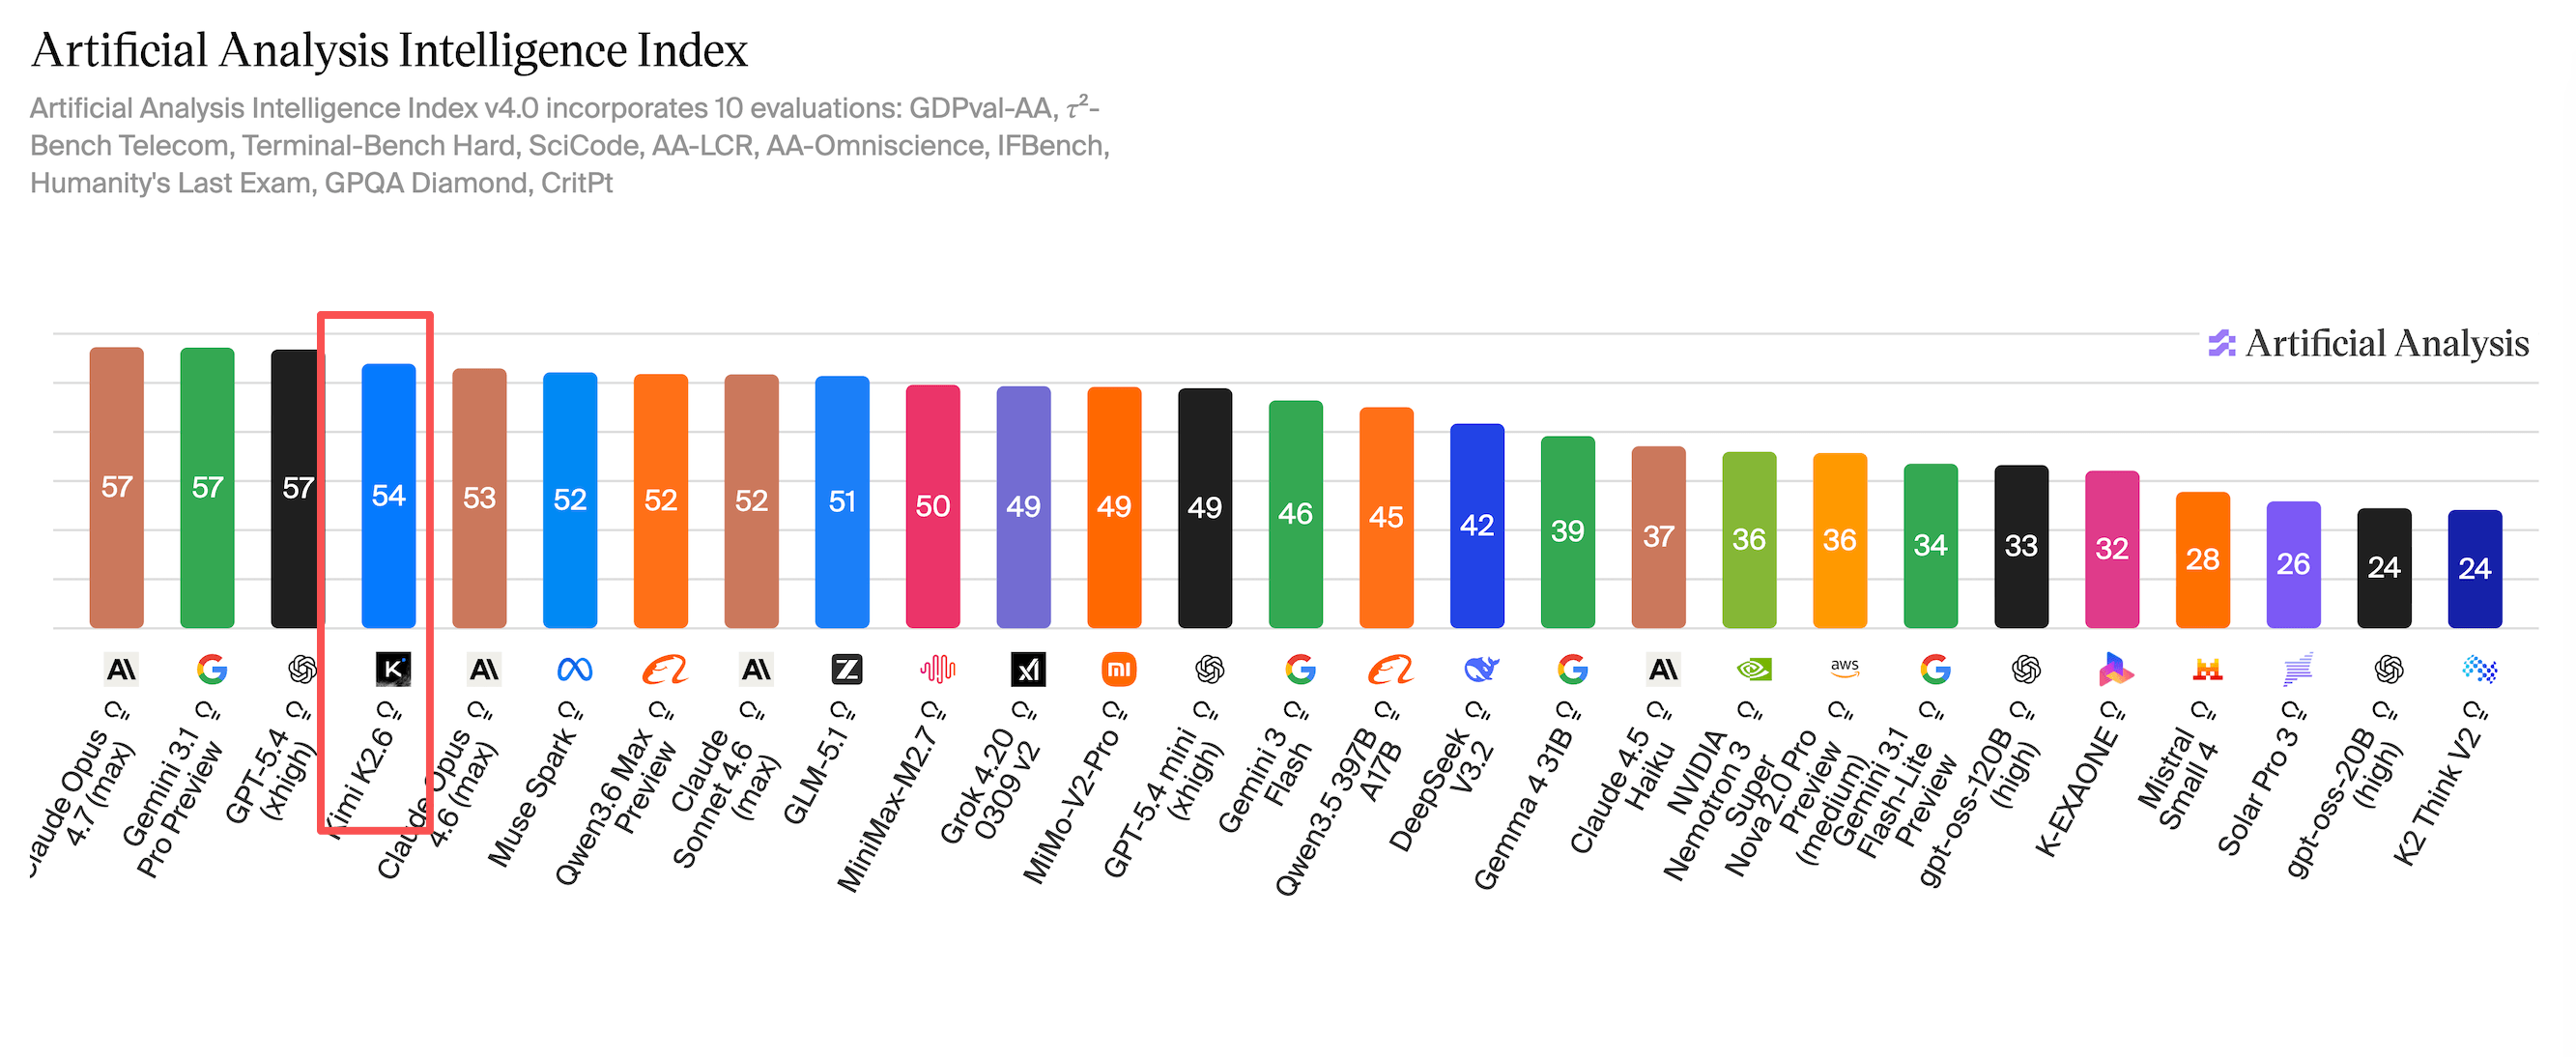
在 Artificial Analysis Intelligence Index 中得分如下:
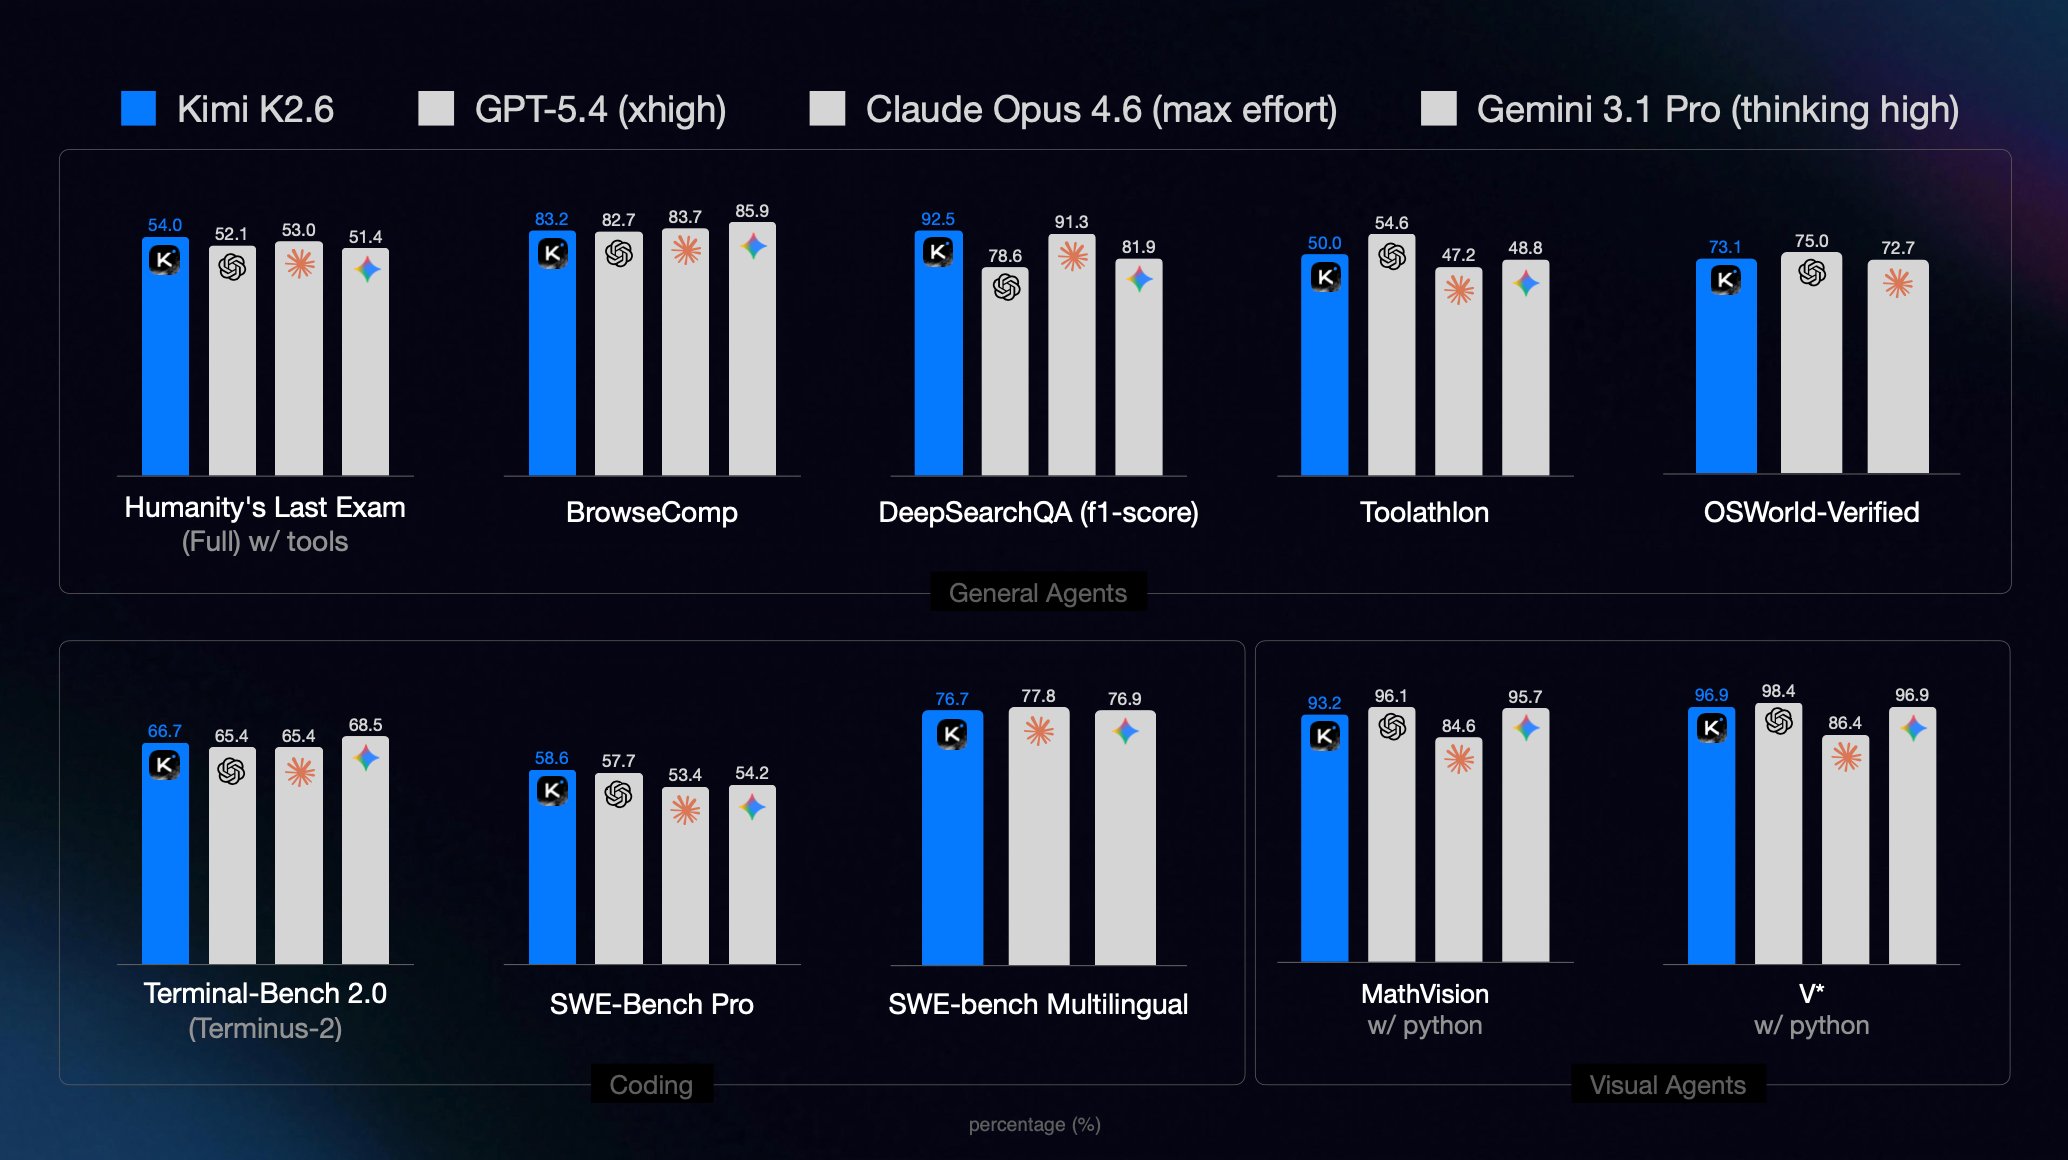
详细专项能力测评:
Arena AI Code Arena-WebDev 得分如下:
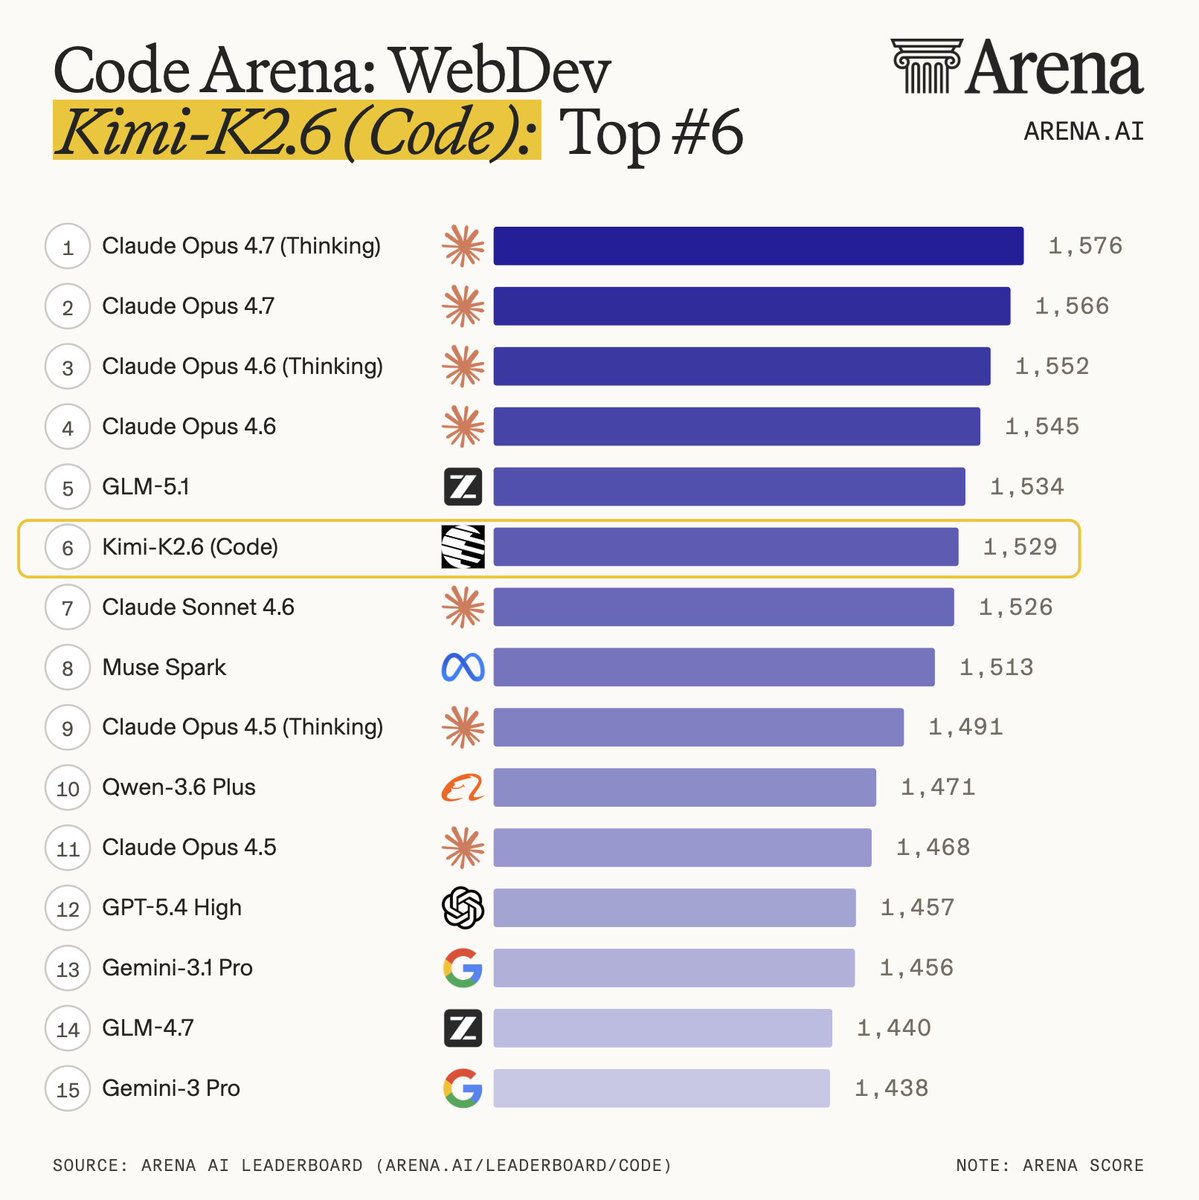
从榜单数据来看,Kimi-K2.6 和 GLM-5.1 各有千秋,二者也都基本达到了 Claude Opus 4.6 的水平。
2. 测试环境
本文所有测试均在以下环境完成:
 1
 2
 3
 4
 5
 6
 7
 8
 9
10
11
12
13
14
15
16
| +-----------------------------------------------------------------------------------------+
| GPU Name Persistence-M | Bus-Id Disp.A | Volatile Uncorr. ECC |
| Fan Temp Perf Pwr:Usage/Cap | Memory-Usage | GPU-Util Compute M. |
|=========================================+========================+======================|
| 0 NVIDIA GB200 On | 00000008:01:00.0 Off | 0 |
| N/A 42C P0 395W / 1200W | 175750MiB / 189471MiB | 0% Default |
+-----------------------------------------+------------------------+----------------------+
| 1 NVIDIA GB200 On | 00000009:01:00.0 Off | 0 |
| N/A 42C P0 369W / 1200W | 175366MiB / 189471MiB | 0% Default |
+-----------------------------------------+------------------------+----------------------+
| 2 NVIDIA GB200 On | 00000018:01:00.0 Off | 0 |
| N/A 41C P0 354W / 1200W | 175366MiB / 189471MiB | 0% Default |
+-----------------------------------------+------------------------+----------------------+
| 3 NVIDIA GB200 On | 00000019:01:00.0 Off | 0 |
| N/A 42C P0 375W / 1200W | 179133MiB / 189471MiB | 0% Default |
+-----------------------------------------+------------------------+----------------------+
|
3. 模型下载
3.1 安装 HuggingFace CLI
首先安装 HuggingFace CLI 工具用于下载模型:
1
| curl -LsSf https://hf.co/cli/install.sh | bash
|
3.2 下载模型
Kimi-K2.6 原生提供 Int4 精度版本,模型权重约需 595 GB 显存,加上推理时的 KV Cache,官方推荐最低显存为 714 GB。
H100 80G × 8 也能跑起来,但由于总显存只有 640 GB,余量较紧,上下文长度会受到一定限制。
1
2
3
4
5
| # --local-dir 指定下载目录
hf download moonshotai/Kimi-K2.6 --local-dir /raid/lixd/models/kimi-k2.6
# 下载 EAGLE-3 投机解码模型
hf download lightseekorg/kimi-k2.6-eagle3 --local-dir /raid/lixd/models/kimi-k2.6-eagle3
|
4. vLLM 部署
4.1 Kubernetes 部署
由于单机多卡即可运行,因此在 Kubernetes 中可以直接使用 Deployment 进行部署:
使用 vllm/vllm-openai:v0.19.1-cu130 镜像即可
 1
 2
 3
 4
 5
 6
 7
 8
 9
10
11
12
13
14
15
16
17
18
19
20
21
22
23
24
25
26
27
28
29
30
31
32
33
34
35
36
37
38
39
40
41
42
43
44
45
46
47
48
49
50
51
52
53
54
55
56
57
58
59
60
61
62
63
64
65
66
67
68
69
70
71
72
73
74
75
76
77
78
79
80
81
82
83
84
85
86
87
88
89
90
91
92
93
94
| apiVersion: resource.k8s.io/v1
kind: ResourceClaimTemplate
metadata:
name: kimi-k26-gpu-claim
namespace: default
spec:
spec:
devices:
requests:
- name: gpu
exactly:
deviceClassName: gpu.nvidia.com # 匹配前面的 DeviceClass
allocationMode: ExactCount
count: 4 # 数量
---
apiVersion: apps/v1
kind: Deployment
metadata:
name: kimi-k26
namespace: default
spec:
replicas: 1
selector:
matchLabels:
app: kimi-k26
template:
metadata:
labels:
app: kimi-k26
spec:
containers:
- name: vllm-server
image: vllm/vllm-openai:v0.19.1-cu130
command: ["/bin/bash"]
args:
- "-c"
- |
vllm serve /app/model \
--tensor-parallel-size 4 \
--tool-call-parser kimi_k2 \
--reasoning-parser kimi_k2 \
--enable-auto-tool-choice \
--served-model-name Kimi-K2.6 \
--trust-remote-code \
--gpu-memory-utilization 0.90 \
--attention-config.use_trtllm_ragged_deepseek_prefill=True \
--speculative-config '{"model":"/app/eagle-model","method":"eagle3","num_speculative_tokens":3}' \
--host 0.0.0.0 \
--port 8000
resources:
claims:
- name: gpu
limits:
memory: "256Gi"
cpu: "32"
requests:
memory: "128Gi"
cpu: "16"
ports:
- containerPort: 8000
name: http
volumeMounts:
- name: model-storage
mountPath: /app/model
readOnly: true
- name: eagle-model-storage
mountPath: /app/eagle-model
readOnly: true
resourceClaims:
- name: gpu
resourceClaimTemplateName: kimi-k26-gpu-claim
volumes:
- name: model-storage
hostPath:
path: /raid/lixd/models/kimi-k2.6
type: Directory
- name: eagle-model-storage
hostPath:
path: /raid/lixd/models/kimi-k2.6-eagle3
type: Directory
---
apiVersion: v1
kind: Service
metadata:
name: kimi-k26
namespace: default
spec:
selector:
app: kimi-k26
ports:
- port: 8000
targetPort: 8000
nodePort: 30180
type: NodePort
|
部署要点:
- 使用
ResourceClaimTemplate 声明 4 块 GPU,由 DRA 调度器自动分配 - 主模型和 EAGLE-3 投机解码模型分别通过
hostPath 挂载到 /app/model 和 /app/eagle-model - Service 使用 NodePort 暴露,外部可通过节点 IP + 30180 访问
4.2 关键参数说明
| 参数 | 说明 |
|---|
--tensor-parallel-size | 张量并行数,通常等于 GPU 数量 |
--attention-config.use_trtllm_ragged_deepseek_prefill | 启用 TRT-LLM 优化的不规则 prefill,加速长上下文处理 |
--tool-call-parser kimi_k2 | 使用 Kimi-K2.6 工具调用解析器 |
--reasoning-parser kimi_k2 | 启用 Kimi-K2.6 推理能力解析 |
--enable-auto-tool-choice | 启用自动工具选择 |
--trust-remote-code | 信任模型中的远程代码 |
--gpu-memory-utilization | GPU 显存利用率,建议 0.85–0.95 |
--speculative-config | 启用 EAGLE-3 投机解码(测试显示当前版本效果不佳,接受率仅 1.28%) |
5. 服务验证
5.1 基础验证
部署完成后,验证服务是否正常运行:
 1
 2
 3
 4
 5
 6
 7
 8
 9
10
11
12
13
14
| # 查看可用模型列表
curl http://10.108.198.155:8000/v1/models
# 基础对话测试
curl http://10.108.198.155:8000/v1/chat/completions \
-H "Content-Type: application/json" \
-d '{
"model": "Kimi-K2.6",
"messages": [
{"role": "user", "content": "你好,请介绍一下你自己"}
],
"max_tokens": 100,
"temperature": 0.7
}'
|
5.2 思考模式控制
Kimi-K2.6 支持开启/关闭思考模式,通过 chat_template_kwargs 参数控制。
1
| "chat_template_kwargs": {"thinking": false}
|
开启思考模式(默认):
 1
 2
 3
 4
 5
 6
 7
 8
 9
10
11
| curl http://10.108.198.155:8000/v1/chat/completions \
-H "Content-Type: application/json" \
-d '{
"model": "Kimi-K2.6",
"messages": [
{"role": "system", "content": "You are a helpful assistant."},
{"role": "user", "content": "Summarize Kimi-K2.6 in one sentence."}
],
"temperature": 1,
"max_tokens": 4096
}'
|
关闭思考模式:
 1
 2
 3
 4
 5
 6
 7
 8
 9
10
11
12
| curl http://10.108.198.155:8000/v1/chat/completions \
-H "Content-Type: application/json" \
-d '{
"model": "Kimi-K2.6",
"messages": [
{"role": "system", "content": "You are a helpful assistant."},
{"role": "user", "content": "Summarize Kimi-K2.6 in one sentence."}
],
"temperature": 1,
"max_tokens": 4096,
"chat_template_kwargs": {"thinking": false}
}'
|
5.3 多模态推理
Kimi-K2.6 支持视觉-语言多模态输入:
 1
 2
 3
 4
 5
 6
 7
 8
 9
10
11
12
13
14
| curl http://10.108.198.155:8000/v1/chat/completions \
-H "Content-Type: application/json" \
-d ' {
"model": "Kimi-K2.6",
"messages": [
{"role": "system", "content": "You are a helpful assistant."},
{"role": "user", "content": [
{"type": "text", "text": "请描述这张图片的内容,并提取其中的关键信息。"},
{"type": "image_url", "image_url": {"url": "https://ofasys-multimodal-wlcb-3-toshanghai.oss-accelerate.aliyuncs.com/wpf272043/keepme/image/receipt.png"}}
]}
],
"temperature": 1,
"max_tokens": 4096
} '
|
6. 性能基准测试
6.1 测试方法
使用 vLLM 内置的 benchmark 工具进行测试:
 1
 2
 3
 4
 5
 6
 7
 8
 9
10
11
| # Prompt-heavy benchmark (8k input / 1k output)
vllm bench serve \
--model /app/model \
--served_model_name Kimi-K2.6 \
--dataset-name random \
--random-input 8000 \
--random-output 1024 \
--request-rate 10 \
--num-prompts 32 \
--trust-remote-code \
--ignore-eos
|
6.2 测试结果
 1
 2
 3
 4
 5
 6
 7
 8
 9
10
11
12
13
14
15
16
17
18
19
20
21
22
23
24
25
26
| tip: install termplotlib and gnuplot to plot the metrics
============ Serving Benchmark Result ============
Successful requests: 32
Failed requests: 0
Request rate configured (RPS): 10.00
Benchmark duration (s): 27.73
Total input tokens: 256000
Total generated tokens: 32768
Request throughput (req/s): 1.15
Output token throughput (tok/s): 1181.84
Peak output token throughput (tok/s): 1376.00
Peak concurrent requests: 32.00
Total token throughput (tok/s): 10414.96
---------------Time to First Token----------------
Mean TTFT (ms): 162.09
Median TTFT (ms): 142.44
P99 TTFT (ms): 296.55
-----Time per Output Token (excl. 1st token)------
Mean TPOT (ms): 24.35
Median TPOT (ms): 24.46
P99 TPOT (ms): 24.62
---------------Inter-token Latency----------------
Mean ITL (ms): 24.35
Median ITL (ms): 24.33
P99 ITL (ms): 50.53
==================================================
|
关键指标解读:
| 指标 | 含义 | 测试结果 |
|---|
| TTFT | Time To First Token,首 token 延迟 | 平均 162 ms |
| TPOT | Time Per Output Token,每个 token 的生成时间 | 平均 24.4 ms |
| 吞吐量 | Output token throughput | 1182 tok/s |
6.3 开启推测解码的测试
在 vLLM 启动参数中添加 --speculative-config 启用 EAGLE-3 投机解码:
 1
 2
 3
 4
 5
 6
 7
 8
 9
10
11
12
| vllm serve /app/model \
--tensor-parallel-size 4 \
--tool-call-parser kimi_k2 \
--reasoning-parser kimi_k2 \
--enable-auto-tool-choice \
--served-model-name Kimi-K2.6 \
--trust-remote-code \
--gpu-memory-utilization 0.90 \
--attention-config.use_trtllm_ragged_deepseek_prefill=True \
--speculative-config '{"model":"/app/eagle-model","method":"eagle3","num_speculative_tokens":3}' \
--host 0.0.0.0 \
--port 8000
|
在此配置下再次运行基准测试:
测试结果:
 1
 2
 3
 4
 5
 6
 7
 8
 9
10
11
12
13
14
15
16
17
18
19
20
21
| ============ Serving Benchmark Result ============
Successful requests: 32
Failed requests: 0
Request throughput (req/s): 0.62
Output token throughput (tok/s): 631.18
Peak output token throughput (tok/s): 672.00
---------------Time to First Token----------------
Mean TTFT (ms): 206.96
Median TTFT (ms): 197.77
P99 TTFT (ms): 315.71
-----Time per Output Token (excl. 1st token)------
Mean TPOT (ms): 46.52
Median TPOT (ms): 48.22
P99 TPOT (ms): 48.52
---------------Speculative Decoding---------------
Acceptance rate (%): 1.28
Acceptance length: 1.04
Drafts: 31529
Draft tokens: 94587
Accepted tokens: 1212
==================================================
|
结果分析:
开启推测解码后,性能反而下降约 46%(吞吐量从 1182 tok/s 降至 631 tok/s)。根本原因是 EAGLE-3 投机模型的接受率仅 1.28%,远低于有效阈值(通常需要 60%+ 才有正收益)。
过低的接受率直接导致:
- 无效验证开销过大:94K+ 的 draft tokens 中只有 1.2K 被接受,大量 rejected drafts 的验证计算成为纯开销
- TPOT 翻倍:平均 TPOT 从 24.4 ms 增至 46.5 ms,每个 token 的生成时间被验证过程拉长
ps:本次测试开启推测解码后产生负收益,推测是当前 EAGLE-3 模型与 Kimi-K2.6 的适配参数或配置方式存在问题(1.28% 的接受率明显异常)。在官方给出更明确的配置指引前,不建议开启 推测解码功能。
7. 小结
Kimi-K2.6 是一个综合能力非常强的开源模型,长上下文、多模态、工具调用、推理能力都具备,部署起来也不算复杂,单机多卡就能跑。
对于编码任务来说,模型选择也比较简单:
- 对于纯代码生成任务,Claude 仍表现最佳;
- 若工作流需要频繁处理截图或 UI 视觉信息,Kimi-K2.6 的原生多模态能力是更自然的选择;
- 而 GLM-5.1 在后端复杂逻辑推理上稍有优势。
从榜单数据来看,Kimi-K2.6 和 GLM-5.1 各有千秋,二者也都基本达到了 Claude Opus 4.6 的水平。
当然,各家发布时都喜欢标榜「超越 Claude」,但真落到实际使用上,Claude 的体感依旧是目前最稳的——不过最近网上关于 Claude “降智” 的吐槽也不少。
最后再扯一句题外话。从 GLM-5 到 GLM-5.1 再到这次的 Kimi-K2.6,国产大模型的迭代速度确实肉眼可见。虽然跟 OpenAI、Anthropic、Google 这”御三家”比,整体差距还在,但也算是”能够干活”了。
哦对,DeepSeek V4 什么时候发?(手动狗头)