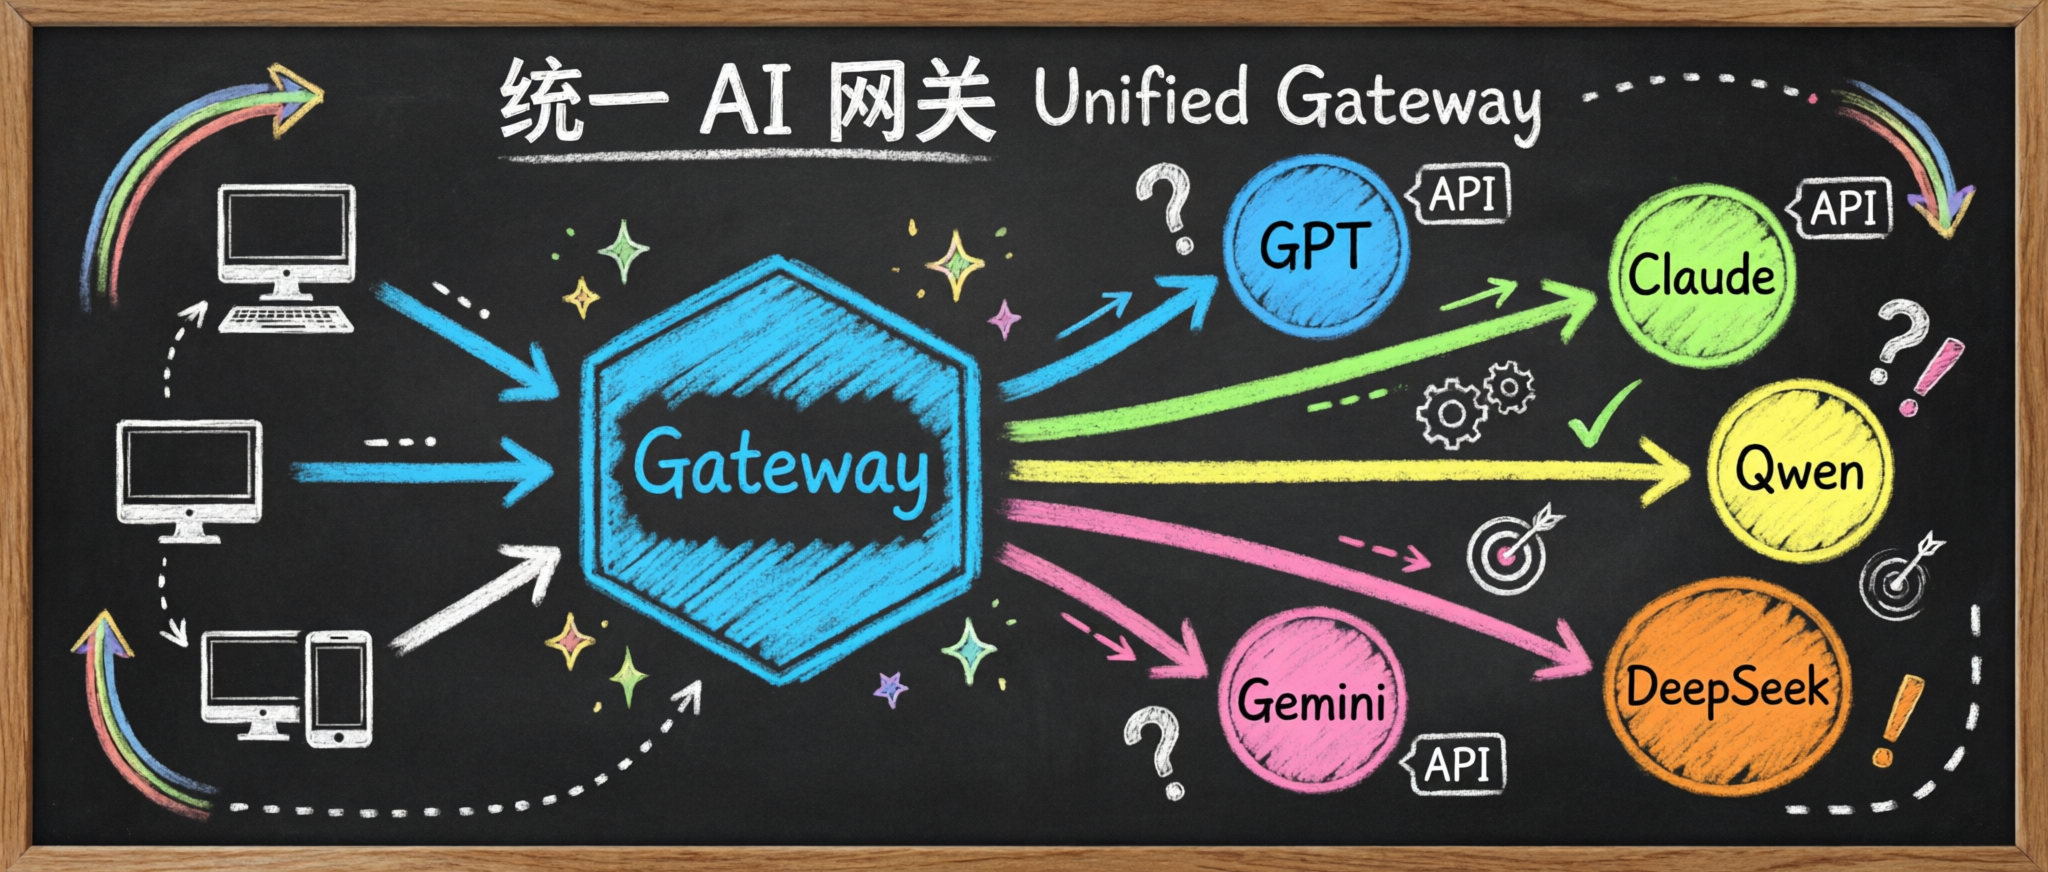
为什么需要 LiteLLM?
当你在使用多个 AI 模型时,会遇到这些问题:
每个 Provider 的 API 格式不同,需要维护多套代码 无法统一监控所有模型的调用情况和成本 切换模型需要修改业务代码 LiteLLM 通过统一的 OpenAI 兼容接口解决了这些问题,让你只需修改 model 参数就能切换模型。
核心功能:
统一接口 :一套 API 调用 OpenAI、Azure、Anthropic、Google 等多家模型成本追踪 :实时监控各模型的使用量和成本负载均衡 :自动在多个模型间分配请求速率限制 :防止 API 滥用和成本失控LiteLLM 作为统一网关,接收所有客户端请求,然后根据 model 参数自动路由到对应的后端模型服务。无论是本地部署的 vLLM,还是云端 API(OpenAI、Claude 等),都可以通过同一套接口调用。
本文将介绍如何在 Kubernetes 环境中部署 LiteLLM,并配置 PostgreSQL 作为数据库。
部署完成后,你可以像这样统一调用不同的模型:
 1
 2
 3
 4
 5
 6
 7
 8
 9
10
11
12
13
14
15
16
17
18
19
20
21
# 请求 GLM-5 模型
curl -X POST http://example.com:8080/v1/chat/completions \
"Content-Type: application/json" \
"Authorization: Bearer xxx" \
'{
"model": "glm5",
"messages": [{"role": "user", "content": "hello"}],
"temperature": 0.1,
"max_tokens": 100
}'
# 请求 Qwen3.5 模型
curl -X POST http://example.com:8080/v1/chat/completions \
"Content-Type: application/json" \
"Authorization: Bearer xxx" \
'{
"model": "qwen3.5",
"messages": [{"role": "user", "content": "hello"}],
"temperature": 0.1,
"max_tokens": 100
}'
0. 安全警告:供应链投毒事件
⚠️ 重要安全提醒
ps:主要影响 PyPI 包,如果是 Docker Image 则不受影响。
如果你的环境中有 LiteLLM,请立即检查版本:
1.82.7 / 1.82.8 存在安全问题,可能导致凭证泄露如果你不幸安装了 1.82.7 或 1.82.8,请假设所有凭证已泄露,立即:
切换到安全版本 轮换所有相关 API 密钥和凭证 详细信息请参考官方安全公告:LiteLLM Security Update - March 2026
Github Issue: https://github.com/BerriAI/litellm/issues/24518
1. 部署 PostgreSQL
1.1 部署 LocalPathStorage
PostgreSQL 需要 StorageClass,使用 LocalPathStorage:
1
kubectl apply -f https://raw.githubusercontent.com/rancher/local-path-provisioner/v0.0.35/deploy/local-path-storage.yaml
查看部署状态:
1
2
3
4
5
6
7
$ kubectl -n local-path-storage get po
NAME                                      READY   STATUS    RESTARTS   AGE
local-path-provisioner-567b5f79b9-j2tcw   1/1     Running   0          27m

$ kubectl get sc
NAME            PROVISIONER             RECLAIMPOLICY   VOLUMEBINDINGMODE      ALLOWVOLUMEEXPANSION   AGE
local-path      rancher.io/local-path   Delete          WaitForFirstConsumer   false
1.2 部署 PostgreSQL
使用 Bitnami PostgreSQL Helm Chart 部署:
 1
 2
 3
 4
 5
 6
 7
 8
 9
10
11
REGISTRY_NAME = registry-1.docker.io
REPOSITORY_NAME = bitnamicharts
storageClass = "local-path"
# user 为 postgres
adminPassword = "Thinkbig1"
helm install pgsql oci://$REGISTRY_NAME /$REPOSITORY_NAME /postgresql \
= $storageClass \
= $adminPassword \
= litellm \
查看部署状态:
1
2
3
$ kubectl -n litellm get po
NAME                 READY   STATUS    RESTARTS   AGE
pgsql-postgresql-0   1/1     Running   0          2m57s
OK,准备工作完成,接下来可以开始部署 LiteLLM 了。
2. 部署 LiteLLM
2.1 配置文件
官方文档:入门指南 - 端到端教程 | liteLLM中文文档
 1
 2
 3
 4
 5
 6
 7
 8
 9
10
11
12
13
14
15
16
17
18
19
20
21
22
23
24
25
26
27
# configmap.yaml
apiVersion : v1
kind : ConfigMap
metadata :
name : litellm-config
namespace : litellm
data :
config.yaml : |
model_list:
# GLM-5 模型(本地 vLLM 部署)
- model_name: glm5
litellm_params:
model: openai/glm5
api_base: http://1.1.1.1:8000/v1
api_key: "xxx"
# Qwen3.5 模型(本地 vLLM 部署)
- model_name: qwen3.5
litellm_params:
model: openai/qwen3.5
api_base: http://2.2.2.2:8000/v1
api_key: "xxx"
general_settings:
master_key: "sk-xxx"
database_url: "postgresql://postgres:Thinkbig1@pgsql-postgresql:5432/litellm"
store_model_in_db: true
2.2 Deployment
 1
 2
 3
 4
 5
 6
 7
 8
 9
10
11
12
13
14
15
16
17
18
19
20
21
22
23
24
25
26
27
28
29
30
31
32
33
34
35
36
37
38
39
40
41
42
43
44
45
46
47
48
49
50
51
52
53
54
55
56
57
58
59
60
61
62
63
apiVersion : apps/v1
kind : Deployment
metadata :
name : litellm-proxy
namespace : litellm
spec :
replicas : 1
selector :
matchLabels :
app : litellm
template :
metadata :
labels :
app : litellm
spec :
containers :
- name : litellm-container
image : ghcr.io/berriai/litellm:v1.82.3-stable
imagePullPolicy : Always
args :
- "--config"
- "/app/config.yaml"
- "--port"
- "4000"
volumeMounts :
- name : config-volume
mountPath : /app/config.yaml
subPath : config.yaml
livenessProbe :
httpGet :
path : /health/liveliness
port : 4000
initialDelaySeconds : 120
periodSeconds : 15
successThreshold : 1
failureThreshold : 3
timeoutSeconds : 10
readinessProbe :
httpGet :
path : /health/readiness
port : 4000
initialDelaySeconds : 120
periodSeconds : 15
successThreshold : 1
failureThreshold : 3
timeoutSeconds : 10
volumes :
- name : config-volume
configMap :
name : litellm-config
---
apiVersion : v1
kind : Service
metadata :
name : litellm
namespace : litellm
spec :
selector :
app : litellm
ports :
- port : 4000
targetPort : 4000
type : ClusterIP
查看 Pod 状态:
1
2
3
4
kubectl -n litellm get po
# NAME                             READY   STATUS    RESTARTS   AGE
# litellm-proxy-744c98f4f4-2b6ll   1/1     Running   0          6m15s
# pgsql-postgresql-0               1/1     Running   0          63m
3. 验证
3.1 查看模型列表
LiteLLM 对外提供 OpenAI API 格式的端点,会根据 model 自动路由到不同的后端 Provider 上:
1
2
curl http://10.104.161.89:4000/v1/models \
"Authorization: Bearer sk-xxx"
3.2 请求具体模型
 1
 2
 3
 4
 5
 6
 7
 8
 9
10
11
12
13
14
15
16
17
# 请求 glm5
curl http://3.3.3.3:4000/v1/chat/completions \
"Authorization: Bearer sk-xxx" \
"Content-Type: application/json" \
'{
"model": "glm5",
"messages": [{"role": "user", "content": "你好,请介绍一下你自己"}]
}'
# 请求 qwen3.5
curl http://3.3.3.3:4000/v1/chat/completions \
"Authorization: Bearer sk-xxx" \
"Content-Type: application/json" \
'{
"model": "qwen3.5",
"messages": [{"role": "user", "content": "你好,请介绍一下你自己"}]
}'
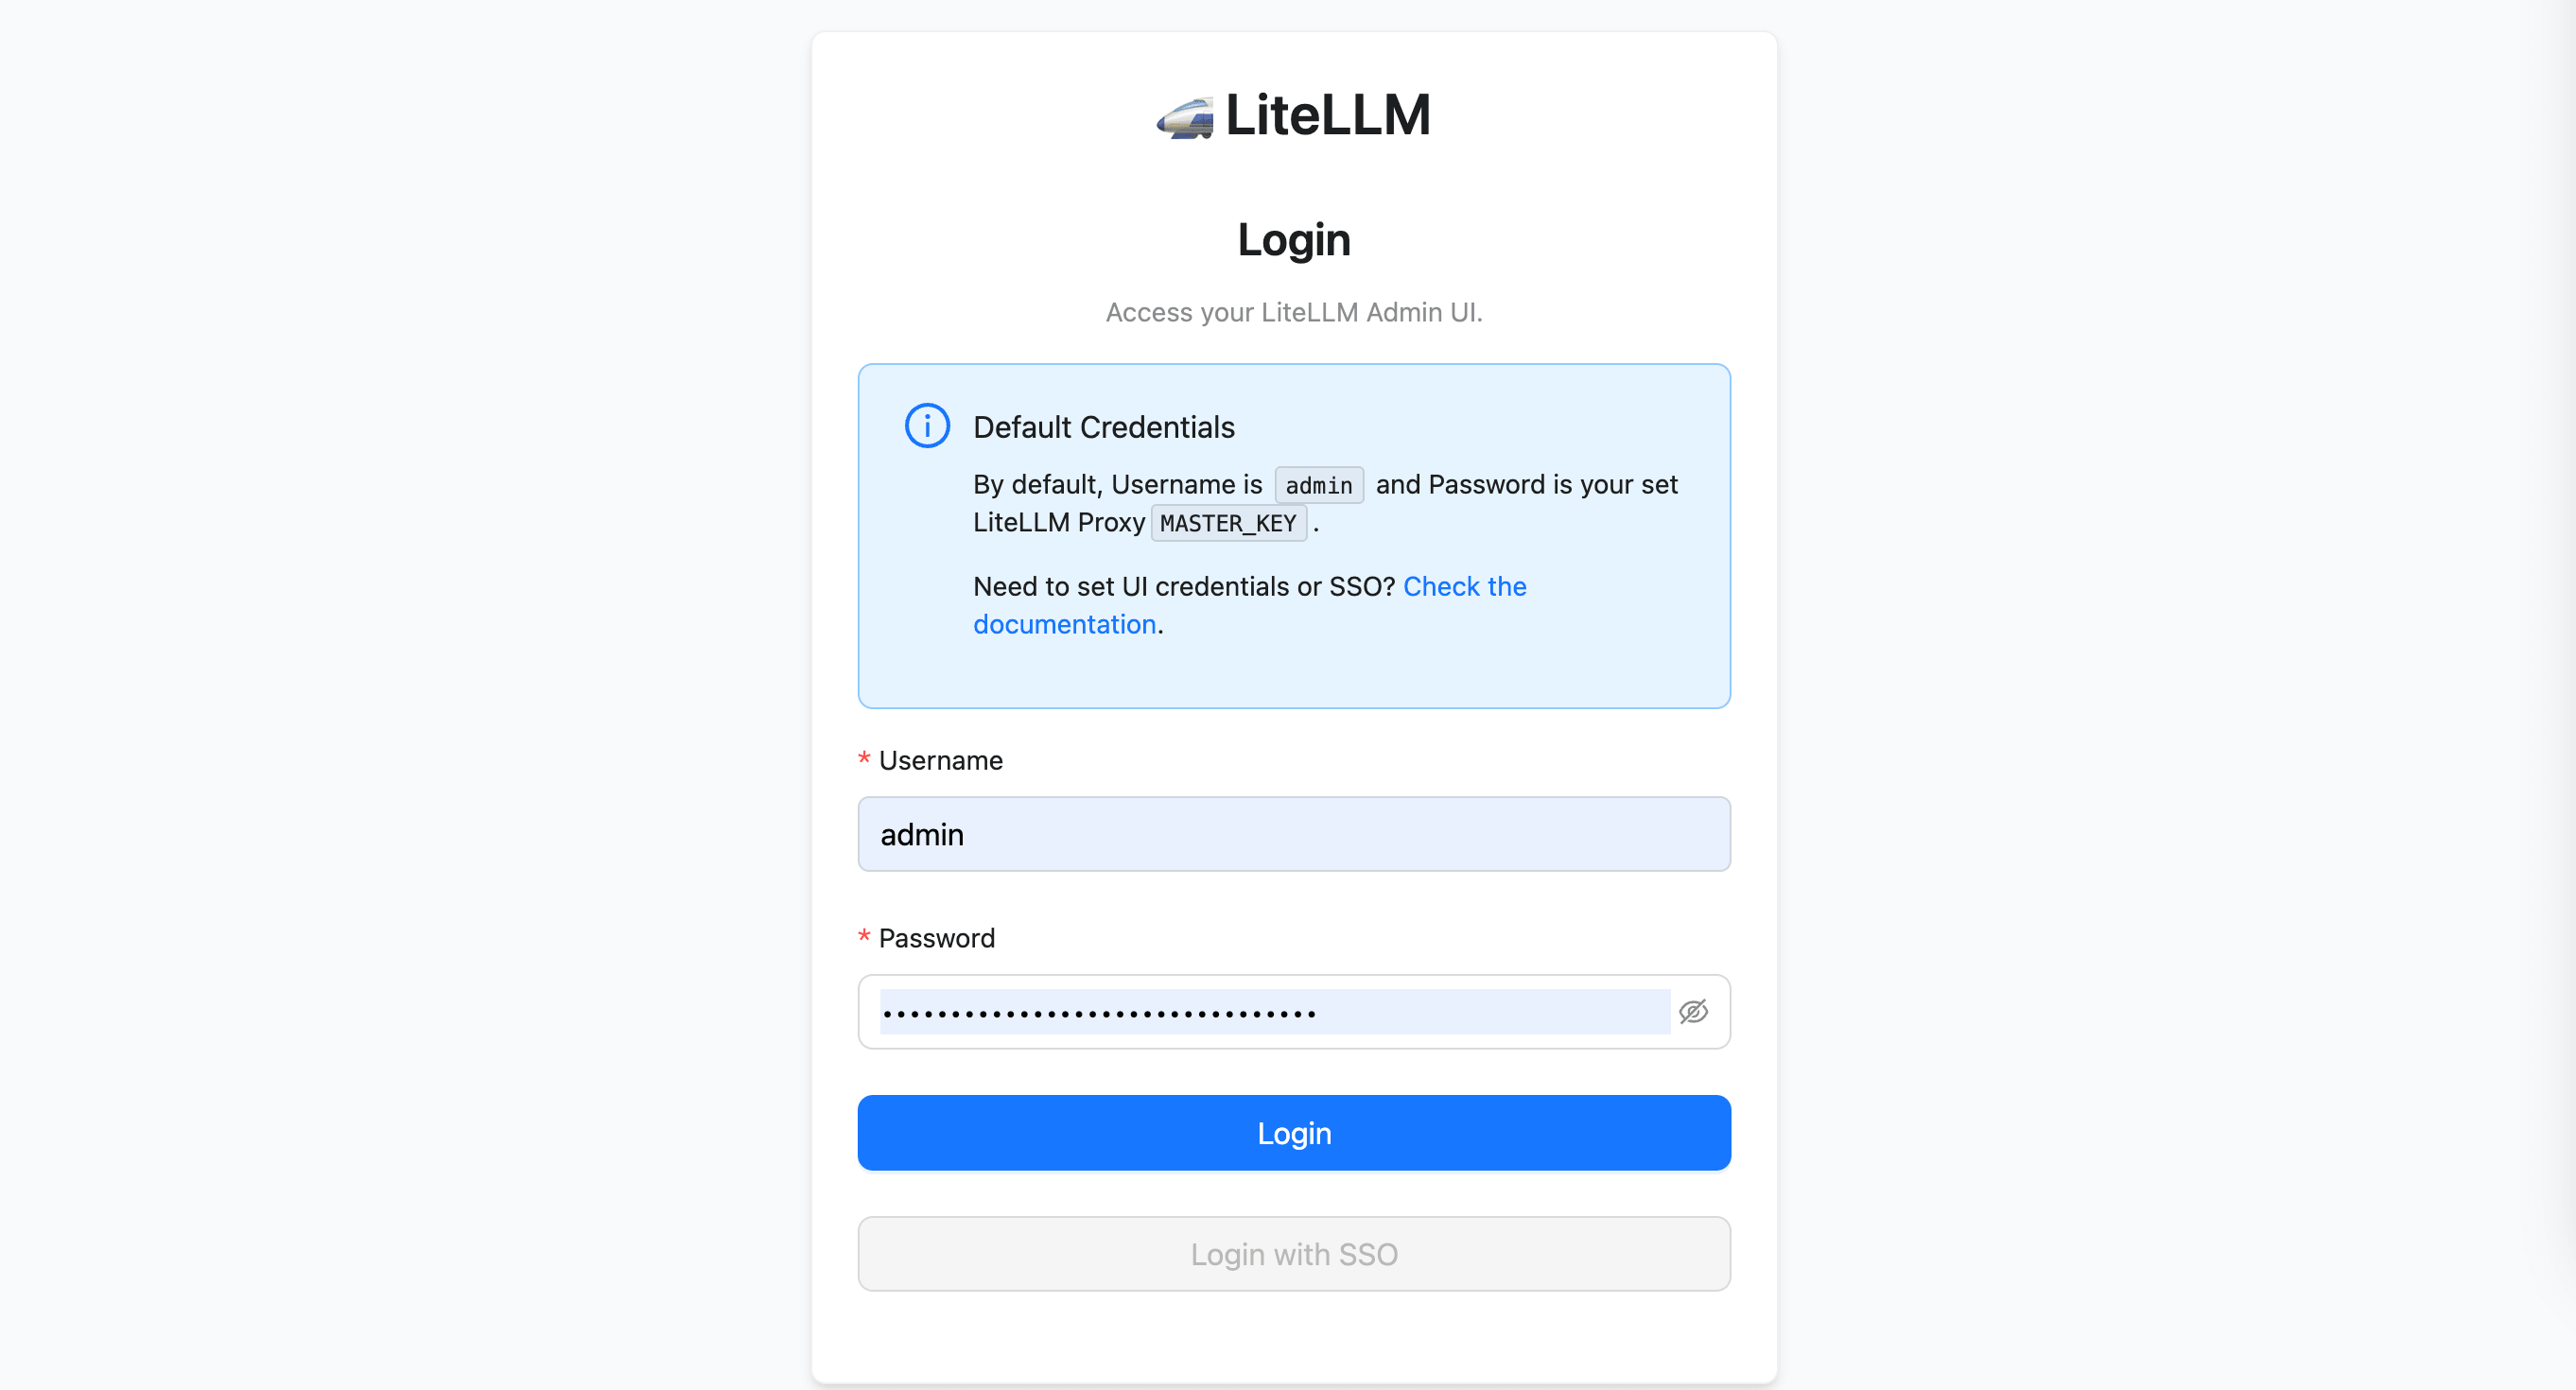
3.3 访问 UI
服务启动后,访问 4000 端口,进入 LiteLLM UI 界面:
账号 admin,密码为配置文件中指定的 MASTER_KEY:
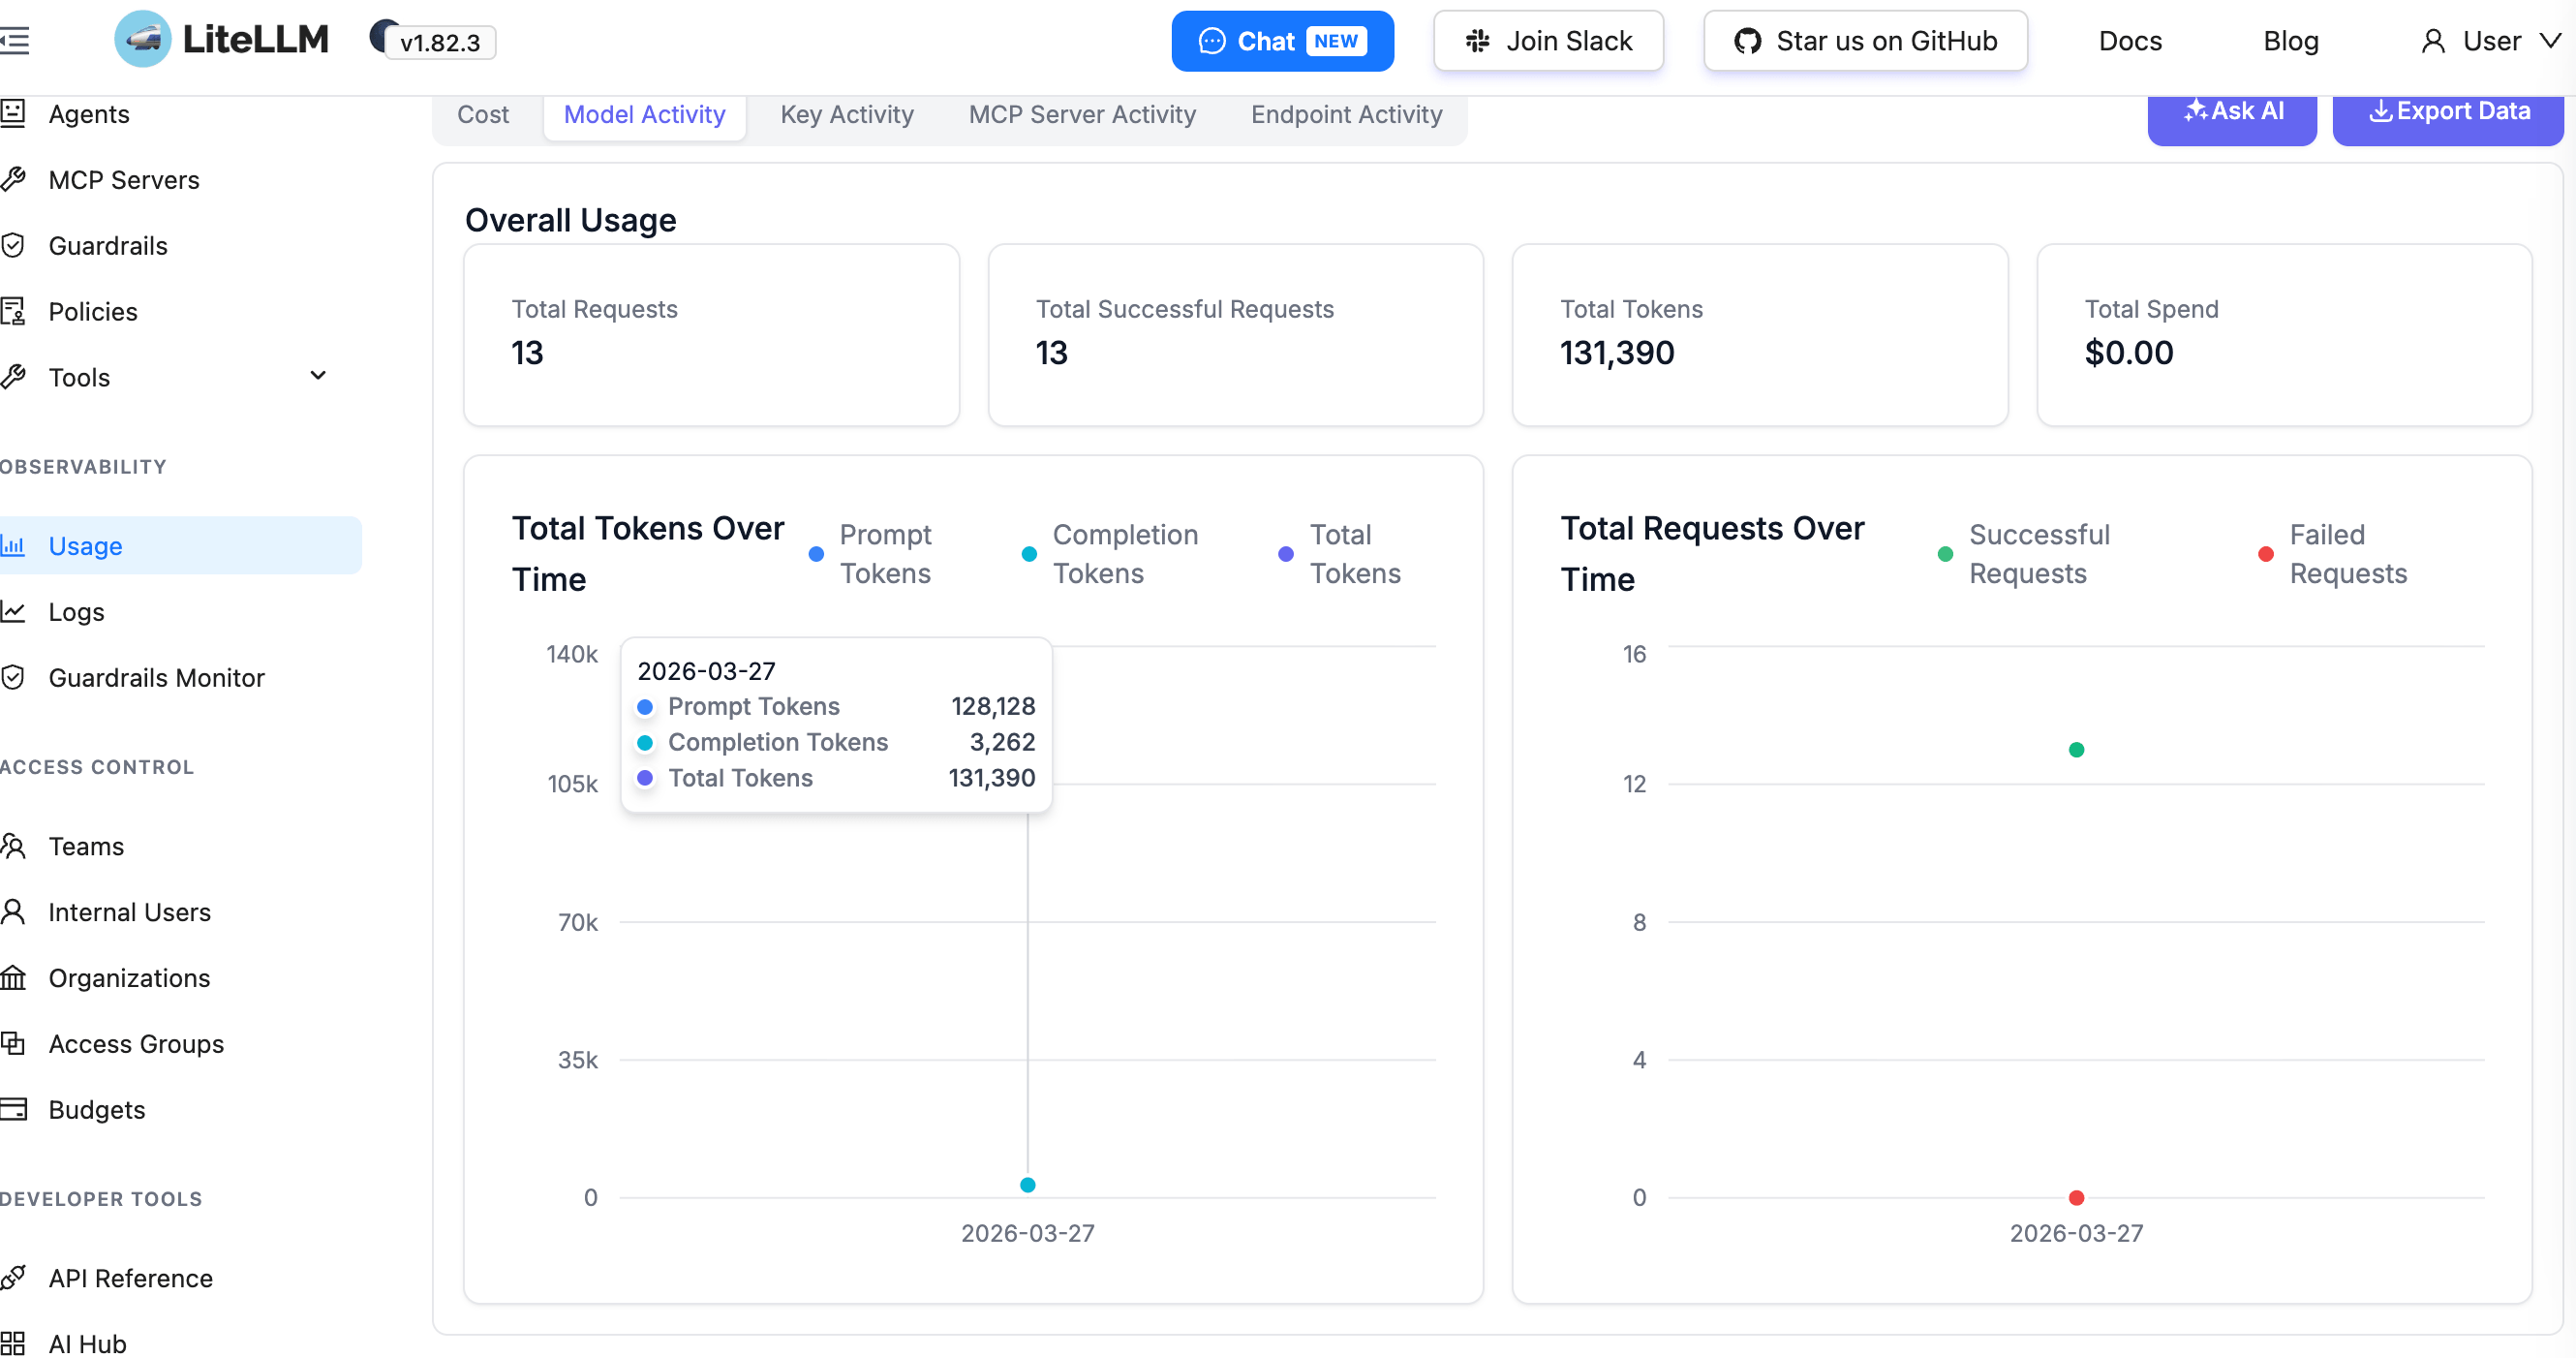
登录后,跳转到界面上 Usage 页面可以看到不同模型的具体的使用情况:
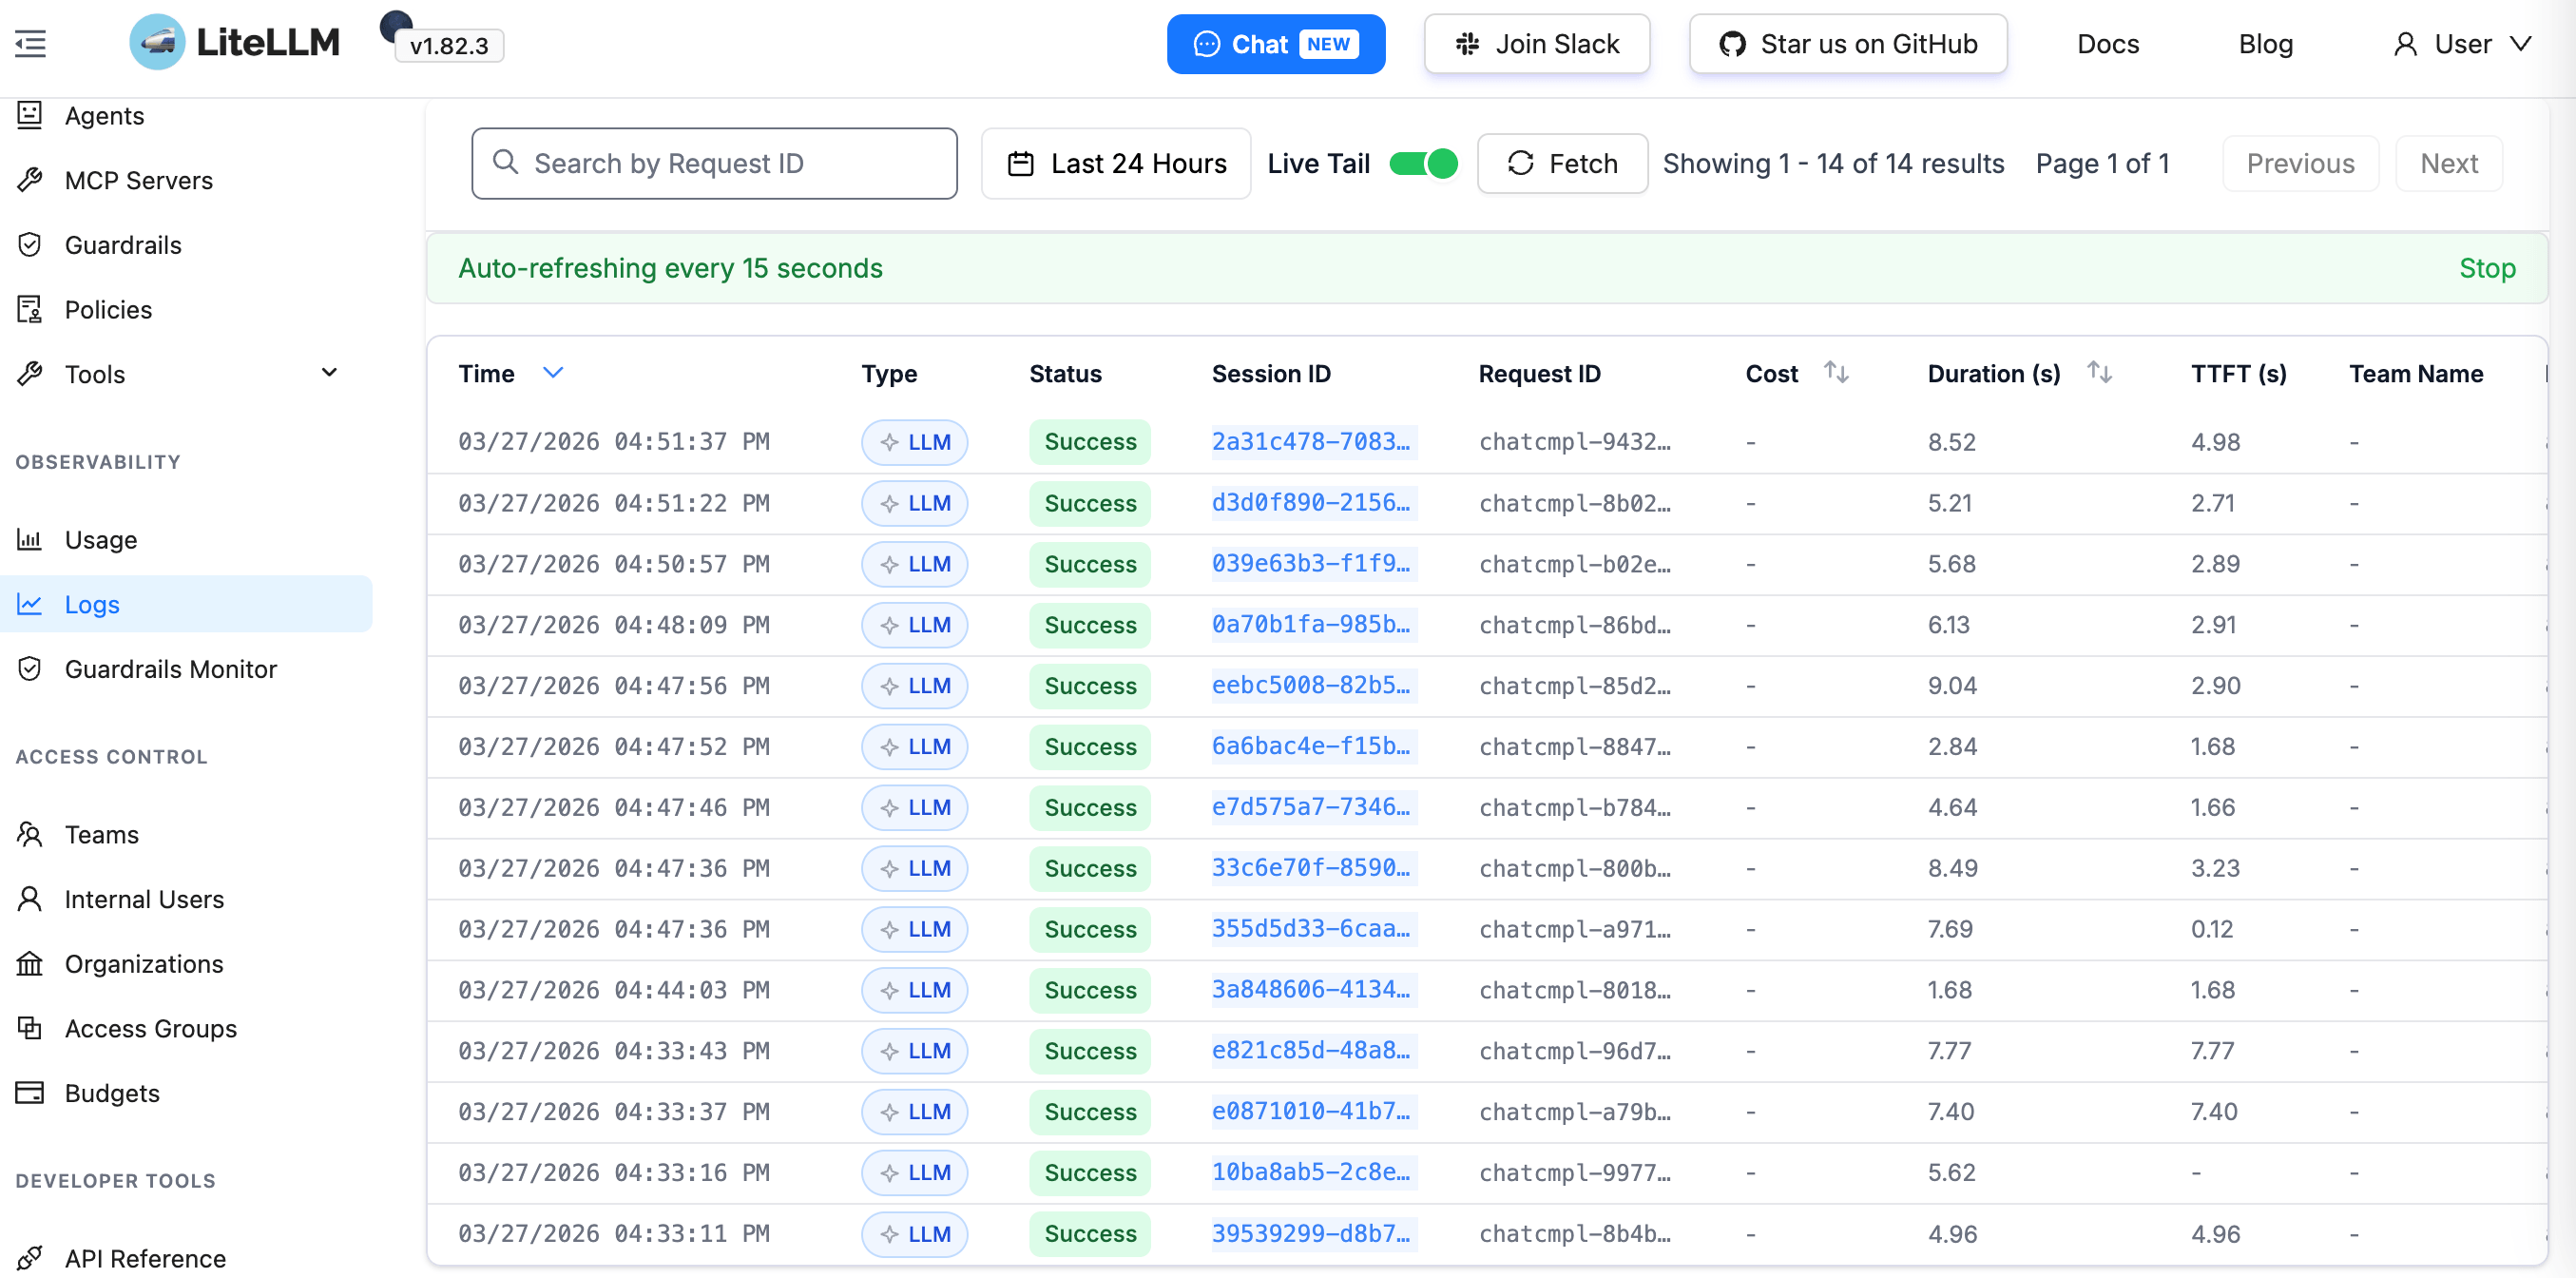
以及具体请求:
4. 小结
本文详细介绍了 LiteLLM AI Gateway 的 Kubernetes 部署:
供应链投毒事件 :注意版本安全,避免使用存在问题的版本完整部署 :从 LocalPathStorage 到 PostgreSQL 再到 LiteLLM 的完整流程统一管理 :通过 LiteLLM 统一管理本地 vLLM 部署的多个模型LiteLLM 的核心价值:
功能 说明 一行代码切换模型 只需修改 model 参数,无需改业务代码 可视化监控 Web UI 实时查看调用次数、Token 消耗、成本统计 多模型负载均衡 自动在多个模型实例间分配请求 OpenAI 兼容 无缝对接现有使用 OpenAI API 的应用
如果你已经在使用 vLLM 部署本地模型,可以参考我的其他文章: