# 14G 显存跑动千亿大模型!基于 KTransformers 的 DeepSeek-R1'满血版'实战

14G 显存跑动千亿大模型!基于 KTransformers 的 DeepSeek-R1'满血版'实战。
标题党了,实际情况如下:
* 1)'满血版':这里是加了引号的满血版,因为部署模型为 `DeepSeek-R1-Q4_K_M`,也就是 671B 参数的 int4 量化版本
* 2)14G 显存:确实是 14G 显存,但是需要内存 382G(推荐 512G)
## 1. 概述
### 1.1 什么是 ktransformers
[ktransformers](https://github.com/kvcache-ai/ktransformers)(读作 Quick Transformers)是一个由 清华大学 KVCache.AI 团队开发的开源项目,旨在优化大语言模型(LLM)的推理性能,特别是在有限显存资源下运行大型模型。
**性能表现**:在 24GB 显存环境下,KTransformers 可以运行 DeepSeek-R1 和 V3 的 671B 满血版模型,预处理速度最高可达 286 tokens/s,推理生成速度最高可达 14 tokens/s。
**技术细节**:KTransformers 采用高稀疏性 MoE 架构,通过 GPU/CPU 异构计算策略,减少 GPU存储需求,显著降低显存需求至 24GB。
该架构的核心思想是将模型中的任务分配给不同的专家模块,每个模块专注于特定类型的任务。在推理时,只会激活其中的一部分参数模块,将非共享的稀疏矩阵卸载至CPU内存,从而大大降低了计算资源的需求。
> 更多信息参见 [ktransformers 官网](https://kvcache-ai.github.io/ktransformers/en/deepseek-v2-injection.html)
### 1.2 运行环境
理论上最低配置:
* CPU:32 Core
* 内存:382G
* GPU:14G 显存
本次部署的环境如下:
* CPU:Intel(R) Xeon(R) Platinum 8460Y+ * 2,合计 160 Core
* 内存:2 T
* GPU:L40S * 1,40G 显存
以下为详细信息:
```bash
# lscpu
Architecture: x86_64
CPU op-mode(s): 32-bit, 64-bit
Address sizes: 52 bits physical, 57 bits virtual
Byte Order: Little Endian
CPU(s): 160
On-line CPU(s) list: 0-159
Vendor ID: GenuineIntel
Model name: Intel(R) Xeon(R) Platinum 8460Y+
CPU family: 6
Model: 143
Thread(s) per core: 2
Core(s) per socket: 40
Socket(s): 2
Stepping: 8
CPU max MHz: 3700.0000
CPU min MHz: 800.0000
BogoMIPS: 4000.00
NUMA:
NUMA node(s): 2
NUMA node0 CPU(s): 0-39,80-119
NUMA node1 CPU(s): 40-79,120-159
```
```bash
#free -h
total used free shared buff/cache available
Mem: 2.0Ti 54Gi 153Gi 23Gi 1.8Ti 1.9Ti
Swap: 0B 0B 0B
```
```bash
# nvidia-smi
Wed Feb 19 21:07:27 2025
+---------------------------------------------------------------------------------------+
| NVIDIA-SMI 535.161.08 Driver Version: 535.161.08 CUDA Version: 12.2 |
|-----------------------------------------+----------------------+----------------------+
| GPU Name Persistence-M | Bus-Id Disp.A | Volatile Uncorr. ECC |
| Fan Temp Perf Pwr:Usage/Cap | Memory-Usage | GPU-Util Compute M. |
| | | MIG M. |
|=========================================+======================+======================|
| 0 NVIDIA L40S On | 00000000:8D:00.0 Off | Off |
| N/A 30C P8 35W / 350W | 3MiB / 49140MiB | 0% Default |
| | | N/A |
+-----------------------------------------+----------------------+----------------------+
+---------------------------------------------------------------------------------------+
| Processes: |
| GPU GI CI PID Type Process name GPU Memory |
| ID ID Usage |
|=======================================================================================|
| No running processes found |
+---------------------------------------------------------------------------------------+
```
## 2. 下载模型
### 2.1 DeepSeek-R1-Q4\_K\_M
从 HuggingFace 下载
```bash
# pip install huggingface_hub hf_transfer
from huggingface_hub import snapshot_download
snapshot_download(
repo_id="unsloth/DeepSeek-R1-GGUF", # 指定 Hugging Face 仓库
local_dir="DeepSeek-R1-GGUF", # 指定本地存储目录
allow_patterns=["*R1-Q4_K_M*"], # 仅下载 Q4 量化版本
)
```
或者从魔塔下载
```python
# pip install modelscope
from modelscope import snapshot_download
snapshot_download(
repo_id="unsloth/DeepSeek-R1-GGUF", # 指定 Hugging Face 仓库
local_dir="DeepSeek-R1-GGUF", # 指定本地存储目录
allow_patterns=["*R1-Q4_K_M*"], # 仅下载 Q4 量化版本
)
```
模型权重文件如下:
```bash
root@infer:/mnt/e015a2b7cb4b49f18419022d3fb045ec/models# ll -lhS DeepSeek-R1-GGUF/DeepSeek-R1-Q4_K_M/
total 377G
-rw-r--r-- 1 root root 47G 2月 20 17:40 DeepSeek-R1-Q4_K_M-00003-of-00009.gguf
-rw-r--r-- 1 root root 47G 2月 20 17:18 DeepSeek-R1-Q4_K_M-00002-of-00009.gguf
-rw-r--r-- 1 root root 47G 2月 21 04:11 DeepSeek-R1-Q4_K_M-00007-of-00009.gguf
-rw-r--r-- 1 root root 47G 2月 20 18:31 DeepSeek-R1-Q4_K_M-00005-of-00009.gguf
-rw-r--r-- 1 root root 46G 2月 20 20:54 DeepSeek-R1-Q4_K_M-00001-of-00009.gguf
-rw-r--r-- 1 root root 45G 2月 20 20:12 DeepSeek-R1-Q4_K_M-00004-of-00009.gguf
-rw-r--r-- 1 root root 45G 2月 20 20:17 DeepSeek-R1-Q4_K_M-00006-of-00009.gguf
-rw-r--r-- 1 root root 44G 2月 20 16:55 DeepSeek-R1-Q4_K_M-00008-of-00009.gguf
-rw-r--r-- 1 root root 14G 2月 20 03:45 DeepSeek-R1-Q4_K_M-00009-of-00009.gguf
drwxr-xr-x 2 root root 4.0K 2月 21 09:32 ./
drwxr-xr-x 6 root root 4.0K 2月 21 14:17 ../
```
int4 量化后,权重大小为 377G。
### 2.2 原始 DeepSeek-R1 模型
不需要下载权重文件,**后续只会用到 config 和 tokenizer**
```bash
git clone https://www.modelscope.cn/deepseek-ai/DeepSeek-R1.git
```
内容如下:
```bash
(base) root@admin-50d4:/mnt/e015a2b7cb4b49f18419022d3fb045ec/models/DeepSeek-R1# ll -lhS
total 17M
-rw-r--r-- 1 root root 8.5M 2月 13 11:34 model.safetensors.index.json
-rw-r--r-- 1 root root 7.5M 2月 13 11:34 tokenizer.json
-rw-r--r-- 1 root root 74K 2月 13 11:34 modeling_deepseek.py
-rw-r--r-- 1 root root 19K 2月 13 11:34 README.md
-rw-r--r-- 1 root root 11K 2月 13 11:34 configuration_deepseek.py
drwxr-xr-x 4 root root 4.0K 2月 13 11:34 ./
drwxr-xr-x 9 root root 4.0K 2月 13 11:34 ../
drwxr-xr-x 2 root root 4.0K 2月 13 11:34 figures/
drwxr-xr-x 9 root root 4.0K 2月 13 11:34 .git/
-rw-r--r-- 1 root root 3.6K 2月 13 11:34 tokenizer_config.json
-rw-r--r-- 1 root root 1.7K 2月 13 11:34 config.json
-rw-r--r-- 1 root root 1.5K 2月 13 11:34 .gitattributes
-rw-r--r-- 1 root root 1.1K 2月 13 11:34 LICENSE
-rw-r--r-- 1 root root 171 2月 13 11:34 generation_config.json
-rw-r--r-- 1 root root 64 2月 13 11:34 configuration.json
```
## 3. 安装 ktransformers
### 3.1 安装依赖
需要 CUDA 12.1 and above, if you didn't have it yet, you may install from here: [cuda-downloads](https://developer.nvidia.com/cuda-downloads).
```bash
# Adding CUDA to PATH
export PATH=/usr/local/cuda/bin:$PATH
export LD_LIBRARY_PATH=/usr/local/cuda/lib64:$LD_LIBRARY_PATH
export CUDA_PATH=/usr/local/cuda
```
安装 Linux 依赖
```bash
apt-get update
apt-get install gcc g++ cmake ninja-build
```
推荐使用 conda 创建虚拟 Python 环境,推荐使用 Python 3.11 版本
> Conda 安装参考官网:[#miniconda/install](https://docs.anaconda.com/miniconda/install/#quick-command-line-install)
```bash
conda create --name ktransformers python=3.11
conda activate ktransformers
```
安装 Python 库
```bash
pip install torch packaging ninja cpufeature numpy
```
### 3.2 安装 ktransformers
```bash
git clone https://github.com/kvcache-ai/ktransformers --recursive
cd ktransformers
# 不使用 NUMA 则去掉该配置
export USE_NUMA=1
bash install.sh
```
## 4. 启动推理服务
### 4.1 启动 chat 服务
```bash
# 原始模型,会用到 config 和 tokenizer
modelPath=/mnt/e015a2b7cb4b49f18419022d3fb045ec/models/DeepSeek-R1
# 量化 GGUF 模型
ggufPath=/mnt/e015a2b7cb4b49f18419022d3fb045ec/models/DeepSeek-R1-GGUF/DeepSeek-R1-Q4_K_M
ktransformers \
--model_path $modelPath \
--gguf_path $ggufPath \
--host 0.0.0.0 \
--port 10002 \
--cpu_infer 65 \
--max_new_tokens 8192
```
启动过程会比较慢,加载权重会花一些时间,启动完成后会打印访问 URL:
```bash
INFO: Started server process [3542]
INFO: Waiting for application startup.
INFO: Application startup complete.
INFO: Uvicorn running on http://0.0.0.0:10002 (Press CTRL+C to quit)
```
这样就算是启动完成了。
### 4.2 资源占用情况
看下资源占用情况,确实会占挺多内存的,接近描述中的 382 G了
```bash
top - 10:51:53 up 93 days, 18:52, 0 users, load average: 11.00, 12.73, 15.92
Tasks: 9 total, 1 running, 8 sleeping, 0 stopped, 0 zombie
%Cpu(s): 1.8 us, 0.6 sy, 0.0 ni, 97.5 id, 0.0 wa, 0.0 hi, 0.0 si, 0.0 st
MiB Mem : 2063908.+total, 553136.9 free, 64027.8 used, 1446744.+buff/cache
MiB Swap: 0.0 total, 0.0 free, 0.0 used. 1964976.+avail Mem
PID USER PR NI VIRT RES SHR S %CPU %MEM TIME+ COMMAND
3542 root 20 0 415.0g 381.2g 377.0g S 42.7 18.9 20:15.92 ktransformers
```
显存也是接近描述中的 14G
```bash
(ktransformers) root@infer:/mnt/e015a2b7cb4b49f18419022d3fb045ec/models/tmp2# nvidia-smi
Fri Feb 21 11:00:50 2025
+---------------------------------------------------------------------------------------+
| NVIDIA-SMI 535.161.08 Driver Version: 535.161.08 CUDA Version: 12.2 |
|-----------------------------------------+----------------------+----------------------+
| GPU Name Persistence-M | Bus-Id Disp.A | Volatile Uncorr. ECC |
| Fan Temp Perf Pwr:Usage/Cap | Memory-Usage | GPU-Util Compute M. |
| | | MIG M. |
|=========================================+======================+======================|
| 0 NVIDIA L40S On | 00000000:8D:00.0 Off | Off |
| N/A 39C P0 95W / 350W | 13480MiB / 49140MiB | 3% Default |
| | | N/A |
+-----------------------------------------+----------------------+----------------------+
+---------------------------------------------------------------------------------------+
| Processes: |
| GPU GI CI PID Type Process name GPU Memory |
| ID ID Usage |
|=======================================================================================|
+---------------------------------------------------------------------------------------+
```
### 4.3 API 使用
直接通过 OpenAI API 调用,需要 UI 的话大家可以自行部署 WebUI 然后配置 API 即可。
查看下模型信息
```bash
# 查看模型名称
$ curl http://localhost:10002/v1/models
[{"id":"DeepSeek-Coder-V2-Instruct","name":"DeepSeek-Coder-V2-Instruct"}]
```
emmm,返回的是 DeepSeek-Coder-V2-Instruct 模型。
再试试
```bash
curl -X POST "http://localhost:10002/v1/chat/completions" \
-H "Content-Type: application/json" \
-d '{
"model": "DeepSeek-Coder-V2-Instruct",
"messages": [
{
"role": "user",
"content": "你是谁?"
}
],
"temperature": 0.7,
"max_tokens": 512
}'
```
输出如下:
```bash
{"id":"c09bac93-f176-4d7a-b401-70d77f1401ff","object":"chat.completion","created":1740366001,"model":"not implmented","system_fingerprint":"not implmented","usage":{"completion_tokens":1,"prompt_tokens":1,"total_tokens":2},"choices":[{"index":0,"message":{"content":"\n\n\n\n您好!我是由中国的深度求索(DeepSeek)公司开发的智能助手DeepSeek-R1。如您有任何任何问题,我会尽我所能为您提供帮助。","role":"assistant","name":null},"logprobs":null,"finish_reason":null}]}
```
看起来确实是 DeepSeek-R1,不知道为啥 models 接口返回的是 DeepSeek-Coder-V2-Instruct。
来一个复杂点的推理请求:
```bash
# 发送推理请求测试
curl -X POST "http://localhost:10002/v1/chat/completions" \
-H "Content-Type: application/json" \
-d '{
"model": "DeepSeek-Coder-V2-Instruct",
"messages": [
{
"role": "user",
"content": "写一个计算阶乘的 Python 函数"
}
],
"temperature": 0.7,
"max_tokens": 512
}'
```
在终端可以看到实时的 Token 生成情况
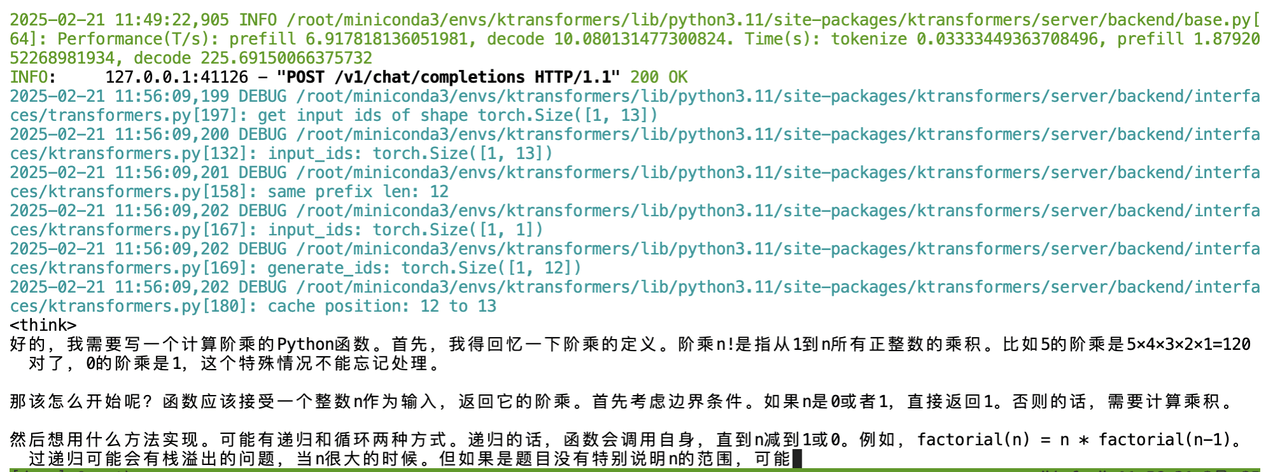
不过速度确实比较慢,感觉每秒不超过 10 个 token。
## 5. Benchmark
使用 evalscope 测试下推理性能。
### 5.1 安装环境
```bash
# 建议使用 python 3.10
conda create -n evalscope python=3.10
# 激活conda环境
conda activate evalscope
```
接着安装依赖
```bash
# 安装 Native backend (默认)
pip install evalscope
# 安装 模型压测模块 依赖
pip install evalscope[perf]
pip install gradio
```
### 5.2 启动测试
测试命令如下:
```bash
evalscope perf \
--url "http://127.0.0.1:10002/v1/chat/completions" \
--parallel 1 \
--model DeepSeek-Coder-V2-Instruct \
--number 15 \
--api openai \
--dataset openqa \
--stream \
--tokenizer-path "/mnt/e015a2b7cb4b49f18419022d3fb045ec/models/DeepSeek-R1"
```
### 5.3 查看结果
```bash
Benchmarking summary:
+-----------------------------------+----------------------------------------------------------------------+
| Key | Value |
+===================================+======================================================================+
| Time taken for tests (s) | 846.114 |
+-----------------------------------+----------------------------------------------------------------------+
| Number of concurrency | 1 |
+-----------------------------------+----------------------------------------------------------------------+
| Total requests | 15 |
+-----------------------------------+----------------------------------------------------------------------+
| Succeed requests | 15 |
+-----------------------------------+----------------------------------------------------------------------+
| Failed requests | 0 |
+-----------------------------------+----------------------------------------------------------------------+
| Throughput(average tokens/s) | 10.116 |
+-----------------------------------+----------------------------------------------------------------------+
| Average QPS | 0.018 |
+-----------------------------------+----------------------------------------------------------------------+
| Average latency (s) | 56.39 |
+-----------------------------------+----------------------------------------------------------------------+
| Average time to first token (s) | 0.799 |
+-----------------------------------+----------------------------------------------------------------------+
| Average time per output token (s) | 0.09886 |
+-----------------------------------+----------------------------------------------------------------------+
| Average input tokens per request | 20.467 |
+-----------------------------------+----------------------------------------------------------------------+
| Average output tokens per request | 570.6 |
+-----------------------------------+----------------------------------------------------------------------+
| Average package latency (s) | 0.097 |
+-----------------------------------+----------------------------------------------------------------------+
| Average package per request | 569.533 |
+-----------------------------------+----------------------------------------------------------------------+
| Expected number of requests | 15 |
+-----------------------------------+----------------------------------------------------------------------+
| Result DB path | outputs/20250221_134348/DeepSeek-Coder-V2-Instruct/benchmark_data.db |
+-----------------------------------+----------------------------------------------------------------------+
2025-02-21 13:58:02,263 - evalscope - INFO -
Percentile results:
+------------+----------+----------+-------------+--------------+---------------+----------------------+
| Percentile | TTFT (s) | TPOT (s) | Latency (s) | Input tokens | Output tokens | Throughput(tokens/s) |
+------------+----------+----------+-------------+--------------+---------------+----------------------+
| 10% | 0.6379 | 0.0931 | 20.0476 | 12 | 207 | 9.8417 |
| 25% | 0.6552 | 0.0944 | 26.28 | 16 | 266 | 9.9125 |
| 50% | 0.8 | 0.0967 | 48.6707 | 21 | 479 | 10.12 |
| 66% | 0.8479 | 0.0982 | 55.7277 | 21 | 578 | 10.1335 |
| 75% | 0.887 | 0.0991 | 101.7128 | 24 | 1046 | 10.2263 |
| 80% | 0.9289 | 0.0997 | 103.9016 | 25 | 1059 | 10.3254 |
| 90% | 0.977 | 0.102 | 114.0194 | 31 | 1150 | 10.3719 |
| 95% | 0.9772 | 0.105 | 116.0154 | 31 | 1166 | 10.4117 |
| 98% | 0.9772 | 0.1093 | 116.0154 | 31 | 1166 | 10.4117 |
| 99% | 0.9772 | 0.1163 | 116.0154 | 31 | 1166 | 10.4117 |
+------------+----------+----------+-------------+--------------+---------------+----------------------+
```
测试下来确实也就 10 tokens/s。
## 6.小结
KTransformers 可以实现在算力受限情况下,以极低的资源实现 DeepSeek-R1 Int4 量化版本的部署,单并发 10 tokens/s 性能在轻量化使用场景下也足够。
以下为几种部署方案
| | 高性价比方案 | 国产化方案 | 轻量化方案 |
| -------- | ------------------------------------------------------------ | -------------------------------------- | -------------------------------------------- |
| 硬件配置 | 8 卡 H20 8*141G显存 | 16卡910B 16*64G 显存 | 1 张高性价比显卡 1*24GB 显存 |
| 模型 | DeepSeek-V3/R1 满血版 | DeepSeek-V3/R1 满血版 | DeepSeek-V3/R1 满血版(int4) |
| 性能 | 单并发 20tokens/s 支持高并发 | 单并发 15tokens/s 支持高并发 | 单并发 10tokens/s |
| 适用场景 | 性价比首选,支持多种行业场景,生产环境全面接入DeepSeek满血版 | 适合需要信创和国产化的政府、金融等企业 | 办公环境可部署,适用适用于小型企业轻量化使用 |
> 来源:UCLOUD官方配置表
**为什么是 H20?**
相较于主流的 A100 等 GPU,H20 的 141 GB 显存只需 8 卡即可部署满血版 DeepSeek,同时 H20 拥有 296 TFLOPS 的 FP8 算力,而 A100 等 GPU 并不支持 FP8,因此对于部署 DeepSeek 来说则更具性价比。
## 7. FAQ
### GLIBCXX\_3.4.30 not found
错误信息如下:
```bash
ImportError: /root/miniconda3/envs/ktransformers/bin/../lib/libstdc++.so.6: version `GLIBCXX_3.4.30' not found (required by /root/miniconda3/envs/ktransformers/lib/python3.11/site-packages/cpuinfer_ext.cpython-311-x86_64-linux-gnu.so)
```
先看下
```bash
$ strings /usr/lib/x86_64-linux-gnu/libstdc++.so.6 | grep GLIBCXX
GLIBCXX_3.4.2
GLIBCXX_3.4.3
GLIBCXX_3.4.4
GLIBCXX_3.4.5
GLIBCXX_3.4.6
GLIBCXX_3.4.7
GLIBCXX_3.4.10
GLIBCXX_3.4.11
GLIBCXX_3.4.12
GLIBCXX_3.4.13
GLIBCXX_3.4.14
GLIBCXX_3.4.15
GLIBCXX_3.4.16
GLIBCXX_3.4.17
GLIBCXX_3.4.18
GLIBCXX_3.4.19
GLIBCXX_3.4.22
GLIBCXX_3.4.23
GLIBCXX_3.4.24
GLIBCXX_3.4.25
GLIBCXX_3.4.26
GLIBCXX_3.4.27
GLIBCXX_3.4.30
GLIBCXX_DEBUG_MESSAGE_LENGTH
```
其实是有 `GLIBCXX_3.4.30` 的,只是在 conda 里没有识别到,创建一个软链接
```bash
# /root/miniconda3/envs/ktransformers/bin/../lib/libstdc++.so.6 目的地址就是前面报错的路径
ln -sf /usr/lib/x86_64-linux-gnu/libstdc++.so.6 /root/miniconda3/envs/ktransformers/bin/../lib/libstdc++.so.6
```
也可以参考官方的 [FQA](https://github.com/kvcache-ai/ktransformers/blob/main/doc/en/FAQ.md),直接使用 conda 安装
```bash
conda install -c conda-forge libstdcxx-ng
```
### No module named 'flash\_attn'
错误信息如下:
```bash
File "/root/miniconda3/envs/ktransformers/lib/python3.11/site-packages/ktransformers/operators/models.py", line 22, in
from ktransformers.operators.dynamic_attention import DynamicScaledDotProductAttention
File "/root/miniconda3/envs/ktransformers/lib/python3.11/site-packages/ktransformers/operators/dynamic_attention.py", line 20, in
from flash_attn import flash_attn_func, flash_attn_with_kvcache
ModuleNotFoundError: No module named 'flash_attn'
```
安装一下 flash\_attn 即可
```bash
pip install flash_attn
```
---
> 作者: [意琦行](https://github.com/lixd)
> URL: https://www.lixueduan.com/posts/ai/06-ktransformers-serving-deepseek-r1/